



Share information:
Brake system of the car Peugeot 106
.

Braking system — specifications
General System type — Dual hydraulic circuit, split diagonally. Anti-lock braking system (ABS) available as an option. Front disc brakes (ventilated on certain models) and rear drum or disc brakes according to model....
General System type — Dual hydraulic circuit, split diagonally. Anti-lock braking system (ABS) available as an option. Front disc brakes (ventilated on certain models) and rear drum or disc brakes according to model....

General information
The braking system is of the servoassisted, dual-circuit hydraulic type. The arrangement of the hydraulic system is such that each circuit operates one front and one rear brake from a tandem master cylinder. Under...
The braking system is of the servoassisted, dual-circuit hydraulic type. The arrangement of the hydraulic system is such that each circuit operates one front and one rear brake from a tandem master cylinder. Under...

Hydraulic system — bleeding
Warning: Hydraulic fluid is poisonous; wash off immediately and thoroughly in the case of skin contact and seek immediate medical advice if any fluid is swallowed or gets into the eyes. Certain types of hydraulic fluid...
Warning: Hydraulic fluid is poisonous; wash off immediately and thoroughly in the case of skin contact and seek immediate medical advice if any fluid is swallowed or gets into the eyes. Certain types of hydraulic fluid...

Hydraulic pipes and hoses — renewal
Note: Before starting work, refer to the warning at the beginning of Section 2 concerning the dangers of hydraulic fluid. 1. If any pipe or hose is to be renewed, minimise fluid loss by first removing the master...
Note: Before starting work, refer to the warning at the beginning of Section 2 concerning the dangers of hydraulic fluid. 1. If any pipe or hose is to be renewed, minimise fluid loss by first removing the master...

Front brake pads — renewal (solid disc)
Warning: Renew BOTH sets of front brake pads at the same time - NEVER renew the pads on only one wheel, as uneven braking may result. Note that the dust created by wear of the pads may contain asbestos, which is a...
Warning: Renew BOTH sets of front brake pads at the same time - NEVER renew the pads on only one wheel, as uneven braking may result. Note that the dust created by wear of the pads may contain asbestos, which is a...

Rear brake pads — renewal
Warning: Renew both sets of rear brake pads at the same time - never renew the pads on only one wheel, as uneven braking may result. Dust created by wear of the pads may contain asbestos, which is a health hazard. Never...
Warning: Renew both sets of rear brake pads at the same time - never renew the pads on only one wheel, as uneven braking may result. Dust created by wear of the pads may contain asbestos, which is a health hazard. Never...

Rear brake shoes — renewal
Warning: Renew BOTH sets of rear brake shoes at the same time - NEVER renew the shoes on only one wheel, as uneven braking may result. Note that the dust created by wear of the shoes may contain asbestos, which is a...
Warning: Renew BOTH sets of rear brake shoes at the same time - NEVER renew the shoes on only one wheel, as uneven braking may result. Note that the dust created by wear of the shoes may contain asbestos, which is a...

Front brake disc — inspection, removal and refitting
Note: Before starting work, refer to the warning at the beginning of Section 4 concerning the dangers of asbestos dust. Inspection Note: If either disc requires renewal, BOTH should be renewed at the same time, to...
Note: Before starting work, refer to the warning at the beginning of Section 4 concerning the dangers of asbestos dust. Inspection Note: If either disc requires renewal, BOTH should be renewed at the same time, to...
Rear brake disc — inspection, removal and refitting
Note: Before starting work, refer to the note at the beginning of Section 5 concerning the dangers of asbestos dust. Inspection Note: If either disc requires renewal, BOTH should be renewed at the same time, to ensure...
Note: Before starting work, refer to the note at the beginning of Section 5 concerning the dangers of asbestos dust. Inspection Note: If either disc requires renewal, BOTH should be renewed at the same time, to ensure...

Rear brake drum — removal, inspection and refitting
Note: Before starting work, refer to the warning at the beginning of Section 6 concerning the dangers of asbestos dust. Note: A new rear hub nut and dust cap must be used on refitting. Removal 1. Chock the front wheels...
Note: Before starting work, refer to the warning at the beginning of Section 6 concerning the dangers of asbestos dust. Note: A new rear hub nut and dust cap must be used on refitting. Removal 1. Chock the front wheels...

Front brake caliper — removal, overhaul and refitting
Note: Before starting work, refer to the warning at the beginning of Section 2 concerning the dangers of hydraulic fluid and to the warning at the beginning of Section 4 concerning the dangers of asbestos dust. Removal...
Note: Before starting work, refer to the warning at the beginning of Section 2 concerning the dangers of hydraulic fluid and to the warning at the beginning of Section 4 concerning the dangers of asbestos dust. Removal...

Rear brake caliper — removal, overhaul and refitting
Note: Before starting work, refer to the note at the beginning of Section 2 concerning the dangers of hydraulic fluid and to the warning at the beginning of Section 5 concerning the dangers of asbestos dust. Removal 1....
Note: Before starting work, refer to the note at the beginning of Section 2 concerning the dangers of hydraulic fluid and to the warning at the beginning of Section 5 concerning the dangers of asbestos dust. Removal 1....

Rear wheel cylinder — removal, overhaul and refitting
Removal 1. Remove the brake drum as described in Section 9 . 2. Using pliers, carefully unhook the brake shoe upper return spring and remove it from both brake shoes (note the orientation of the spring, to ensure...
Removal 1. Remove the brake drum as described in Section 9 . 2. Using pliers, carefully unhook the brake shoe upper return spring and remove it from both brake shoes (note the orientation of the spring, to ensure...

Master cylinder — removal, overhaul and refitting
Note: Before starting work, refer to the warning at the beginning of Section 2 concerning the dangers of hydraulic fluid. Removal 1. Remove the master cylinder fluid reservoir cap and syphon the hydraulic fluid from the...
Note: Before starting work, refer to the warning at the beginning of Section 2 concerning the dangers of hydraulic fluid. Removal 1. Remove the master cylinder fluid reservoir cap and syphon the hydraulic fluid from the...
Brake pedal — removal and refitting
Removal 1. Remove retaining clips from the fabric panel at the bottom of the dashboard and remove the panel. 2. Remove the pivot bolt which secures the pedal to its mounting bracket and recover the return spring. 3....
Removal 1. Remove retaining clips from the fabric panel at the bottom of the dashboard and remove the panel. 2. Remove the pivot bolt which secures the pedal to its mounting bracket and recover the return spring. 3....

Brake pedal-to-servo linkage (RHD models) — renewal and overhaul
Removal 1. Removal of the servo-end linkage and the main crossover linkage, is described in Section 16 as part of the vacuum servo unit removal and refitting procedure. 2. To remove the brake pedal bracket and linkage,...
Removal 1. Removal of the servo-end linkage and the main crossover linkage, is described in Section 16 as part of the vacuum servo unit removal and refitting procedure. 2. To remove the brake pedal bracket and linkage,...

Vacuum servo unit — testing, removal and refitting
Right-hand-drive models Testing 1. To test the operation of the servo unit, with the engine switched off, depress the footbrake several times to exhaust the vacuum. Keep the pedal firmly depressed and start the engine....
Right-hand-drive models Testing 1. To test the operation of the servo unit, with the engine switched off, depress the footbrake several times to exhaust the vacuum. Keep the pedal firmly depressed and start the engine....
Vacuum servo unit check valve — removal, testing and refitting
Removal 1. Slacken the retaining clip (where fitted) and disconnect the vacuum hose from the servo unit check valve. 2. Withdraw the valve from its rubber sealing grommet, using a pulling and twisting motion. Remove the...
Removal 1. Slacken the retaining clip (where fitted) and disconnect the vacuum hose from the servo unit check valve. 2. Withdraw the valve from its rubber sealing grommet, using a pulling and twisting motion. Remove the...

Handbrake lever — removal and refitting
Removal 1. Chock the front wheels then jack up the rear of the vehicle and support it on axle stands (see " Jacking and vehicle support "). Working under the vehicle, slacken the adjuster nut on the cable equaliser...
Removal 1. Chock the front wheels then jack up the rear of the vehicle and support it on axle stands (see " Jacking and vehicle support "). Working under the vehicle, slacken the adjuster nut on the cable equaliser...

Handbrake cables — removal and refitting
Front cable/rod 1. The front cable or rod is integral with the handbrake lever assembly and must be removed complete with the lever assembly, as described in Section 18 . The cable/rod cannot be renewed individually and...
Front cable/rod 1. The front cable or rod is integral with the handbrake lever assembly and must be removed complete with the lever assembly, as described in Section 18 . The cable/rod cannot be renewed individually and...

Rear brake pressure-regulating valves — adjustment, removal and refitting
Conventional braking system - rear drum brakes 1. On models with a conventional braking system, the pressure-regulating valves are integral with the rear wheel cylinders. The cylinders must not be dismantled and if a...
Conventional braking system - rear drum brakes 1. On models with a conventional braking system, the pressure-regulating valves are integral with the rear wheel cylinders. The cylinders must not be dismantled and if a...
Stop-light switch — adjustment, removal and refitting
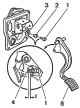
Adjustment 1. With the brake pedal at rest, adjust the position of the stop-light switch in its mounting bracket to obtain the clearance shown between the end of the switch plunger and the stop on the brake pedal (see...
Adjustment 1. With the brake pedal at rest, adjust the position of the stop-light switch in its mounting bracket to obtain the clearance shown between the end of the switch plunger and the stop on the brake pedal (see...

Handbrake «on» warning light switch — removal and refitting
Removal 1. Disconnect the battery negative terminal (refer to " Disconnecting the battery "). 2. Lift the carpet panel for access to the switch. 3. Carefully prise out the switch and disconnect the wiring plug (see...
Removal 1. Disconnect the battery negative terminal (refer to " Disconnecting the battery "). 2. Lift the carpet panel for access to the switch. 3. Carefully prise out the switch and disconnect the wiring plug (see...

Anti-lock Braking System (ABS) — general information
The Bendix "additional" Anti-lock Braking System is available as an option on certain models (see illustration). 23.1. Schematic layout of Anti-lock Braking System (ABS) 1. Front brake calipers; 2. Rear brake wheel...
The Bendix "additional" Anti-lock Braking System is available as an option on certain models (see illustration). 23.1. Schematic layout of Anti-lock Braking System (ABS) 1. Front brake calipers; 2. Rear brake wheel...

Anti-lock Braking System (ABS) components — removal and refitting
Modulator assembly Note: Before starting work, refer to the warning at the beginning of Section 2 concerning the dangers of hydraulic fluid. Removal 1. Disconnect the battery negative terminal (refer to " Disconnecting...
Modulator assembly Note: Before starting work, refer to the warning at the beginning of Section 2 concerning the dangers of hydraulic fluid. Removal 1. Disconnect the battery negative terminal (refer to " Disconnecting...

Vacuum pump (diesel models) — removal and refitting
Removal Note: A new O-ring should be used on refitting. 1. The pump is located at the transmission end of the cylinder head. 2. Where applicable, release the securing clip and disconnect the vacuum hose from the pump...
Removal Note: A new O-ring should be used on refitting. 1. The pump is located at the transmission end of the cylinder head. 2. Where applicable, release the securing clip and disconnect the vacuum hose from the pump...
Vacuum pump (diesel models) — testing and overhaul
Testing 1. The operation of the braking system vacuum pump can be checked using a suitable vacuum gauge. 2. Disconnect the vacuum hose from the pump and connect the gauge to the pump union using a suitable length of...
Testing 1. The operation of the braking system vacuum pump can be checked using a suitable vacuum gauge. 2. Disconnect the vacuum hose from the pump and connect the gauge to the pump union using a suitable length of...

Front brake pads — renewal (vented discs)
Warning: Renew BOTH sets of front brake pads at the same time - NEVER renew the pads on only one wheel, as uneven braking may result Note that the dust created by wear of the pads may contain asbestos, which is a health...
Warning: Renew BOTH sets of front brake pads at the same time - NEVER renew the pads on only one wheel, as uneven braking may result Note that the dust created by wear of the pads may contain asbestos, which is a health...
This section is available on russian, bulgarian, belarusian, ukrainian, serbian, croatian, romanian, polish, slovak, hungarian
See similar information for other Peugeot models
➨ Chassis, running gear: Brake system Peugeot 207 (2006-2014)
➨ Chassis, running gear: Brake system Peugeot 305 (1977-1989)
➨ Chassis, running gear: Brake system Peugeot 405 (1987-1997)
➨ Chassis, running gear: Brake system Peugeot 605 (1989-2000)
➨ Chassis, running gear: Brake system Peugeot 806 (1994-2002)
Link to this section in different formats
TEXTHTMLBB Code
- General information
- Introduction to manual
- Weekly checks
- Maintenance (petrol)
- Maintenance (diesel)
- Troubleshooting
- Power unit
- Petrol engines
- Diesel engines
- Engine overhaul
- Cooling and heating
- Fuel system (carburetor)
- Single point injection (petrol)
- Multipoint injection (petrol)
- Fuel system (diesel)
- Emission control system
- Engine electrical equipment
- Ignition system
- Diesel heating
- Transmission
- Clutch
- Manual gearbox
- Automatic gearbox
- Drive shafts
- Chassis, running gear
- Brake system
- Car suspension
- Steering
- Body and interior
- Exterior (external elements)
- Interior (internal elements)
- Doors, locks and windows
- Electrical equipment
- Equipment and devices
- Electrical diagrams