



Share information:
Diesel engine repair for car Peugeot 306

Diesel engines — general description
This section describes the work carried out on a diesel engine, i.e. on the engine itself, the fuel injection system and the glow plug system, and notes the differences in the lubrication system and the engine cooling...
This section describes the work carried out on a diesel engine, i.e. on the engine itself, the fuel injection system and the glow plug system, and notes the differences in the lubrication system and the engine cooling...

Removal the power unit
The engine together with the gearbox is pulled upward. This job requires a strong lifting device, but the engine can be removed with two strong helpers. To remove the engine, the front of the car must be placed on...
The engine together with the gearbox is pulled upward. This job requires a strong lifting device, but the engine can be removed with two strong helpers. To remove the engine, the front of the car must be placed on...

Installation of the power unit
The power unit is installed in reverse order. In this case, it is necessary to follow the following instructions: Be sure to replace all self-locking nuts, lock washers, drive seals and other wear parts. Prepare the...
The power unit is installed in reverse order. In this case, it is necessary to follow the following instructions: Be sure to replace all self-locking nuts, lock washers, drive seals and other wear parts. Prepare the...

Disassembling the engine
Before starting work, thoroughly clean all external surfaces of the engine. First, cover all openings with clean rags to prevent foreign objects from getting inside the engine. Engine disassembly is described in detail...
Before starting work, thoroughly clean all external surfaces of the engine. First, cover all openings with clean rags to prevent foreign objects from getting inside the engine. Engine disassembly is described in detail...
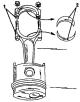
Engine assembly
The following general guidelines apply to all engine types: Before assembly, check that the parts are clean and free of foreign inclusions. Apply a layer of grease to all rotating and moving parts. This should be done...
The following general guidelines apply to all engine types: Before assembly, check that the parts are clean and free of foreign inclusions. Apply a layer of grease to all rotating and moving parts. This should be done...

Cylinder head — removal
The cylinder head can be removed without removing the engine, however, it should be noted that the timing belt must be partially removed. This tool requires a magnetic based dial gauge to determine the cylinder head...
The cylinder head can be removed without removing the engine, however, it should be noted that the timing belt must be partially removed. This tool requires a magnetic based dial gauge to determine the cylinder head...

Disassembling the cylinder head
It is assumed that the parts have already been removed from the cylinder head, that is, the cylinder head looks as shown in Figure 367. Figure 367. Cylinder head before disassembly. Remove all camshaft covers. Remove...
It is assumed that the parts have already been removed from the cylinder head, that is, the cylinder head looks as shown in Figure 367. Figure 367. Cylinder head before disassembly. Remove all camshaft covers. Remove...
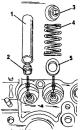
Cylinder head assembly
If the cylinder head is replaced, all parts are transferred from the old cylinder head to the new one. Thoroughly clean all parts and generously lubricate all moving and rotating parts with engine oil. Insert the valves...
If the cylinder head is replaced, all parts are transferred from the old cylinder head to the new one. Thoroughly clean all parts and generously lubricate all moving and rotating parts with engine oil. Insert the valves...

Installing the cylinder head
Thoroughly clean the threaded holes under the cylinder head. The holes must be degreased. If necessary, you can go through the threads with an M12 x 150 tap. After this, clean the threaded holes. Press the centering...
Thoroughly clean the threaded holes under the cylinder head. The holes must be degreased. If necessary, you can go through the threads with an M12 x 150 tap. After this, clean the threaded holes. Press the centering...

Adjusting valve clearances
If the adjustment is made on the engine installed in the vehicle, which is usually the case during a general valve clearance check, then a number of preliminary steps must be performed to ensure access to the valves....
If the adjustment is made on the engine installed in the vehicle, which is usually the case during a general valve clearance check, then a number of preliminary steps must be performed to ensure access to the valves....

Pistons and connecting rods
Replacement of pistons and cylinder liners can only be performed with the power unit and gearbox removed. All pistons have two compression rings and one oil scraper ring. The upper compression ring has a chrome plated...
Replacement of pistons and cylinder liners can only be performed with the power unit and gearbox removed. All pistons have two compression rings and one oil scraper ring. The upper compression ring has a chrome plated...
Disassembling pistons and connecting rods
No special tools are required to disassemble the pistons and connecting rods. Remove the pistons and connecting rods from the working sleeves (or holes) cylinders. Check again that the markings are applied. Remove the...
No special tools are required to disassemble the pistons and connecting rods. Remove the pistons and connecting rods from the working sleeves (or holes) cylinders. Check again that the markings are applied. Remove the...
Checking pistons and connecting rods
Check all details carefully. If parts show signs of metal corrosion, scratches or wear, they must be replaced. Measure the piston ring height clearances in the piston grooves by sequentially inserting the rings into the...
Check all details carefully. If parts show signs of metal corrosion, scratches or wear, they must be replaced. Measure the piston ring height clearances in the piston grooves by sequentially inserting the rings into the...
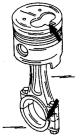
Assembly of pistons and connecting rods
It is assumed that all details are in accordance with section 15.5.2 checked and repaired. Check the absence of twisting and bending of the connecting rods on a connecting rod testing machine. It is best to do this in a...
It is assumed that all details are in accordance with section 15.5.2 checked and repaired. Check the absence of twisting and bending of the connecting rods on a connecting rod testing machine. It is best to do this in a...
Cylinder block
The cylinder block consists of the crankcase and the cylinder block itself. When completely disassembling, thoroughly clean the cylinder block and remove all foreign particles from the cavities and lubrication channels....
The cylinder block consists of the crankcase and the cylinder block itself. When completely disassembling, thoroughly clean the cylinder block and remove all foreign particles from the cavities and lubrication channels....
Crankshaft and crankshaft bearings
Removing the crankshaft has already been described in the section on engine disassembly. The crankshaft runs in five bearings. The main bearing journals and connecting rod bearing journals can be turned once, that is,...
Removing the crankshaft has already been described in the section on engine disassembly. The crankshaft runs in five bearings. The main bearing journals and connecting rod bearing journals can be turned once, that is,...
Measuring the axial play of the crankshaft
Before removing the crankshaft, the amount of its axial play should be determined in order to prepare oversized expansion washers for installation, if necessary. Carry out the following work: Install a dial indicator on...
Before removing the crankshaft, the amount of its axial play should be determined in order to prepare oversized expansion washers for installation, if necessary. Carry out the following work: Install a dial indicator on...
Installing the crankshaft
The description of the crankshaft installation is given in connection with the installation of the engine in section 15.3 . It is essential to install both expansion washers of the same thickness. Maintain all specified...
The description of the crankshaft installation is given in connection with the installation of the engine in section 15.3 . It is essential to install both expansion washers of the same thickness. Maintain all specified...
Replacing the rear crankshaft oil seal
The oil seal can be replaced with the flywheel removed. This may be necessary when the clutch starts to slip due to contamination with oil leaking from the engine crankcase. Remove the oil seal using a screwdriver...
The oil seal can be replaced with the flywheel removed. This may be necessary when the clutch starts to slip due to contamination with oil leaking from the engine crankcase. Remove the oil seal using a screwdriver...
Replacing the front crankshaft oil seal
The front oil seal is located in the flange in front of the oil pump and can be replaced without removing the engine, but the timing belt must be removed. To remove the oil seal, screw two self-tapping screws into the...
The front oil seal is located in the flange in front of the oil pump and can be replaced without removing the engine, but the timing belt must be removed. To remove the oil seal, screw two self-tapping screws into the...
Flywheel — general information
Everything written about the flywheel on gasoline engines also applies to diesel engines. When installing the flywheel, coat the bolt threads with Loctite and tighten the bolts evenly to a torque of 50 Nm.
Everything written about the flywheel on gasoline engines also applies to diesel engines. When installing the flywheel, coat the bolt threads with Loctite and tighten the bolts evenly to a torque of 50 Nm.

Gas distribution mechanism drive
The timing drive can be removed without removing the engine. When performing the following work, the timing belt should be removed only partially, that is, only from the camshaft toothed pulley: Removal and installation...
The timing drive can be removed without removing the engine. When performing the following work, the timing belt should be removed only partially, that is, only from the camshaft toothed pulley: Removal and installation...
This section is available on russian, bulgarian, belarusian, ukrainian, serbian, croatian, romanian, polish, slovak, hungarian
See similar information for other Peugeot models
➨ Power unit: Engine overhaul Peugeot 106 (1991-2003)
➨ Power unit: Engine repair Peugeot 207 (2006-2014)
➨ Power unit: Engine overhaul Peugeot 406 (1995-2004)
➨ Gasoline engine: Engine repair Peugeot J5 (1981-1993)
Link to this section in different formats
TEXTHTMLBB Code
- User manual
- Keys, doors and alarm
- Controls and instruments
- Driving and operation
- Maintenance
- Power unit
- Petrol engines TU3 and TU5
- Petrol engines EW10
- Diesel engines DV10
- Diesel engines DW10
- Transmission
- Clutch and drive shafts
- Mechanical gearbox
- Automatic gearbox
- Chassis, running gear
- Front suspension
- Rear suspension
- Steering
- Brake system
- Body and interior
- Exterior (external elements)
- Interior (internal elements)
- Doors, locks and windows
- Heating and air conditioning
- Electrical equipment
- Equipment and devices
- Power devices
- Airbags
- Electrical circuits
- General information
- Introduction to manual
- Specifications
- Gasoline engine
- Engine repair
- Lubrication system
- Cooling system
- Fuel injection
- Ignition system
- Diesel engine
- Engine repair
- Lubrication system
- Cooling system
- Fuel injection
- Transmission
- Clutch
- Gearbox
- Drive shafts
- Chassis, running gear
- Steering system
- Front suspension
- Rear suspension
- Brake system
- Electrical equipment
- Power devices
- Electrical circuits
- General information
- Maintenance
- Power unit
- Gasoline engines
- Diesel engines
- Cooling system (gasoline)
- Cooling system (diesel)
- Fuel system (gasoline)
- Fuel system (diesel)
- Ignition system
- Transmission
- Clutch
- Mechanical gearbox BB8
- Mechanical gearbox BE1
- Automatic gearbox ZF4
- Shafts, hubs and wheels
- Chassis, running gear
- Brake system
- Car suspension
- Steering
- Body and interior
- Exterior (external elements)
- Interior (internal elements)
- Electrical equipment
- Equipment and devices
- Headlights and lighting
- Power devices
- Electrical circuits
- Wiring diagrams (diesel)