English Русский
Български
Беларускі
Український
Српски
Hrvatski
Română
Polski
Slovenský
Magyar
Bookmark Articles Sitemap Contacts
Company Hyundai Company Opel Company Skoda Company Kia Company Mitsubishi Company LADA Company Audi
PeugeotBook.ru


Series 100   Series 200   Series 300   400-500   Series 600   Crossovers   Others
 
Peugeot 405 (1987-1997) Peugeot 406 (1995-2004)

Electric Fan — Removal, Checking and Installation (Peugeot 406)

  • Main
  • 40X
  • Peugeot 406 (1995-2004)
  • Power unit
  • Cooling and heating
  • Electric Fan — Removal, Checking and Installation
0
Table of contents: Examination 🠇 Removal 🠇 Installation 🠇

Examination


1. Power is supplied to the cooling fan via the ignition switch and fuse. On petrol engines without air conditioning, the fan is controlled by a temperature sensor installed on the left side of the radiator. On petrol engines with air conditioning and all diesel engines, the fans are controlled by a "Bitron" sensor.

2. The fan should turn on when the engine operating temperature is exceeded, i.e. a few minutes before the engine temperature gauge needle enters the red sector or before the coolant temperature warning lamp lights up. If the fan does not turn on, remove the wires from the temperature sensor, connect them together and turn on the ignition. If the fan starts working after this, the temperature sensor is probably out of order and needs to be replaced.

3. If the fan still does not work, check if there is voltage to the temperature sensor. If there is no voltage to the temperature sensor, the wires may be damaged or the fuse may have blown. If voltage is supplied, check the reliability of the ground connection of the second wire of the sensor. If the temperature sensor and wiring are in good condition, then the fan motor may be damaged. The motor can be checked by applying voltage to it with additional wires from the battery.

Removal


1. Remove the radiator.

2. On models with air conditioning, remove the mounting screws, then remove the mounting bracket securing the condenser assembly to the fan shroud. Move the condenser assembly to the side to expose the fan motor mounting nuts.


3. Remove the radiator grille.
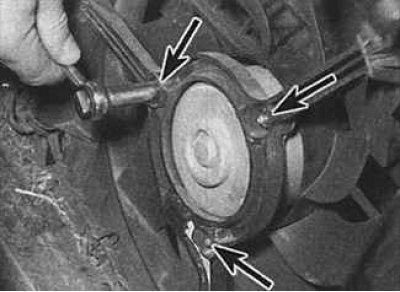
4. Unscrew the bolts securing the fan shroud to the hood lock. Disconnect the hood lock cable from…

4. Unscrew the bolts securing the fan shroud to the hood lock. Disconnect the hood lock cable from the lock and remove it. Unscrew the mounting nuts (indicated by arrows) and remove the motor with the fan from the casing.

(Source available here PeugeotBook.ru)
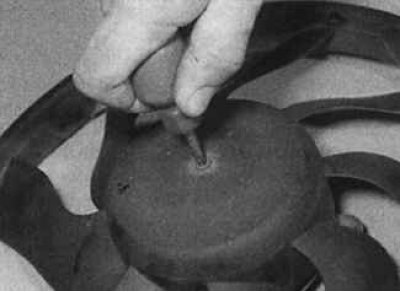
5. If necessary, unscrew the mounting screw and remove the fan from the motor shaft.


5. If necessary, unscrew the mounting screw and remove the fan from the motor shaft.


Installation


Installation is carried out in the reverse order of removal, taking into account the following points:
  • before installation, check the condition of the fan casing;
  • check the condition of the electrical wiring and its placement in the mounting brackets;
  • install the radiator.
This article is available at russian, bulgarian, belarusian, ukrainian, serbian, croatian, romanian, polish, slovak, hungarian
Article reviewed by editor: Vinogradov Robert
Share information:
Previous
Peugeot 406: Cooling and heating
Next

Thermostat — Removal, Checking and Installation
Radiator — removal, inspection and installation
Connecting the cooling system hoses
Technical characteristics of the cooling system
Cooling, heating and ventilation systems
Thermal sensors — removal, testing and installation
Coolant Temperature High Lamp Sensor
Water pump — removal and installation
Heating and ventilation system
Heating system elements — removal and installation
See similar information for other Peugeot models

➨ Valve clearances (8-valve engines) — checking and adjustment Peugeot 106 (1991-2003)
➨ Checking tire pressure Peugeot 207 (2006-2014)
➨ Cylinder liner protrusion value — checking and adjustment Peugeot 305 (1977-1989)
➨ Electric power windows Peugeot 605 (1989-2000)
➨ Electric and manual windows Peugeot 806 (1994-2002)
Link to this article in different formats
Comments and feedback from visitors
No comments yet


Add two numbers 50 + 17


Peugeot 406 (1995-2004) 
  • General information
  • User manual
  • Maintenance (gasoline)
  • Maintenance (diesel)
  • Power unit
  • Gasoline engines
  • Diesel engines
  • Engine overhaul
  • Cooling and heating
  • Fuel system (gasoline)
  • Fuel system (diesel)
  • Engine electrical equipment
  • Transmission
  • Clutch and drive shafts
  • Mechanical gearbox
  • Automatic gearbox
  • Chassis, running gear
  • Brake system
  • Car suspension
  • Steering
  • Body and interior
  • Exterior (external elements)
  • Interior (internal elements)
  • Doors, locks and windows
  • Electrical equipment
  • Equipment and devices
  • Electrical circuits
Peugeot 405 (1987-1997) 
  • General information
  • User manual
  • Maintenance
  • Power unit
  • Petrol engines 1.4 l
  • Petrol engines 1.6-2.0 l
  • Diesel engines
  • Ignition system
  • Fuel system (carburetor)
  • Single point fuel injection
  • Multipoint fuel injection
  • Cooling and lubrication system
  • Exhaust system
  • Transmission
  • Clutch
  • Manual gearbox MA
  • Manual gearbox BE
  • Automatic gearbox
  • Drive shafts
  • Chassis, running gear
  • Steering
  • Front suspension
  • Rear suspension
  • Brake system
  • Body and interior
  • Exterior (external elements)
  • Interior (internal elements)
  • Doors, locks and windows
  • Electrical equipment
  • Equipment and devices
  • Electrical circuits
PeugeotBook.ru © 2018–2026 | Mobile version | Sitemap: EN BG BY UA RS HR RO PL SK HU | Write message | Site search | Add to bookmarks | Peugeot owners
106 (1991-2003) | 206 (1998-2012) | 207 (2006-2014) | 305 (1977-1989) | 306 (1993-2002) | 307 (2001-2008) | 405 (1987-1997) | 406 (1995-2004) | 605 (1989-2000) | Partner-I (1996-2008) | Eurovans-807 (2002-2014) | Eurovans-806 (1994-2002) | J5 (1981-1993) |
Cookies are used to ensure the correct display of pages on the site.