
English Русский
Български
Беларускі
Український
Српски
Hrvatski
Română
Polski
Slovenský
Magyar
Bookmark Articles Sitemap Contacts
Company Hyundai Company Opel Company Skoda Company Kia Company Mitsubishi Company LADA Company Audi
PeugeotBook.ru


Series 100   Series 200   Series 300   400-500   Series 600   Crossovers   Others
 
Peugeot 106 (1991-2003)

Valve clearances (8-valve engines) — checking and adjustment (Peugeot 106)

  • Main
  • 10X
  • Peugeot 106 (1991-2003)
  • Power unit
  • Petrol engines
  • Valve clearances (8-valve engines) — checking and adjustment
0
Note: The valve clearances must be checked and adjusted only when the engine is cold.


1. The importance of having the valve clearances correctly adjusted cannot be overstressed, as they vitally affect the performance of the engine. If the clearances are too big, the engine will be noisy (characteristic rattling or tapping noises) and engine efficiency will be reduced, as the valves open too late and close too early. A more serious problem arises if the clearances are too small, however. If this is the case, the valves may not close fully when the engine is hot, resulting in serious damage to the engine (eg. burnt valve seats and/or cylinder head warping/cracking). The clearances are checked and adjusted as follows.

2. Remove the cylinder head cover as described in Section 4.

3. The engine can now be turned using a suitable socket and extension bar fitted to the crankshaft sprocket/pulley bolt.

4. It is important that the clearance of each valve is checked and adjusted only when the valve is fully closed, with the rocker arm resting on the heel of the cam (directly opposite the peak). This can be ensured by carrying out the adjustments in the following sequence, (ex. = exhaust, in. = inlet) noting that No 1 cylinder is at the transmission end of the engine. The correct valve clearances are given in the Specifications at the start of this Chapter. The valve locations can be determined from the position of the manifolds.

Valve fully openAdjust valves
No 1 ex.No 3 in. and No 4 ex.
No 3 ex.No 4 in. and No 2 ex.
No 4 ex.No 2 in. and No 1 ex.
No 2 ex.No 1 in. and No 3 ex.


5. With the relevant valve fully open, check the clearances of the two valves specified. Clearances are checked by inserting a feeler blade of the correct thickness between the valve stem and the rocker arm adjusting screw. The feeler blade should be a light, sliding fit. If adjustment is necessary, slacken the adjusting screw locknut, and turn the screw as necessary (see illustration). Once the correct clearance is obtained, hold the adjusting screw and securely tighten the locknut. Recheck the valve clearance, and adjust again if necessary.
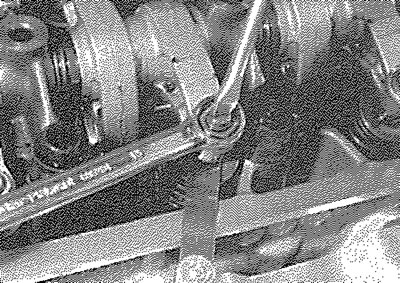
9.5. Adjusting a valve clearance

9.5. Adjusting a valve clearance


6. Rotate the crankshaft until the next valve in the sequence is fully open, and check the clearances of the next two specified valves.

7. Repeat the procedure until all eight valve clearances have been checked (and if necessary, adjusted), then refit the cylinder head cover as described in Section 4.
This article is available at russian, bulgarian, belarusian, ukrainian, serbian, croatian, romanian, polish, slovak, hungarian
Article reviewed by editor: Matveev Demid
Share information:
Previous
Peugeot 106: Petrol engines
Next

Camshaft oil seal — renewal
Timing belt tensioner and sprockets — removal, inspection and…
Timing belt — general information, removal and refitting
Timing belt covers — removal and refitting
Cylinder head cover — removal and refitting
Camshaft and rocker arms (8-valve engines) — removal, inspection…
Camshaft and followers (16-valve engines) — removal, inspection…
Cylinder head (8-valve engines) — removal and refitting
Cylinder head (16-valve engines) — removal and refitting
Sump — removal and refitting
See similar information for other Peugeot models

➨ Valve mechanism characteristics (petrol engines 1.4 and 1.6 l,… Peugeot 207 (2006-2014)
➨ Valve clearances — checking and adjustment Peugeot 305 (1977-1989)
➨ Checking and adjusting valve clearances of 1.6L engines Peugeot 406 (1995-2004)
➨ Engine Oil Level — Checking and Replacing Peugeot 605 (1989-2000)
➨ Valve clearances — checking and adjustment Peugeot Partner I (1996-2008)
Link to this article in different formats
Comments and feedback from visitors
No comments yet


Add two numbers 47 + 16


Peugeot 106 (1991-2003) 
  • General information
  • Introduction to manual
  • Weekly checks
  • Maintenance (petrol)
  • Maintenance (diesel)
  • Troubleshooting
  • Power unit
  • Petrol engines
  • Diesel engines
  • Engine overhaul
  • Cooling and heating
  • Fuel system (carburetor)
  • Single point injection (petrol)
  • Multipoint injection (petrol)
  • Fuel system (diesel)
  • Emission control system
  • Engine electrical equipment
  • Ignition system
  • Diesel heating
  • Transmission
  • Clutch
  • Manual gearbox
  • Automatic gearbox
  • Drive shafts
  • Chassis, running gear
  • Brake system
  • Car suspension
  • Steering
  • Body and interior
  • Exterior (external elements)
  • Interior (internal elements)
  • Doors, locks and windows
  • Electrical equipment
  • Equipment and devices
  • Electrical diagrams
PeugeotBook.ru © 2018–2026 | Mobile version | Sitemap: EN BG BY UA RS HR RO PL SK HU | Write message | Site search | Add to bookmarks | Peugeot owners
106 (1991-2003) | 206 (1998-2012) | 207 (2006-2014) | 305 (1977-1989) | 306 (1993-2002) | 307 (2001-2008) | 405 (1987-1997) | 406 (1995-2004) | 605 (1989-2000) | Partner-I (1996-2008) | Eurovans-807 (2002-2014) | Eurovans-806 (1994-2002) | J5 (1981-1993) |
Cookies are used to ensure the correct display of pages on the site.