



Removal
1. Disconnect the battery negative terminal (refer to "Disconnecting the battery").
2. Remove both cylinder head covers as described in Section 4.
3. Remove the oil seal from the camshaft to be removed as described in Section 8.
4. Progressively slacken, in a spiral sequence starting from the outside, the twelve bolts securing the camshaft bearing housing to the cylinder head. Only slacken the bolts sufficiently to separate the mating surfaces by a few millimetres at this stage.
5. Lightly tap the sprocket end of the camshaft, using a soft-faced mallet, to free the camshaft from its bearings.
6. Completely unscrew and remove the bearing housing retaining bolts, then lift off the housing.
7. As both camshafts are identical, suitably mark them inlet and exhaust, or front and rear before removal, if both are to be removed. Carefully lift the camshaft up and out of its location in the cylinder head.
8. If both camshafts are being removed, repeat the previous procedures on the remaining camshaft.
9. Obtain sixteen small, clean plastic containers (assuming both camshafts have been removed), and number them inlet 1 to 8 and exhaust 1 to 8; alternatively, divide a larger container into sixteen compartments and number each compartment accordingly. Using a rubber sucker, withdraw each hydraulic tappet in turn, and place it in its respective container. Do not interchange the tappets, or the rate of wear will be much-increased.
Inspection
10. Examine the camshaft bearing surfaces and cam lobes for signs of wear ridges and scoring. Renew the camshaft if any of these conditions are apparent. Examine the condition of the bearing surfaces, both on the camshaft journals and in the cylinder head/bearing caps. If the head bearing surfaces are worn excessively, the cylinder head will need to be renewed. If suitable measuring equipment is available, camshaft bearing journal wear can be checked by direct measurement (where the necessary specifications have been quoted by Peugeot), noting that No 1 journal is at the transmission end of the head.
11. Examine the cam follower/hydraulic tappet bearing surfaces which contact the camshaft lobes for wear ridges and scoring. Renew any follower/tappet on which these conditions are apparent. If a follower/tappet bearing surface is badly scored, also examine the corresponding lobe on the camshaft for wear, as it is likely that both will be worn. Renew worn components as necessary.
Refitting
12. Before refitting, remove ail traces of oil from the bearing housing retaining bolt holes in the cylinder head, using a clean rag. Also ensure that both the cylinder head and bearing housing mating faces are clean and free from oil.
13. Remove the flywheel timing pin and turn the crankshaft one quarter turn so that the pistons are positioned half way down their bores.
14. Liberally oil the cylinder head hydraulic tappet bores and the tappets. Carefully refit the tappets to the cylinder head, ensuring that each tappet is refitted to its original bore. Some care will be required to enter the tappets squarely into their bores. Check that each tappet rotates freely in its bore.
15. Liberally oil the camshaft bearings in the cylinder head and the camshaft lobes, then refit the camshafts to the cylinder head. Turn the camshafts so that the groove at the timing belt end of each camshaft is positioned as follows:
- Inlet camshaft groove at 7 o'clock
- Exhaust camshaft groove positioned at 8 o'clock
16. Ensure that the four locating dowels are in position, one at each corner of the cylinder head.
17. Apply a bead of silicone based jointing compound around the perimeter of the mating faces and around the retaining bolt hole locations.
18. Liberally oil the camshaft bearings and carefully locate the bearing housings over the camshafts. Apply a suitable thread locking compound to the retaining bolt threads and refit the retaining bolts finger tight at this stage.
19. Working in the order shown, progressively tighten the bearing housing retaining bolts to the stage one torque setting then to the stage two setting (see illustration).
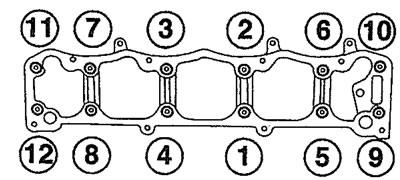
11.19. Camshaft bearing housing retaining bolt tightening sequence - 16-valve engines
20. Fit a new oil seal to each camshaft as described in Section 8.
21. Refit the timing belt inner cover, ensuring that the notch at the base of the cover locates correctly over the rib in the crankshaft oil seal carrier. Refit the idler and tensioner pulleys and the camshaft sprockets as described in Section 7.
22. Refit the cylinder head covers as described in Section 4.