
English Русский
Български
Беларускі
Український
Српски
Hrvatski
Română
Polski
Slovenský
Magyar
Bookmark Articles Sitemap Contacts
Company Hyundai Company Opel Company Skoda Company Kia Company Mitsubishi Company LADA Company Audi
PeugeotBook.ru


Series 100   Series 200   Series 300   400-500   Series 600   Crossovers   Others
 
Peugeot 605 (1989-2000)

Camshaft — Removal (Peugeot 605)

  • Main
  • 60X
  • Peugeot 605 (1989-2000)
  • Power unit
  • Petrol engines «XU»
  • Camshaft — Removal
0
1. Remove the timing belt of the gas distribution mechanism drive (see the relevant chapter).

2. Remove the ignition distributor cap and disconnect the wire harnesses from it.

3. Vehicles with XU102C engines: Remove the fuel pump.

4. Vehicles with XU10J2 engines. Remove the engine mount protective cover with torsional vibration damper

5. Lock the camshaft by installing a suitable thrust pin in the appropriate hole.

6. Unscrew bolt 1 securing the camshaft gear and remove gear 2 (see illustration).
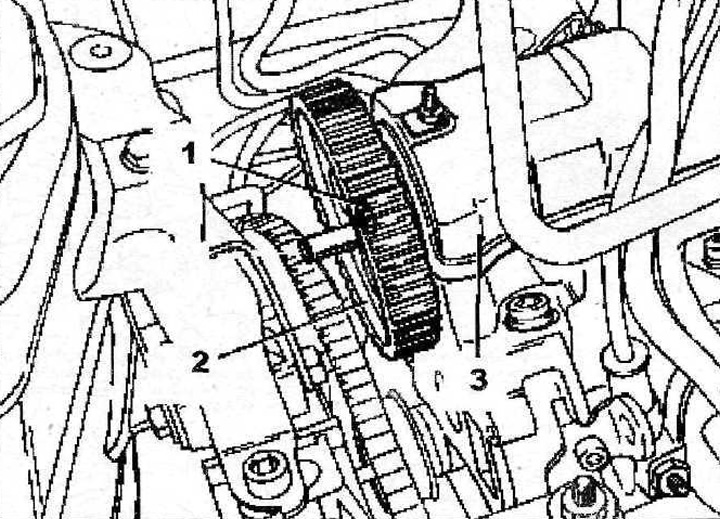
3.6 Unscrew bolt 1 securing the camshaft gear and remove gear 2

3.6 Unscrew bolt 1 securing the camshaft gear and remove gear 2


7. Remove the cylinder head cover 3 (see illustration 3.6).

8. Remove oil line 4, unscrew bolt 5 (see illustration).
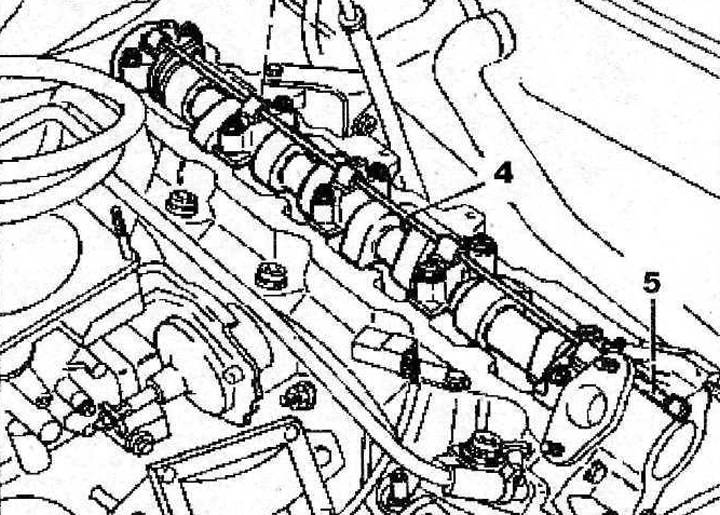
3.8 Remove oil line 4, unscrew bolt 5

3.8 Remove oil line 4, unscrew bolt 5


9. Evenly loosen and then unscrew the camshaft bearing cap nuts.


Important: Number the camshaft bearing caps so that you can install each one in its proper place.


10. Remove the camshaft bearing caps.

11. Carefully remove the camshaft.

Cars with XU10J4R engine


12. Remove the upper part of the timing drive protective cover.

13. Remove timing belt 1 of the gas distribution mechanism drive (see illustration). The procedure is given in the relevant chapter.
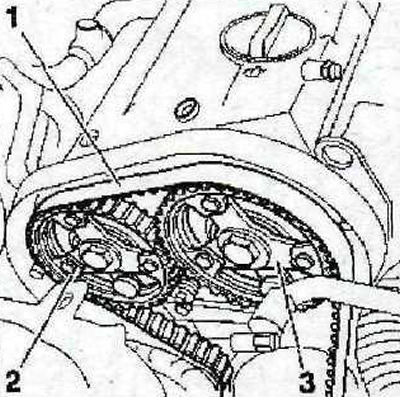
3.13 Remove the timing belt 1 of the gas distribution mechanism drive

3.13 Remove the timing belt 1 of the gas distribution mechanism drive


14. Remove gears 2 and 3 of the camshafts (see illustration 3.13).

15. Make sure that the stops "a" 0153-AB are in their places, and loosen the fit of the hubs 4 and 5 of the camshaft gears (see illustration).
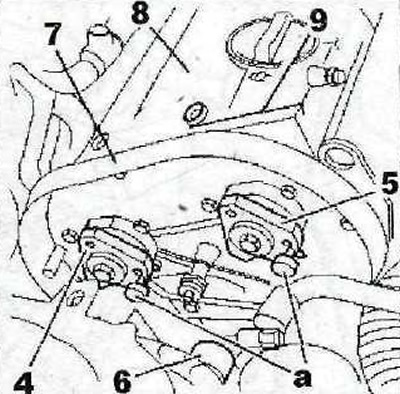
3.15 Make sure that the stops «a» 0153-AB are in their places, and loosen the fit of the hubs 4 and…

3.15 Make sure that the stops "a" 0153-AB are in their places, and loosen the fit of the hubs 4 and 5 of the camshaft gears


16. Remove the camshaft hubs.


17. Remove tension roller 6 (see illustration 3.15).

18. Remove the lower part 7 of the timing gear protective cover (see illustration 3.15).

19. Remove the 8 ignition coil block (see illustration 3.15).

20. Remove the fuel line holder 9 (see illustration 3.15).

21. Disconnect and move aside from the work area the wire harnesses and hoses secured in the holders on the camshaft bearing housings 10 and 11 and the cylinder head covers 12 and 13 (see illustration).
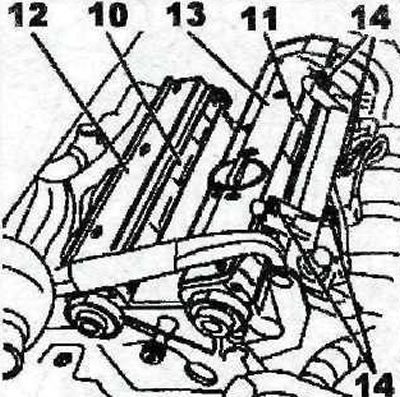
3.21 Disconnect and move aside from the work area the wiring harnesses and hoses secured in the…

3.21 Disconnect and move aside from the work area the wiring harnesses and hoses secured in the holders on the camshaft bearing housings 10 and 11 and the cylinder head covers 12 and 13


22. Unscrew bolts 14 (see illustration 3.21).

23. Remove cylinder head covers 12 and 13 (see illustration 3.21).

24. Loosen the twelve bolts securing the camshaft bearing housings 10 and 11 (see illustration).
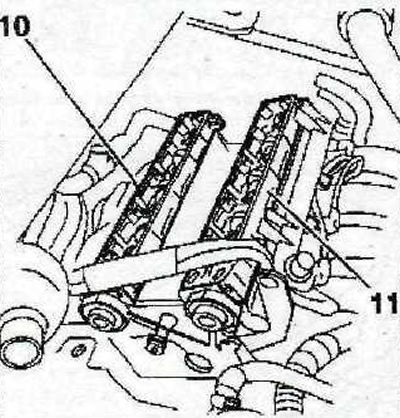
3.24 Loosen the twelve bolts securing the camshaft bearing housings 10 and 11

3.24 Loosen the twelve bolts securing the camshaft bearing housings 10 and 11


25. Loosen the fit of camshaft bearing housings 10 and 11, unscrew their mounting bolts and remove the bearing housings (see illustration 3.24).


Caution! Mark the camshafts to avoid confusion during installation.


26. Tap each camshaft, if necessary, on the flywheel side to loosen them in the centering bearing on the timing gear side (see illustration).
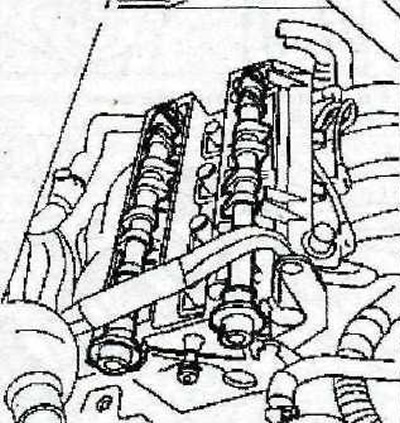
3.26 Tap each camshaft from the flywheel side to loosen their fit in the centering bearing on the…

3.26 Tap each camshaft from the flywheel side to loosen their fit in the centering bearing on the timing side


27. Mark the tappets if they are to be removed so that you can then install each one in its proper place.

28. Remove the pushers using a suction cup (see illustration).
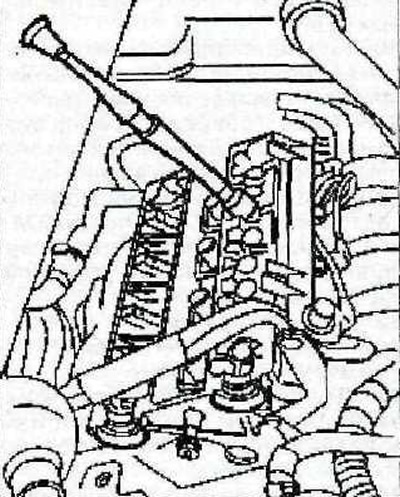
3.28 Remove the pushers using a suction cup

3.28 Remove the pushers using a suction cup
This article is available at russian, bulgarian, belarusian, ukrainian, serbian, croatian, romanian, polish, slovak, hungarian
Article reviewed by editor: Nikonova Veronica
Share information:
Previous
Peugeot 605: Petrol engines «XU»
Next

Timing belt of the gas distribution mechanism drive —…
Timing belt of the gas distribution mechanism drive — removal
General information
Specifications of XU Series Gasoline Engine Vehicles
Camshaft — Installation
Cylinder head — removal
Cylinder head — installation
Engine — removal
Engine — installation
See similar information for other Peugeot models

➨ Camshaft oil seal — renewal Peugeot 106 (1991-2003)
➨ Camshaft Position Sensors (EP Series Gasoline Engines) Peugeot 207 (2006-2014)
➨ Camshaft — removal Peugeot 305 (1977-1989)
➨ Camshaft drive belt Peugeot 405 (1987-1997)
➨ Camshaft position sensor (CMP) Peugeot 806 (1994-2002)
Link to this article in different formats
Comments and feedback from visitors
No comments yet


Add two numbers 14 + 15


Peugeot 605 (1989-2000) 
  • General information
  • User manual
  • Maintenance
  • Troubleshooting
  • Power unit
  • Petrol engines «XU»
  • Petrol engines «ZPJ»
  • Petrol engines «ES9J4»
  • Diesel engines
  • Cooling and heating
  • Fuel system
  • Exhaust system
  • Transmission
  • Clutch
  • Mechanical gearbox
  • Automatic gearbox
  • Chassis, running gear
  • Brake system
  • Car suspension
  • Steering
  • Body and interior
  • Body elements
  • Electrical equipment
  • Power devices
  • Electrical circuits
PeugeotBook.ru © 2018–2026 | Mobile version | Sitemap: EN BG BY UA RS HR RO PL SK HU | Write message | Site search | Add to bookmarks | Peugeot owners
106 (1991-2003) | 206 (1998-2012) | 207 (2006-2014) | 305 (1977-1989) | 306 (1993-2002) | 307 (2001-2008) | 405 (1987-1997) | 406 (1995-2004) | 605 (1989-2000) | Partner-I (1996-2008) | Eurovans-807 (2002-2014) | Eurovans-806 (1994-2002) | J5 (1981-1993) |
Cookies are used to ensure the correct display of pages on the site.