
The sequence of fastening the bolts of the camshaft bearing caps (models 1998 cm3 with 16 valves)
Removing
1. Remove ground wire from battery.
2. Remove the cylinder head cover.
Models 1905 cm3 with 16 valves
3. Remove the bolt from the plastic housing of the power steering pump pulley.
4. Remove the drive belt from the steering drive pulley.
5. Unscrew the bolt and remove the pulley from the end of the camshaft.
6. Remove pulleys from both camshafts.
7. Remove the cover of the breaker-distributor and the distributor rotor.
8. Unscrew the bolt and remove the ignition distributor and sealing disc.
9. Unscrew the bolt securing the inner casing of the toothed belt drive from the side of the cylinder head.
10. Loosen the oil supply pipe to the camshaft bearing caps and remove it.
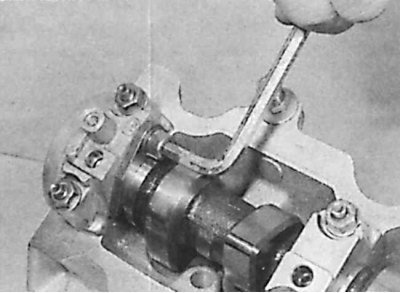
11. Rotate the camshaft so that the wrench splines are approximately at the 3 o'clock position.
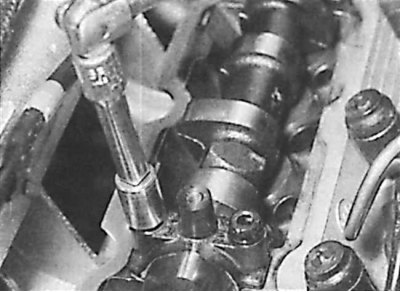
12. Evenly and gradually loosen the camshaft bearing caps, which reduces the valve spring pressure on the bearing cap. Once the spring pressure is released, the bolts can be fully unscrewed and removed.
13. Remove the bearing caps, marking the location of the pins.
14. Remove the camshafts from the cylinder head, seals and thrust lock.
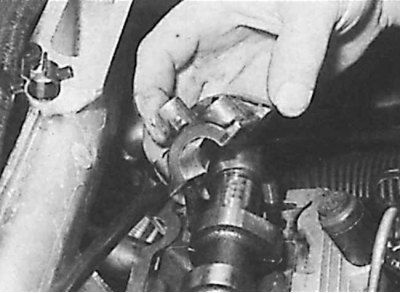
15. Using a rubber suction cup, remove the valve lifter and be sure to turn it over to prevent engine oil from escaping from the tappet. Mark the location of the pushers to re-install them in their places.
Models 1998 cm3 with 16 valves
16. Remove the pulleys from the camshaft and, where necessary, also remove the vacuum pump from the left front end of the cylinder head.
17. Remove the six bolts securing the inner toothed belt cover to the engine block and remove the cover.
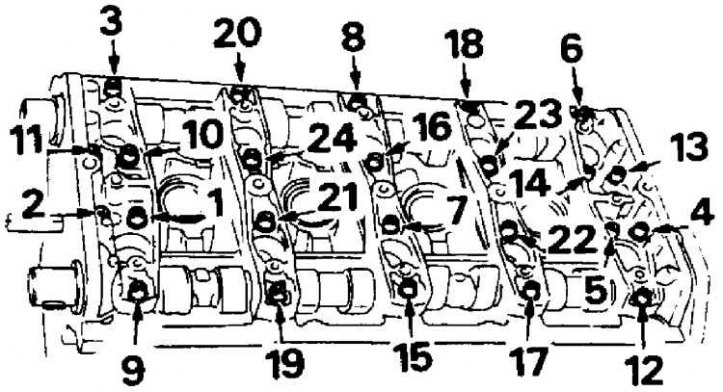
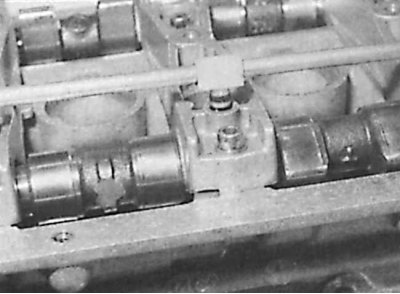
18. Loosen the oil supply pipe to the camshaft bearing caps and remove it.
19. Remove the cover of the breaker-distributor and the distributor rotor.
20. Unscrew the bolt and remove the ignition distributor and sealing disc.
21. The camshaft bearing caps are numbered 1 to 5, with cap 1 located on the drive side.
22. The covers are removed in the reverse order shown in the figure. The sequence of fastening the bolts of the camshaft bearing caps (models 1998 cm3 with 16 valves).
23. Evenly and gradually loosen the camshaft bearing caps, which reduces the valve spring pressure on the bearing cap. Once the spring pressure is released, the bolts can be fully unscrewed and removed.
24. Remove the bearing caps, marking the location of the pins.
25. Remove the camshafts from the cylinder head, seals and thrust lock.
26. The camshaft that controls the intake valves has a groove for the brake vacuum pump at the left end.
27. Using a rubber suction cup, remove the valve lifter and be sure to turn it over to prevent engine oil from escaping from the tappet.
28. Mark the location of the pushers to re-install them in their places.
All other models
29. Remove pulley from camshaft.
30. Remove the ignition distributor.
31. Remove fuel pump.
32. Loosen the oil supply pipe to the camshaft bearing caps and remove it.
33. The camshaft bearing caps are numbered 1 to 5, with cap 1 located on the drive side.
34. Evenly and gradually loosen the camshaft bearing caps, which reduces the valve spring pressure on the bearing cap. Once the spring pressure is released, the bolts can be fully unscrewed and removed.
35. Remove the bearing caps, noting their orientation.
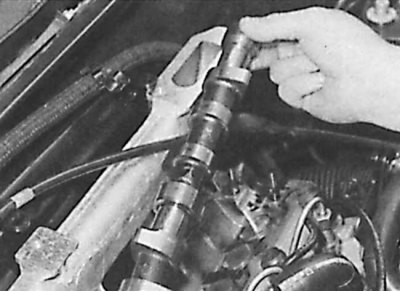
36. Remove the camshaft from the cylinder head.
37. Using a rubber suction cup, remove the valve clearance adjusting shims. Mark the location of the pushers to re-install them in their places.
Examination
1. Check the condition of the working surfaces of the camshaft bearings, the profile of the cam and the neck of the shaft. If the camshaft bearings in the head are worn, the cylinder head must be replaced.
2. Check the condition of the working surfaces of the valve lifter.
3. If valve knocking is heard during operation of a warm engine with hydraulic tappets, the hydraulic tappet must be checked and possibly replaced.
4. On models 1580 cm3 and 1905 cm3 check the fork of the axial fixation of the shaft.
Oil supply pipe to bearing caps
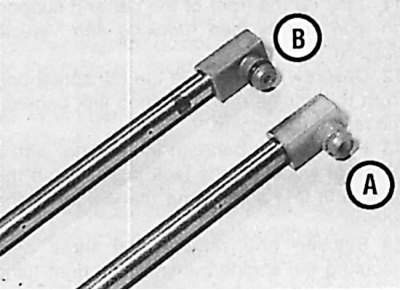
A - oil supply pipe to the bearing caps of early models without seals;
B - oil supply pipe to bearing caps of later models with O-rings
Installation
Attention! If new hydraulic tappets are installed, they must be filled with oil. The tappets are placed in a bath of engine oil and repeatedly compressed.
Before installing the camshaft, lubricate all working surfaces with a thin layer of engine oil.
Models 1905 cm3 and 1998 cm3 with 16 valves
1. Install camshafts to head. Temporarily install segment keys and pulleys. Rotate the camshafts so that the wrench splines are approximately at the 3 o'clock position (see fig. The sequence of fastening the bolts of the camshaft bearing caps (models 1998 cm3 with 16 valves)).
2. Install the bearing caps and tighten them evenly and progressively.
3. Install the oil supply pipe to the camshaft bearing caps with O-rings, checking that the holes are clean. When installing the oil supply pipe to the camshaft bearing caps, do not dislodge the O-rings.
4. Install the inner toothed belt cover.
5. Install new seals on the camshaft.
6. Install the ignition distributor.
7. Install the pulleys on the camshaft.
8. Install the power steering pulley and its cover.
9. Install the head cover.
10. Connect ground wire to battery.
Other models
11. Reinstall the valve clearance shims.
12. Install camshafts to head. Temporarily install the key and pulley.
13. Fit the bearing caps using the markings marked during removal and tighten evenly and progressively.
14. Install the oil supply pipe to the camshaft bearing caps with O-rings, checking that the holes are clean.
15. Install the ignition distributor.
16. Install fuel pump.
17. Install new seals on the camshaft.
18. Install the head cover.
19. Connect ground wire to battery.