
English Русский
Български
Беларускі
Український
Српски
Hrvatski
Română
Polski
Slovenský
Magyar
Bookmark Articles Sitemap Contacts
Company Hyundai Company Opel Company Skoda Company Kia Company Mitsubishi Company LADA Company Audi
PeugeotBook.ru


Series 100   Series 200   Series 300   400-500   Series 600   Crossovers   Others
 
Peugeot 405 (1987-1997) Peugeot 406 (1995-2004)

Cylinder Head Cover — Removal and Installation (Peugeot 405)

  • Main
  • 40X
  • Peugeot 405 (1987-1997)
  • Power unit
  • Petrol engines 1.6-2.0 l
  • Cylinder Head Cover — Removal and Installation
0
Table of contents: Removal 🠇 Installation 🠇

Nuts located under the cylinder head cover of 1761 cc and 1998 cc models (with 8 valves)
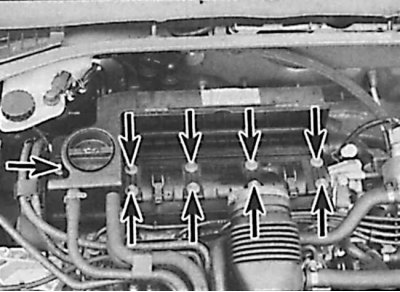


Nuts located under the cylinder head cover of 1761 cc and 1998 cc models (with 8 valves)


The nuts are indicated by arrows.

Removal


Engines 1580 cm³ and 1905 cm³ (8 valves)


1. Remove the ground wire from the battery.

2. On 1580cc and 1905cc models, remove the air filter and air filter housing.

3. On all models, remove the engine crankcase ventilation hose.
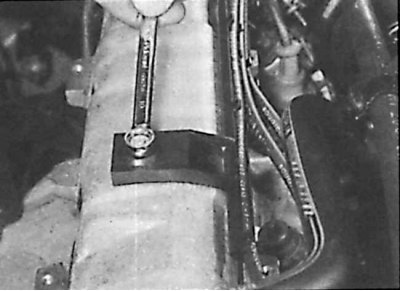
3. On all models, remove the engine crankcase ventilation hose.


4. Remove the brackets securing the high-voltage wires to the cover.

5. Unscrew the two cylinder head cover mounting bolts and remove the cover with the rubber gasket.

Engines 1761 cm³ and 1998 cm³ (8 valves)


6. Remove the crankcase ventilation hose from the right front side of the cover.

7. Remove the brackets, unscrew the two screws and remove the air filter element cover.


8. Unscrew the 10 cylinder head cover mounting bolts and remove the cover with the rubber gasket.

Models with 16 valves


9. Remove the fuel and return hoses from the front of the main cover and plug them.

10. Unscrew 7 bolts and remove the cover covering the spark plugs.

11. Remove electrical wires.

12. Remove the crankcase ventilation hose from the left front side of the cover.

13. Remove the 12 cylinder head cover bolts, noting the position of each bolt as the bolts come in four different lengths.

14. Remove the cover with the rubber gasket.

Tightening sequence of cover mounting bolts on 1761 cc and 1998 cc engines
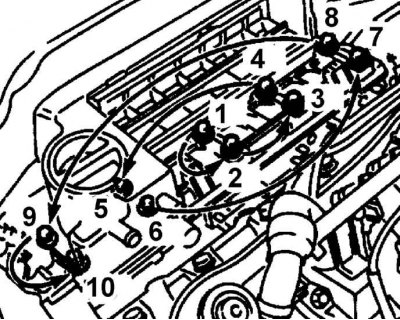


Tightening sequence of cover mounting bolts on 1761 cc and 1998 cc engines


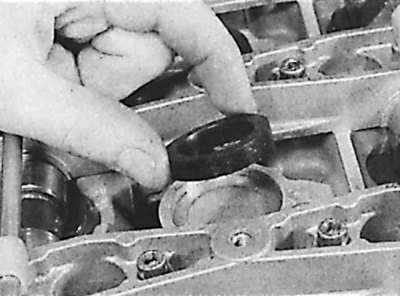
Spark plug seals
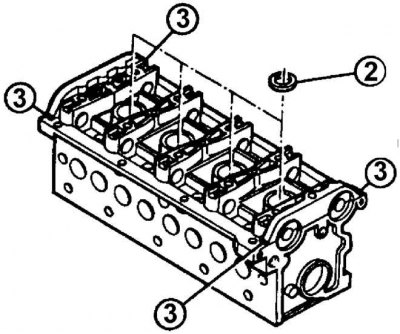


2 – spark plug seal

2 – spark plug seal


Use a silicon insulator at the points marked with arrows (3) (xU9TJ4 engine).


Sequence of the first stage of tightening the bolts of the head cover fastening (xU9J4 engines)


Source can be seen at: www.peugeotbook.ru
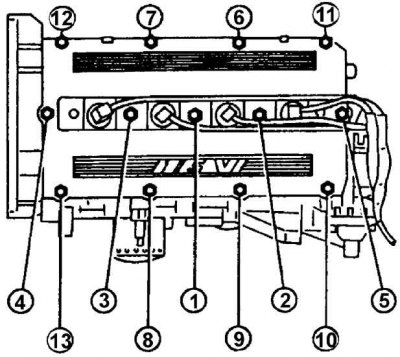
Sequence of the first stage of tightening the bolts of the head cover fastening (xU9J4 engines)


Second stage sequence (after the engine has cooled down for 4 hours) tightening the outer head cover mounting bolts (xU9J4 engines)
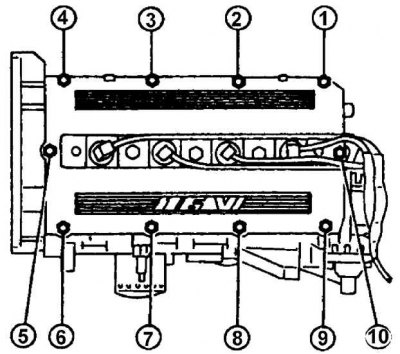


Second stage sequence (after the engine has cooled down for 4 hours) tightening the outer head…


Installation


Engines 1580 cm³ and 1905 cm³ (8 valves)


1. Clean the head cover thoroughly, remove all traces of oil and install a rubber gasket along the entire length of the cover.

2. Carefully install the cover onto the cylinder head and tighten the bolts.

3. Install previously removed wires and hoses.

4. Install the air filter.

5. Connect the ground wire to the battery.

Engines 1761 cm³ and 1998 cm³ (8 valves)


6. Clean the head cover thoroughly, remove all traces of oil and install a rubber gasket along the entire length of the cover.


7. Carefully install the cover onto the cylinder head and tighten the bolts gradually and evenly to the required torque (see Figure Sequence of tightening the cover mounting bolts on 1761 cc and 1998 cc engines).

8. Install previously removed wires and hoses.

9. Install the air filter.

10. Connect the ground wire to the battery.

Models with 16 valves


11. Follow the steps described for 8-valve models.
11. Follow the steps described for 8-valve models.


12. Install four oil seals into the spark plug holes.

13. Install the head cover and tighten the bolts gradually and evenly to the required torque.

14. Install the spark plug cover.

15. Install previously removed wires and hoses.

16. Install the air filter.

17. Install the fuel supply hose and return hoses to their respective fuel connections.

18. Connect the ground wire to the battery.
This article is available at russian, bulgarian, belarusian, ukrainian, serbian, croatian, romanian, polish, slovak, hungarian
Article reviewed by editor: Shirokov Arseny
Share information:
Previous
Peugeot 405: Petrol engines 1.6-2.0 l
Next

Air Filter — Carburetor Models
Generator drive belt
Replacing crankshaft seals
Replacing the camshaft seal
Timing Belt Pulleys
Camshaft — Removal, Inspection and Installation
Removal and installation the cylinder head
Disassembly, repair and assembly of the cylinder head
Removal the engine with a manual transmission
Removal the engine with automatic transmission
See similar information for other Peugeot models

➨ Cylinder head cover — removal and refitting Peugeot 106 (1991-2003)
➨ Cylinder head (petrol engines 1.4 and 1.6 l, EPZ, TU5) Peugeot 207 (2006-2014)
➨ Disassembling the cylinder head (XU series engines) Peugeot 305 (1977-1989)
➨ Cylinder head — removal Peugeot 605 (1989-2000)
➨ Cylinder head cover — removal and installation Peugeot Partner I (1996-2008)
Link to this article in different formats
Comments and feedback from visitors
No comments yet


Add two numbers 31 + 41


Peugeot 406 (1995-2004) 
  • General information
  • User manual
  • Maintenance (gasoline)
  • Maintenance (diesel)
  • Power unit
  • Gasoline engines
  • Diesel engines
  • Engine overhaul
  • Cooling and heating
  • Fuel system (gasoline)
  • Fuel system (diesel)
  • Engine electrical equipment
  • Transmission
  • Clutch and drive shafts
  • Mechanical gearbox
  • Automatic gearbox
  • Chassis, running gear
  • Brake system
  • Car suspension
  • Steering
  • Body and interior
  • Exterior (external elements)
  • Interior (internal elements)
  • Doors, locks and windows
  • Electrical equipment
  • Equipment and devices
  • Electrical circuits
Peugeot 405 (1987-1997) 
  • General information
  • User manual
  • Maintenance
  • Power unit
  • Petrol engines 1.4 l
  • Petrol engines 1.6-2.0 l
  • Diesel engines
  • Ignition system
  • Fuel system (carburetor)
  • Single point fuel injection
  • Multipoint fuel injection
  • Cooling and lubrication system
  • Exhaust system
  • Transmission
  • Clutch
  • Manual gearbox MA
  • Manual gearbox BE
  • Automatic gearbox
  • Drive shafts
  • Chassis, running gear
  • Steering
  • Front suspension
  • Rear suspension
  • Brake system
  • Body and interior
  • Exterior (external elements)
  • Interior (internal elements)
  • Doors, locks and windows
  • Electrical equipment
  • Equipment and devices
  • Electrical circuits
PeugeotBook.ru © 2018–2026 | Mobile version | Sitemap: EN BG BY UA RS HR RO PL SK HU | Write message | Site search | Add to bookmarks | Peugeot owners
106 (1991-2003) | 206 (1998-2012) | 207 (2006-2014) | 305 (1977-1989) | 306 (1993-2002) | 307 (2001-2008) | 405 (1987-1997) | 406 (1995-2004) | 605 (1989-2000) | Partner-I (1996-2008) | Eurovans-807 (2002-2014) | Eurovans-806 (1994-2002) | J5 (1981-1993) |
Cookies are used to ensure the correct display of pages on the site.