
English Русский
Български
Беларускі
Український
Српски
Hrvatski
Română
Polski
Slovenský
Magyar
Bookmark Articles Sitemap Contacts
Company Hyundai Company Opel Company Skoda Company Kia Company Mitsubishi Company LADA Company Audi
PeugeotBook.ru


Series 100   Series 200   Series 300   400-500   Series 600   Crossovers   Others
 
Peugeot 405 (1987-1997) Peugeot 406 (1995-2004)

Connecting the cooling system hoses (Peugeot 406)

  • Main
  • 40X
  • Peugeot 406 (1995-2004)
  • Power unit
  • Cooling and heating
  • Connecting the cooling system hoses
0
Table of contents: Common hose connections 🠇 Hoses with special connector 🠇 Snap-on hose connection 🠇
Caution! Hoses may be removed only after the engine has cooled down to avoid scalding. Before starting work, drain the coolant from the cooling system.


Common hose connections
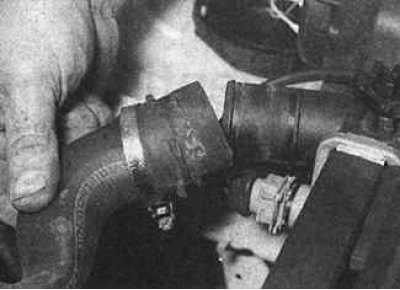


A typical hose connection is a coolant hose pushed all the way onto the fitting and secured with a…


A typical hose connection is a coolant hose pushed all the way onto the fitting and secured with a clamp on top. To remove the hose, loosen the clamp, slide it off the connection point along the hose, and pull the hose off the fitting. If the hose sits tightly on the fitting, twist it in different directions when pulling the hose off or pry the end of the hose off with a screwdriver blade.

Caution: Be careful when removing the hose from the radiator nipple, as the radiator nipple is fragile and can be easily broken.


Attention! If the hose does not come off the nipple, you can cut it along the nipple and, cutting along the axis, remove it from the nipple. In this case, the hose must be replaced with a new one.


Hoses with special connector


Caution: Whenever connecting a hose to a special connector, a new sealing ring must always be installed.


1. Some models may have special plastic connectors to connect the hose. To remove this type of connector, follow these steps:.
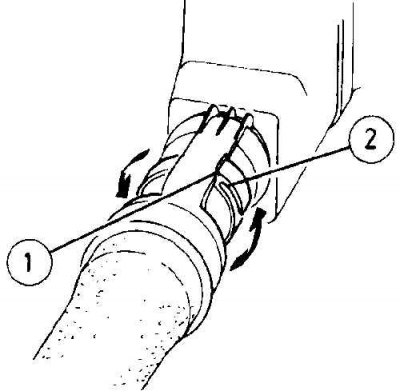
2. To remove the hose with the special connector, turn the locking ring (2) until it stops in the…


2. To remove the hose with the special connector, turn the locking ring (2) until it stops in the eye (1).
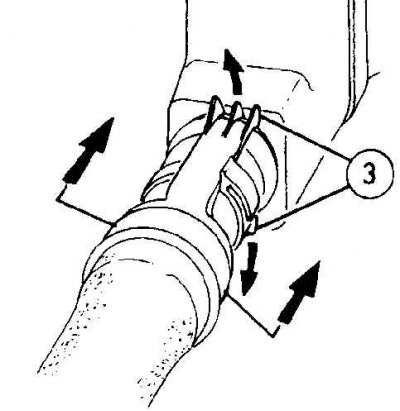
3. Press the eye of the hose connector to release the grips (3).


3. Press the eye of the hose connector to release the grips (3).

4. Remove the hose and special connector from the radiator.

5. When installing the connector, wipe both halves of the connector with a clean cloth.
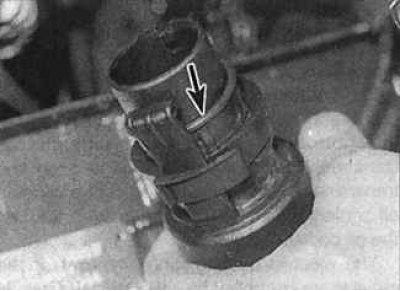
6. Replace the O-ring on the connector. The location of the new O-ring is indicated by the arrow.


6. Replace the O-ring on the connector. The location of the new O-ring is indicated by the arrow.


7. Turn the locking ring clockwise until it clicks.
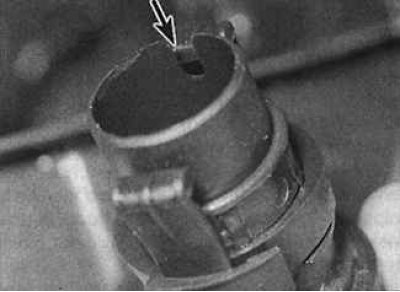
8. When installing the hose connector in place, position the alignment groove correctly (indicated…


8. When installing the hose connector in place, position the alignment groove correctly (indicated by the arrow).

9. Install the connector onto the radiator until the catches snap into place.

10. Check the connection for reliability by pulling on the hose.

11. Add fluid to the cooling system.

12. Check the cooling system for leaks.

Snap-on hose connection


Caution: Always install a new O-ring when making any snap-fitting connection to a hose.
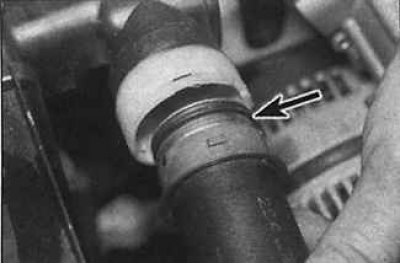

1. Some models are equipped with coolant hoses with snap-on connectors, i.e. the coupling is…


1. Some models are equipped with coolant hoses with snap-on connectors, i.e. the coupling is secured with a retaining ring (the connector sealing ring is indicated by the arrow).
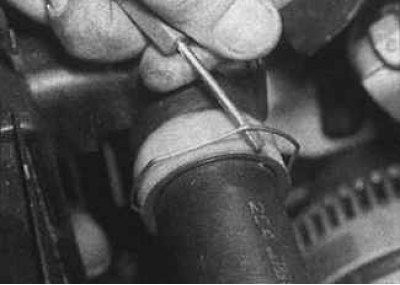
2. To disconnect this type of connection, use a small screwdriver to remove the retaining ring. The…


2. To disconnect this type of connection, use a small screwdriver to remove the retaining ring. The hose can then be pulled out of the connector.

3. When assembling the connector, install a new O-ring on the inside of the connector and connect both parts of the connector until they are secured with a retaining ring. Check that the retaining ring is correctly positioned in the groove of the inside of the connector. By moving the hose sideways, check the reliability of the connection and refill the cooling system.
This article is available at russian, bulgarian, belarusian, ukrainian, serbian, croatian, romanian, polish, slovak, hungarian
Article reviewed by editor: Vinogradov Robert
Share information:
Previous
Peugeot 406: Cooling and heating
Next

Technical characteristics of the cooling system
Cooling, heating and ventilation systems
Radiator — removal, inspection and installation
Thermostat — Removal, Checking and Installation
Electric Fan — Removal, Checking and Installation
Thermal sensors — removal, testing and installation
Coolant Temperature High Lamp Sensor
See similar information for other Peugeot models

➨ Cooling system hoses — disconnection and renewal Peugeot 106 (1991-2003)
➨ Cooling system test data (all engines) Peugeot 207 (2006-2014)
➨ Cooling system specification Peugeot 305 (1977-1989)
➨ Cooling system — bleeding Peugeot 605 (1989-2000)
➨ Checking the cooling system Peugeot 806 (1994-2002)
Link to this article in different formats
Comments and feedback from visitors
No comments yet


Add two numbers 33 + 31


Peugeot 406 (1995-2004) 
  • General information
  • User manual
  • Maintenance (gasoline)
  • Maintenance (diesel)
  • Power unit
  • Gasoline engines
  • Diesel engines
  • Engine overhaul
  • Cooling and heating
  • Fuel system (gasoline)
  • Fuel system (diesel)
  • Engine electrical equipment
  • Transmission
  • Clutch and drive shafts
  • Mechanical gearbox
  • Automatic gearbox
  • Chassis, running gear
  • Brake system
  • Car suspension
  • Steering
  • Body and interior
  • Exterior (external elements)
  • Interior (internal elements)
  • Doors, locks and windows
  • Electrical equipment
  • Equipment and devices
  • Electrical circuits
Peugeot 405 (1987-1997) 
  • General information
  • User manual
  • Maintenance
  • Power unit
  • Petrol engines 1.4 l
  • Petrol engines 1.6-2.0 l
  • Diesel engines
  • Ignition system
  • Fuel system (carburetor)
  • Single point fuel injection
  • Multipoint fuel injection
  • Cooling and lubrication system
  • Exhaust system
  • Transmission
  • Clutch
  • Manual gearbox MA
  • Manual gearbox BE
  • Automatic gearbox
  • Drive shafts
  • Chassis, running gear
  • Steering
  • Front suspension
  • Rear suspension
  • Brake system
  • Body and interior
  • Exterior (external elements)
  • Interior (internal elements)
  • Doors, locks and windows
  • Electrical equipment
  • Equipment and devices
  • Electrical circuits
PeugeotBook.ru © 2018–2026 | Mobile version | Sitemap: EN BG BY UA RS HR RO PL SK HU | Write message | Site search | Add to bookmarks | Peugeot owners
106 (1991-2003) | 206 (1998-2012) | 207 (2006-2014) | 305 (1977-1989) | 306 (1993-2002) | 307 (2001-2008) | 405 (1987-1997) | 406 (1995-2004) | 605 (1989-2000) | Partner-I (1996-2008) | Eurovans-807 (2002-2014) | Eurovans-806 (1994-2002) | J5 (1981-1993) |
Cookies are used to ensure the correct display of pages on the site.