
Antifreeze is concentrated ethylene glycol with anti-corrosion additives that prevent freezing and corrosion of the cooling system, and increase the boiling point of the coolant. Therefore, the engine cooling system must be filled with the mentioned aqueous antifreeze solution all year round.
Due to the fact that the content of anti-corrosion additives in the coolant decreases over time, it must be changed as part of vehicle maintenance. The coolant should also be changed when installing new aluminum parts, such as a cylinder head or a water pump.
The system should be filled with antifreeze recommended by the manufacturer, for example, REVKOGEL 2000 or GLYSANTIN G33. The ratio of water and antifreeze must be maintained in a ratio of 1:1. In this case, frost protection is provided at temperatures down to -35°C.
Attention! Antifreeze should be mixed with clean water of drinking or distilled quality.
If during the repair the cylinder head, cylinder head gasket, radiator, heater or engine were replaced, the coolant must in any case be replaced. This is necessary so that the particles of anti-corrosion protection during the running-in period settle on new parts made of light metals and thus form a strong anti-corrosion film. The content of the anti-corrosion agent in the old coolant is no longer sufficient to form a protective layer on new parts.
Routine coolant changes are performed as part of vehicle maintenance.
Attention! The coolant is poisonous. It cannot be poured in random places. To do this, you need to find out where the nearest collection point for special funds is located or to hand over the coolant at a disposal point.
Coolant drain
Vehicles with ES9J4 petrol engine
1. Unscrew the filler cap of the coolant expansion tank.
2. Connect a transparent hose to the drain socket to ensure a more accurate drain of the liquid directly into the substituted container.
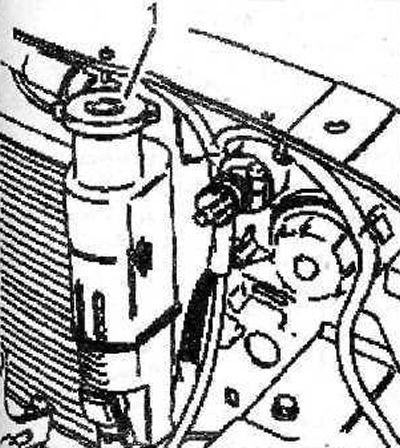
3. Unscrew the drain plug 1 on the radiator (see illustration).
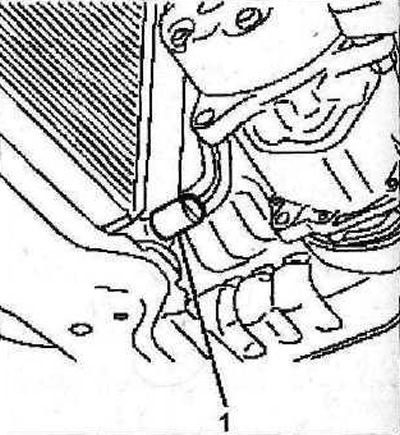
10.3 Unscrew drain plug 1 on the radiator. Vehicles with ES9J4 petrol engine
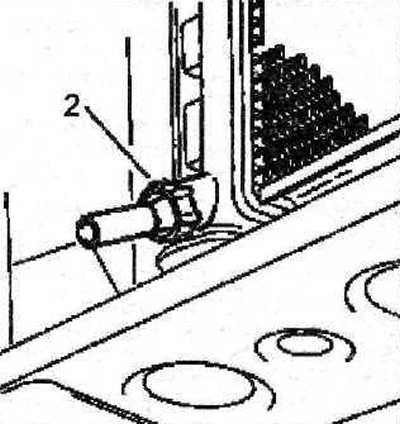
4. Unscrew the plugs 2 and 3 of the ventilation holes (see illustration).
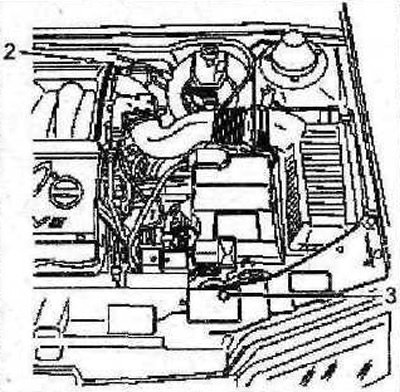
10.4 Unscrew plugs 2 and 3 of the ventilation holes. Vehicles with ES9J4 petrol engine
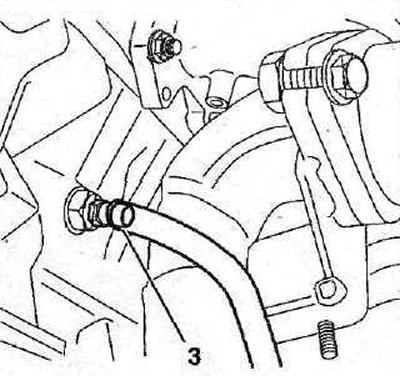
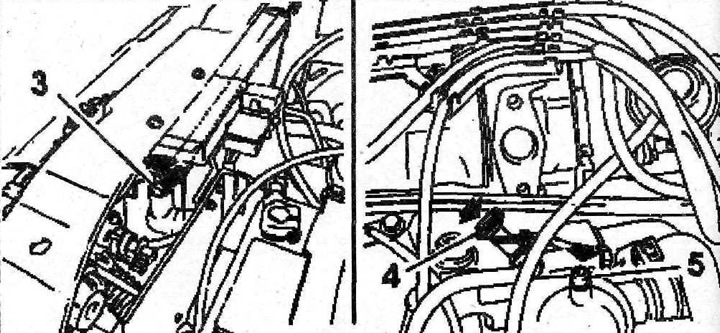
5. Unscrew the vent plug 3 (see illustration).
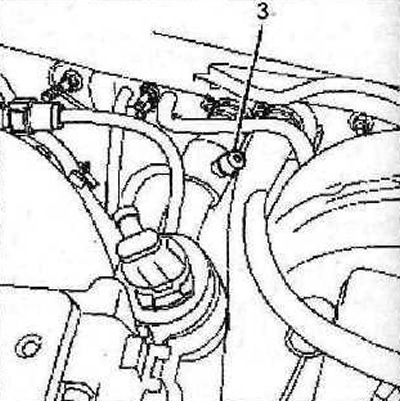
10.5 Remove the breather plug 3. Vehicles with ES9J4 petrol engine
6. Unscrew the plugs of the 4 ventilation holes (see illustration).
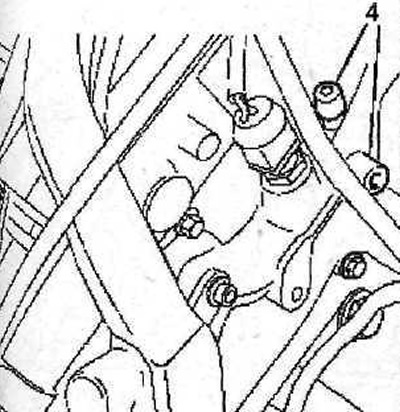
10. 6 Remove the 4 air vent plugs. Vehicles with ES9J4 petrol engine
7. Remove intake manifold 5 (see illustration).
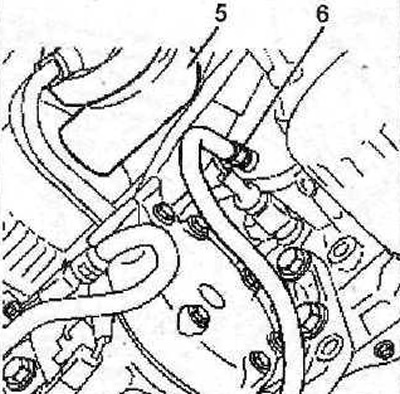
10.7 Remove intake manifold 5. Vehicles with ES9J4 petrol engine
8. Connect a hose to the thermostat drain and drain the engine cooling jacket.
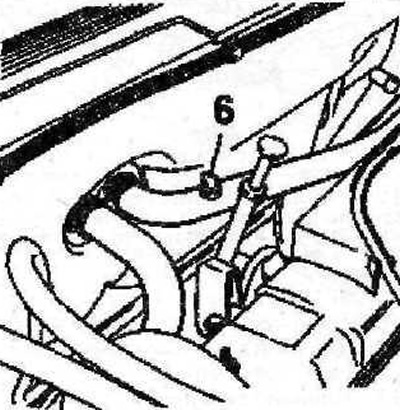
9. Unscrew the hole plug 6 on the cylinder block (see illustration 10.7), connect a transparent hose to it and drain the coolant into a suitable container.
10. Unscrew the hole plug 6 on the cylinder block (see illustration), connect a transparent hose to it and drain the coolant into a suitable container.
10.10 Unscrew the plug of hole 6 on the cylinder block, connect a transparent hose to it and drain the coolant into a suitable container. Vehicles with ES9J4 petrol engine
11. Screw in plugs 1, 6 and 7. Tighten plugs 6 and 7 to 5 Nm.
Vehicles with ZPJ series gasoline engines
12. Unscrew the cap from the coolant expansion tank (see illustration).
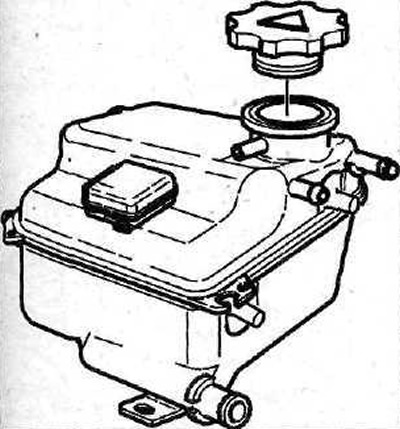
10.12 Unscrew the cap from the coolant expansion tank. Vehicles with ZPJ series gasoline engines
13. Unscrew the drain plug on the radiator (see arrow in illustration) and drain the coolant from the radiator into a suitable container.
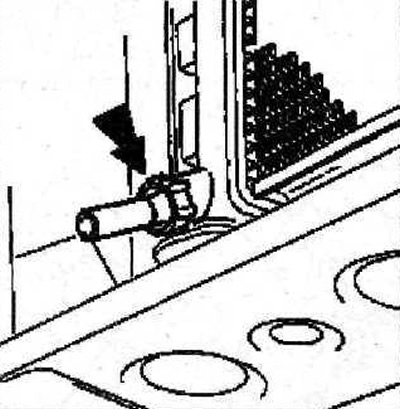
10.13 Unscrew the drain plug on the radiator (see arrow). Vehicles with ZPJ series gasoline engines
14. Unscrew the drain plug on the cylinder block (see arrow in illustration) and drain the coolant.

10.14 Unscrew the drain plug on the cylinder block (see arrow) and drain the coolant. Vehicles with ZPJ series gasoline engines
XU Series Gasoline Vehicles
15. Unscrew cap 1 from the coolant expansion tank (see illustration).
10.15 Unscrew cap 1 from the coolant expansion tank. XU Series Gasoline Vehicles
16. Unscrew the plug 2 of the ventilation hole (see illustration).
10.16 Unscrew plug 2 of the ventilation hole. XU Series Gasoline Vehicles
17. Unscrew plugs 4 and 5, as well as plug 3 (if provided) ventilation holes (see illustration).
10.17 Unscrew plugs 4 and 5 and plug 3 (if provided) ventilation holes. XU Series Gasoline Vehicles
18. Remove plug 6 (see illustration) on the radiator hose and drain the coolant from the radiator
10.18 Remove plug 6 on the radiator hose and drain the coolant from the radiator. XU Series Gasoline Vehicles
19. Unscrew plug 7 (see illustration) and drain the fluid from the cylinder block.

10.19 Unscrew plug 7 and drain the liquid from the cylinder block. XU Series Gasoline Vehicles
Filling the coolant and bleeding the system
Vehicles with ES9J4 petrol engine
Attention! On vehicles with ES9J4 gasoline engine, filling coolant is not a normal filling of liquid into the expansion tank. Some hoses through which the coolant circulates are located above the expansion tank. For this reason, the coolant is filled with a special container to avoid the formation of air pockets in the system.
20. Connect the filling container «A» to the filler neck of the expansion tank (see illustration).
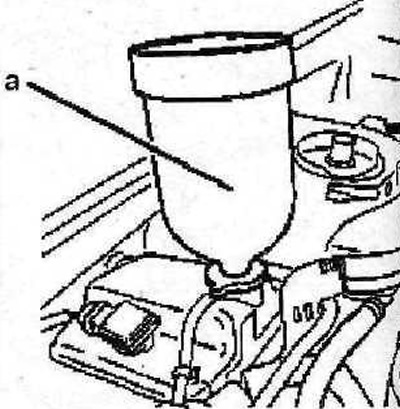
10.20 Connect the filling container «A» to the filler neck of the expansion tank. Vehicles with ES9J4 petrol engine
21. Unscrew the plugs of all ventilation holes.
22. Gently add coolant until it starts to flow out of the vents.
23. Screw in the vent plugs, starting with the one that starts to leak fluid.
Attention! To completely bleed the air from the heater, there must be at least 1 liter of coolant in the filling container.
24. Start the engine.
25. Increase the engine speed and, keeping them within 1500-2000 rpm, wait for the radiator fan to turn on and off. After that, turn off the engine.
26. Remove the coolant refill container.
Attention! The remaining coolant in the container may be hot. Some coolant will leak out, but the system will be filled.
27. Screw a cover on a mouth of a broad tank. Make sure the cap is tightened to the second prong.
Vehicles with ZPJ series gasoline engines
Attention! On cars with gasoline engines of the ZPJ series and XU series, a special filling container is not required to fill the coolant.
28. Fill the coolant into the expansion tank flush with the bottom edge of the filler neck.
29. Screw a cap on a mouth of a broad tank for a cooling liquid.
30. Start the engine and let it idle for about 15 minutes.
31. Stop the engine and let it cool down.
32. Replenish the volume of coolant, screw the cap onto the neck of the expansion tank. Make sure the cap is tightened to the second prong
XU Series Gasoline Vehicles
33. Fill the coolant into the expansion tank flush with the bottom edge of the filler neck.
34. Screw in plugs 2, 3, 4 and 5 as soon as coolant starts to flow out of the respective vent holes.
35. Screw a cap on a mouth of a broad tank for a cooling liquid.
36. Start the engine, increase its speed to 2000 rpm and let it run for about 2 minutes.
37. Replenish the volume of coolant in the expansion tank: the liquid level should reach the lower edge of the filler neck.
38. Screw a cover on a mouth of a broad tank. Make sure the cap is tightened to the second prong.
39. Start the engine and let it run until the radiator fan turns on and off.
40. Stop the engine. Wait approximately 15 minutes.
41. Check the coolant level. Top up the coolant if necessary.