
English Русский
Български
Беларускі
Український
Српски
Hrvatski
Română
Polski
Slovenský
Magyar
Bookmark Articles Sitemap Contacts
Company Hyundai Company Opel Company Skoda Company Kia Company Mitsubishi Company LADA Company Audi
PeugeotBook.ru


Series 100   Series 200   Series 300   400-500   Series 600   Crossovers   Others
 
Partner I (1996-2008) Peugeot 807 (2002-2014) Peugeot 806 (1994-2002) Peugeot J5 (1981-1993)

Windshield wiper — removal and installation (Peugeot Eurovans 807)

  • Main
  • Пежо
  • Peugeot 807 (2002-2014)
  • Electrical equipment
  • Power devices
  • Windshield wiper — removal and installation
0
After about six months of use, the rubber strip of the windshield wiper blade wears out and does not always provide sufficient cleaning of the glass. In this case, there are two options for replacing the brushes. The brushes can be replaced with new ones as a set, or you can replace only the rubber strip and then install the brush with the new strip on the wiper arm.

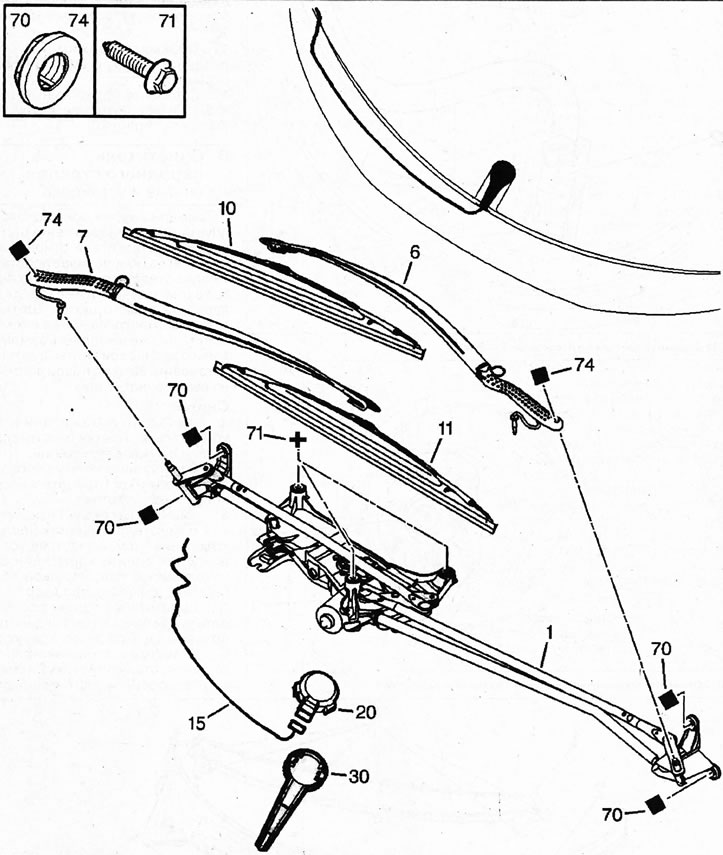
6.0. Windshield wiper 1 - wiper rods and electric motor; 6 - brush holder; 7 - brush holder; 10 -…

6.0. Windshield wiper 1 - wiper rods and electric motor; 6 - brush holder; 7 - brush holder; 10 - brush; 11 - brush; 15 - rain sensor wire; 20 - rain sensor; 30 - rain sensor cap; 70, 71 - wiper mechanism fastening nut; 74 - brush holder mounting bolt
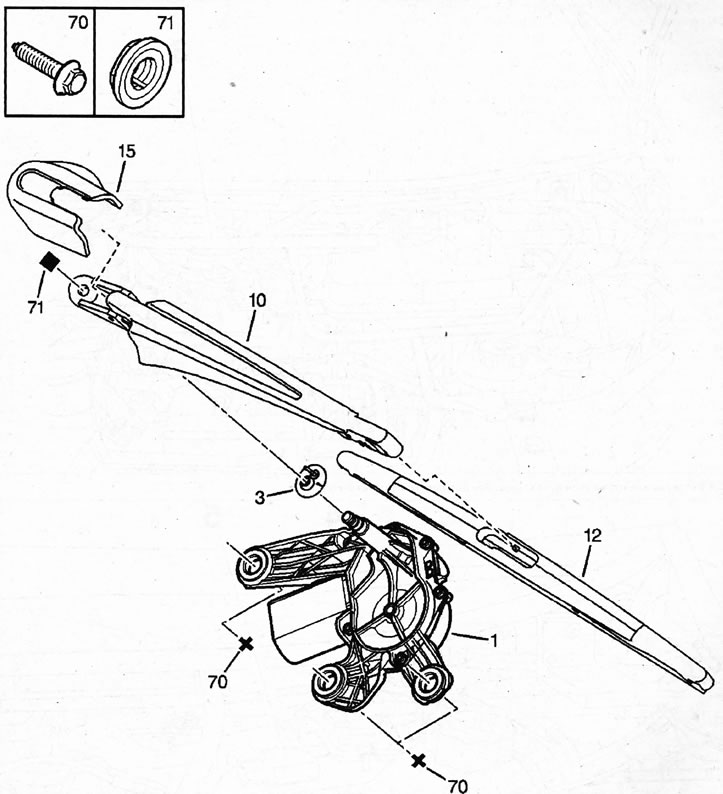

6.0a. Rear window wiper 1 - wiper motor;3 - axle sealing gasket;10 - lever; 12- brush; 15 - washer…

6.0a. Rear window wiper 1 - wiper motor;3 - axle sealing gasket;10 - lever; 12- brush; 15 - washer nozzle cap;70 - bolt M6x100-30 for fastening the electric motor; 71 - nut securing the wiper arm to the axle


Removal


1. Turn off the ignition and make sure the wiper blades are in the correct position.

2. Disconnect the negative (-) battery terminal from the battery.

3. Remove cover 1 and grille 2 of the fairing by unscrewing the mounting bolts A (see illustration).
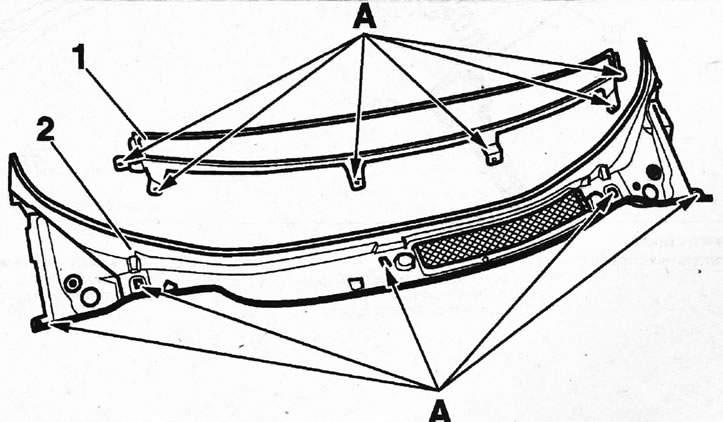
6.3. Remove cover 1 and grille 2 of the fairing by unscrewing the mounting bolts A

6.3. Remove cover 1 and grille 2 of the fairing by unscrewing the mounting bolts A


4. Disconnect bracket 3 located under the fairing grille (see illustration).
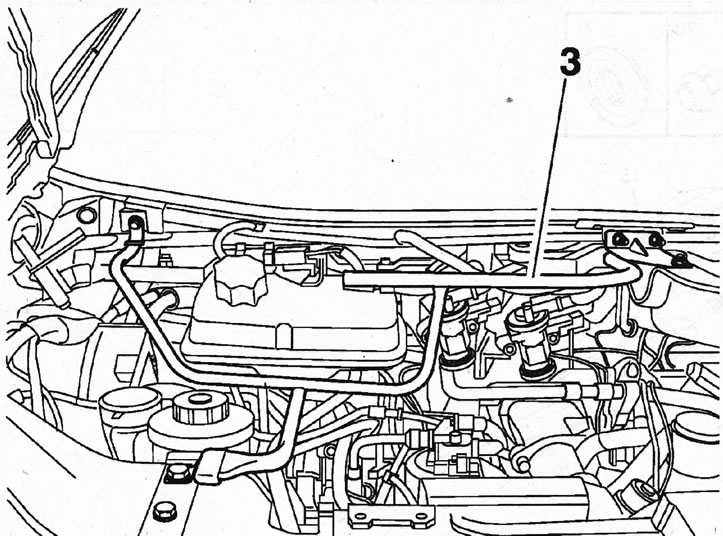
6.4. Disconnect bracket 3 located under the fairing grille

6.4. Disconnect bracket 3 located under the fairing grille


5. Move expansion tank 6 to the side and disconnect plugs 4 and 5 (see illustration).
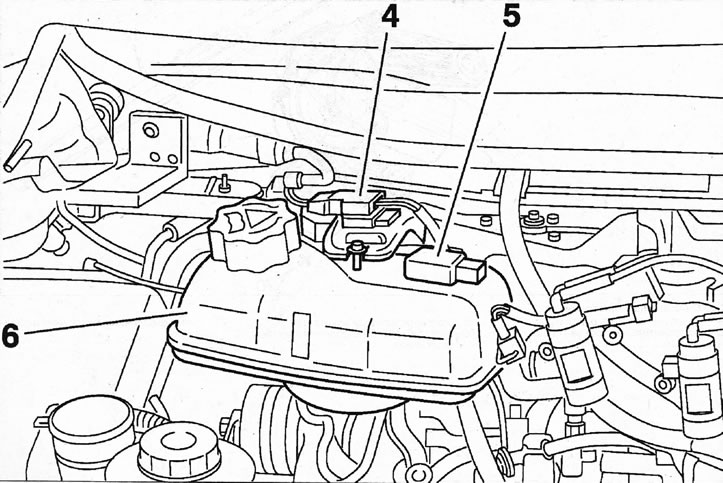
6.5. Move expansion tank 6 to the side and disconnect plugs 4 and 5

6.5. Move expansion tank 6 to the side and disconnect plugs 4 and 5


6. Move brush holder 1 away from the glass, unscrew nut 2 and remove it from the axis (see illustration).
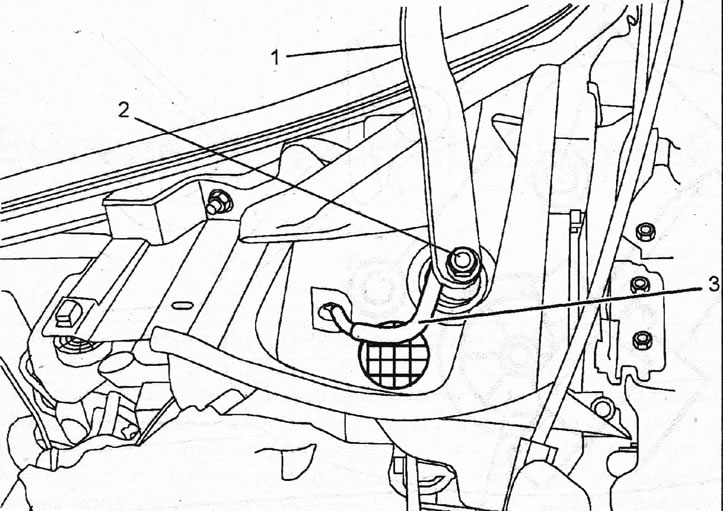
6.6. Move brush holder 1 away from the glass, unscrew nut 2 and remove it from the axis

6.6. Move brush holder 1 away from the glass, unscrew nut 2 and remove it from the axis


When doing this, be careful not to hit the glass with the lever. The lever is usually tightly fitted, so loosen the lever by rocking it from side to side.

7. Move the noise-insulating gasket to the side and disconnect the hose 3 for supplying the washing liquid (see illustration 6.6).

8. Disconnect holders 7 and 8 (see illustration).
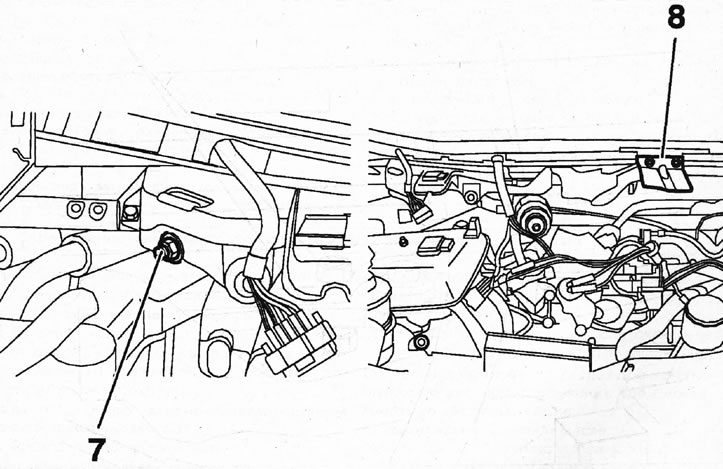
6.8. Disconnect holders 7 and 8

6.8. Disconnect holders 7 and 8


9. Unscrew the three nuts 7, remove the bolts 1 and remove the glass wiper mechanism together with the electric motor 2 (see illustration).
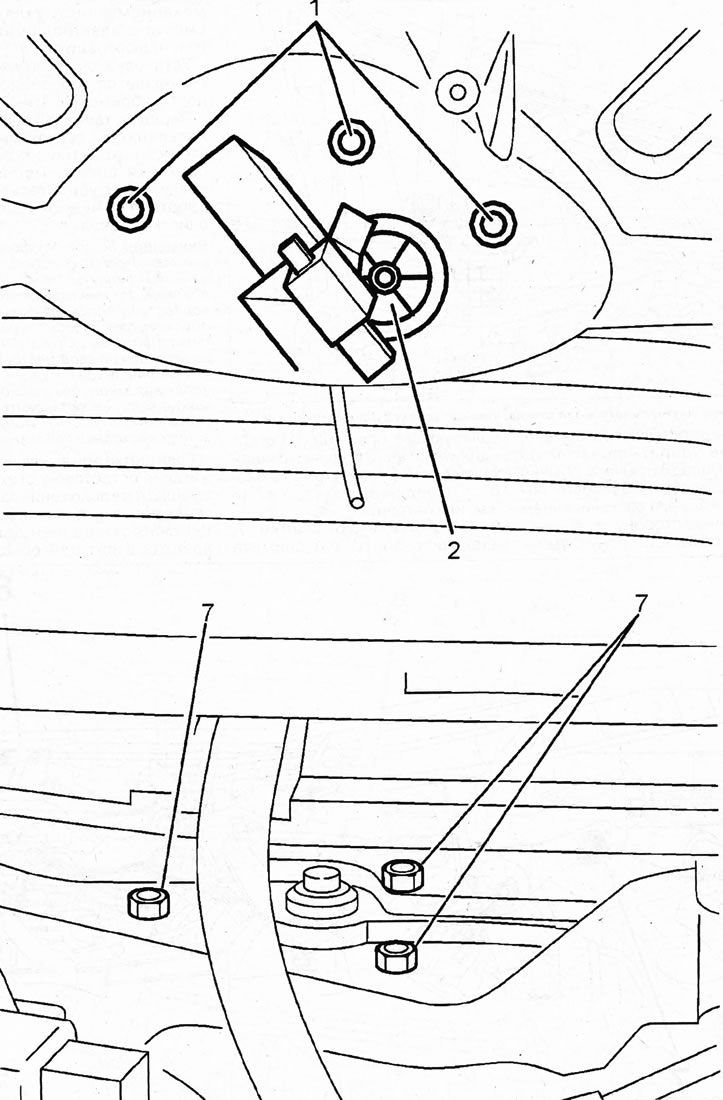
6.9. Unscrew the three nuts 7, remove the bolts 1 and remove the glass wiper mechanism together…

6.9. Unscrew the three nuts 7, remove the bolts 1 and remove the glass wiper mechanism together with the electric motor 2


The installation of the glass wiper is carried out in the reverse order of removal.

Before installing the brush holder on the axle, make sure that the axle is in the brush parking position. After installing the wipers, make sure they work along the desired glass cleaning path.

Caution! If the windshield wiper arm fails to return to its original position during heavy snowfall, the drive motor remains energized and its winding may "break down" if the wiper does not return to its original position after a short period of time. If such a situation occurs, you should, observing safety precautions, stop as quickly as possible and move the wipers away from the glass so that the levers return to their original position.


If the wiper blade remains on the glass when the ignition is turned off and does not move to the parking position, this is not a sign of a defect. Turn on the ignition and the brush will return to its original position.
This article is available at russian, bulgarian, belarusian, ukrainian, serbian, croatian, romanian, polish, slovak, hungarian
Article reviewed by editor: Vinogradov Robert
Share information:
Previous
Peugeot 807: Power devices
Next

Lighting — Removing and installing light bulbs
Generator — inspection, removal and installation
Starter — removal, disassembly, inspection and installation
Battery — Checking
Electrical system — general description
 
See similar information for other Peugeot models

➨ Wiper blades Peugeot 106 (1991-2003)
➨ Diagnostics of the windshield wiper and washer control system Peugeot 207 (2006-2014)
➨ Windshield wiper blades — removal and installation Peugeot 305 (1977-1989)
➨ Windshield wiper Peugeot 406 (1995-2004)
➨ Identifying and troubleshooting windshield wiper problems Peugeot 605 (1989-2000)
Link to this article in different formats
Comments and feedback from visitors
No comments yet


Add two numbers 49 + 21


Partner I (1996-2008) 
  • General information
  • Introduction to the guide
  • Faults en route
  • Weekly checks
  • User manual
  • Maintenance (petrol)
  • Maintenance (diesel)
  • Power unit
  • Petrol engines
  • Diesel engines «XUD»
  • Diesel engines «DW»
  • Overhaul of petrol engines
  • Overhaul of diesel engines
  • Cooling and heating
  • Power and exhaust (petrol)
  • Power and exhaust (XUD diesels)
  • Power and exhaust (DW diesels)
  • Emission reduction
  • Starting and charging system
  • Transmission
  • Clutch
  • Mechanical gearbox
  • Drive shafts
  • Chassis, running gear
  • Brake system
  • Car suspension
  • Steering
  • Body and interior
  • Exterior (external elements)
  • Interior (internal elements)
  • Doors, locks and windows
  • Electrical equipment
  • Equipment and devices
  • Electrical circuits
Peugeot 807 (2002-2014) 
  • General information
  • Operating instructions
  • Maintenance
  • Troubleshooting
  • Power unit
  • Gasoline engines
  • Diesel engines
  • Cooling and heating
  • Fuel injection (petrol)
  • Fuel system (diesel)
  • Fuel system
  • Exhaust system
  • Ignition system
  • Transmission
  • Clutch
  • Manual gearbox
  • Automatic gearbox
  • Chassis, running gear
  • Brake system
  • Car suspension
  • Steering system
  • Body and interior
  • Exterior (external elements)
  • Interior (internal elements)
  • Electrical equipment
  • Power devices
  • Electrical circuits
Peugeot 806 (1994-2002) 
  • General information
  • User manual
  • Maintenance
  • Power unit
  • Petrol engines
  • Diesel engines
  • Lubrication system
  • Cooling system
  • Fuel injection (petrol)
  • Fuel system (diesel)
  • Ignition and exhaust systems
  • ECM Bosch Motronic MP 3.2
  • ECM Magneti-Marelli (MM)
  • Transmission
  • Clutch
  • Mechanical gearbox
  • Chassis, running gear
  • Brake system
  • Car suspension
  • Steering
  • Electrical equipment
  • Equipment and devices
  • Electrical circuits
Peugeot J5 (1981-1993) 
  • General information
  • Introduction to manual
  • Specifications
  • Gasoline engine
  • Engine repair
  • Lubrication system
  • Cooling system
  • Fuel system
  • Ignition system
  • Diesel engine
  • Engine repair (DB9)
  • Lubrication system (DB9)
  • Cooling system (DB9)
  • Fuel injection (DB9)
  • Engine repair (U25)
  • Lubrication system (U25)
  • Cooling system (U25)
  • Fuel injection (U25)
  • Transmission
  • Clutch
  • Gearbox
  • Drive shafts
  • Chassis, running gear
  • Steering system
  • Car suspension
  • Brake system
  • Electrical equipment
  • Power devices
  • Electrical circuits
PeugeotBook.ru © 2018–2026 | Mobile version | Sitemap: EN BG BY UA RS HR RO PL SK HU | Write message | Site search | Add to bookmarks | Peugeot owners
106 (1991-2003) | 206 (1998-2012) | 207 (2006-2014) | 305 (1977-1989) | 306 (1993-2002) | 307 (2001-2008) | 405 (1987-1997) | 406 (1995-2004) | 605 (1989-2000) | Partner-I (1996-2008) | Eurovans-807 (2002-2014) | Eurovans-806 (1994-2002) | J5 (1981-1993) |
Cookies are used to ensure the correct display of pages on the site.