



Table of contents: Removal 🠇 Installation 🠇
The automatic transmission is removed from underneath the vehicle.
Removal
1. Remove the battery and its holder.
2. Remove the air filter and its bracket.
3. Disconnect electrical connections, lines and cables connected to the automatic transmission.
4. Disconnect the automatic transmission shift control cable near the ball joint.
5. On each side of the vehicle, unscrew the bolts securing the stabilizer bar connectors to the suspension arms (the car must stand on wheels).
6. Place the vehicle on a lift or place the front of the vehicle on stands and remove the wheels.
7. Remove both drive shafts.
8. Remove the end sheet of the hydrokinetic transmission housing.
9. Unscrew the three bolts securing the hydrokinetic transmission to the drive disk (you should gradually turn the disk in such a way that you can access the hidden bolts).
10. Unscrew the nut securing the oil level indicator guide to the oil pan.
11. Unscrew the three starter mounting bolts, but do not remove them.
12. Hook the drive system with an automatic transmission to the hoist in such a way as to remove the load from the metal-rubber support element.
13. Separate the axle of the support of the drive system with an automatic transmission from the metal-rubber element. Remove the metal-rubber element.
14. Install a special support frame (tool 0911 A1–AZ) on the vehicle in such a way as to support the engine.
15. Lower the drive system as far as possible so that the automatic transmission is under the vehicle.
16. Unscrew the bolts securing the automatic transmission to the engine.
17. Separate the automatic transmission from the engine and install the flange (fixture 0315 A), fixing the hydrokinetic transmission.
18. Remove the automatic transmission from under the vehicle.
Installation of hydrokinetic transmission in the gearbox housing
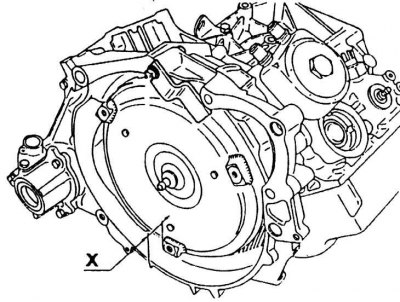
X = 7 mm – protrusion
Installation
1. The steps should be performed in reverse order to the removal process, observing the following instructions.
2. Before installation, make sure that the hydrokinetic transmission centering washer is in the crankshaft. This washer should be lubricated.
3. Check the position of the hydrokinetic transmission (the X dimension must be at least 7 mm).
4. Replace all self-locking nuts, elastic pads, seals and O-rings.
5. The appropriate tightening torques for the fastening elements must be observed.
6. After installation, it is necessary to fill in oil (maintaining the required level) into the automatic transmission and remove air from the cooling system.
7. Adjust the gear shift control.