
English Русский
Български
Беларускі
Український
Српски
Hrvatski
Română
Polski
Slovenský
Magyar
Bookmark Articles Sitemap Contacts
Company Hyundai Company Opel Company Skoda Company Kia Company Mitsubishi Company LADA Company Audi
PeugeotBook.ru


Series 100   Series 200   Series 300   400-500   Series 600   Crossovers   Others
 
Peugeot 605 (1989-2000)

Headlights — removal and installation (Peugeot 605)

  • Main
  • 60X
  • Peugeot 605 (1989-2000)
  • Electrical equipment
  • Power devices
  • Headlights — removal and installation
0
Table of contents: Headlights 🠇 Direction indicators and side…🠇 Rear headlights 🠇

Headlights


Removal


1. Open the hood and disconnect the negative (-) battery cable terminal.

2. Unscrew the bolts 1 and remove the logo A by pressing it with a flat screwdriver (see illustration).
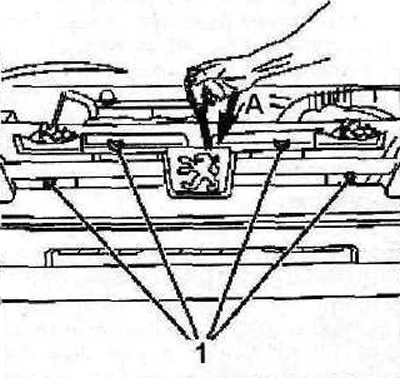
5.2 Unscrew the bolts 1 and remove the logo A by pressing it with a flat screwdriver

5.2 Unscrew the bolts 1 and remove the logo A by pressing it with a flat screwdriver


3. Remove the radiator grille. Unscrew bolt 2 and disconnect holder 3 (see illustration).
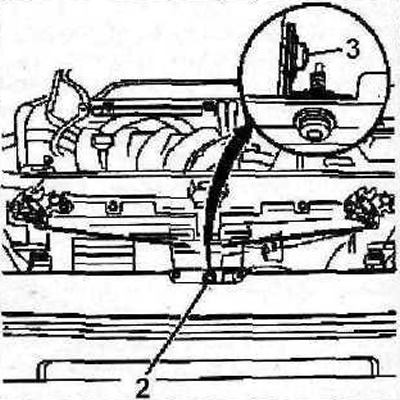
5.3 Unscrew bolt 2 and detach holder 3

5.3 Unscrew bolt 2 and detach holder 3


4. Remove the covers 4 under the headlights and the holders 5 from both sides of the car (see illustration).
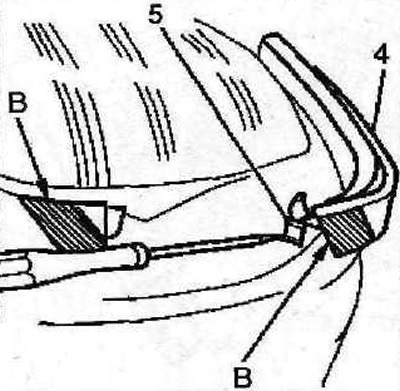
5.4 Remove the headlight covers 4 and holders 5 from both sides of the vehicle

5.4 Remove the headlight covers 4 and holders 5 from both sides of the vehicle


Attention! To avoid damaging the pads, tape them at points B (see illustration 5.4).


5. Unscrew nuts 6, move headlight 7 forward and disconnect the plugs on its rear side (see illustration).
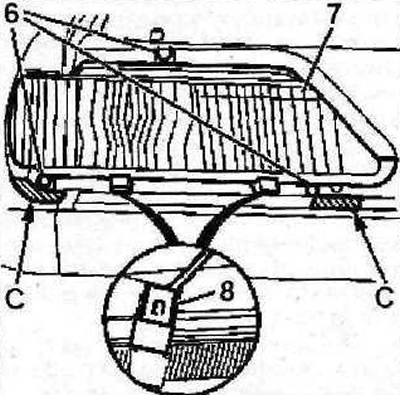
5.5 Unscrew nuts 6, move headlight 7 forward and disconnect the plugs on its rear side

5.5 Unscrew nuts 6, move headlight 7 forward and disconnect the plugs on its rear side


6. Press the clamps 8 with a screwdriver and remove the headlight (see illustration 5.5),

Attention! It is recommended to cover the chrome trims with tape to avoid damage or cover them with a rag.


Installation


7. Adjust the distance D on the headlight mounting pins by unscrewing the nuts. The distance D should be 10 mm (see illustration).

(Material copied from the resource www.PeugeotBook.ru)
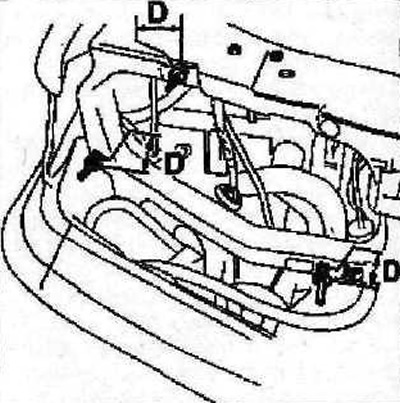
5.7 Adjust the distance D on the headlight mounting pins by unscrewing the nuts

5.7 Adjust the distance D on the headlight mounting pins by unscrewing the nuts


8. Connect the plugs to the headlight, install the headlight on the threaded pins and tighten the nuts.


9. Install the pads around the headlight without securing them with holders and adjust the gaps. The width of the gap E should be 7 mm, F - 0 mm, G and H - 2 mm (see illustration).
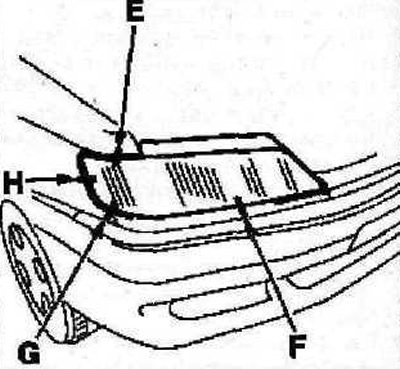
5.9 Install the covers around the headlight without securing them with holders and adjust the gaps…

5.9 Install the covers around the headlight without securing them with holders and adjust the gaps E, F, G and H


10. Install the holders by screwing in the mounting bolt.

Direction indicators and side repeaters


Attention! If the car is equipped with fog lights, they are located near the direction indicators. To access the direction indicators/fog lights, you need to remove the cover by unscrewing four screws (see arrows in illustration 5.0a) and the front part of the fender liner. To remove the bulb, you need to press the clamp.
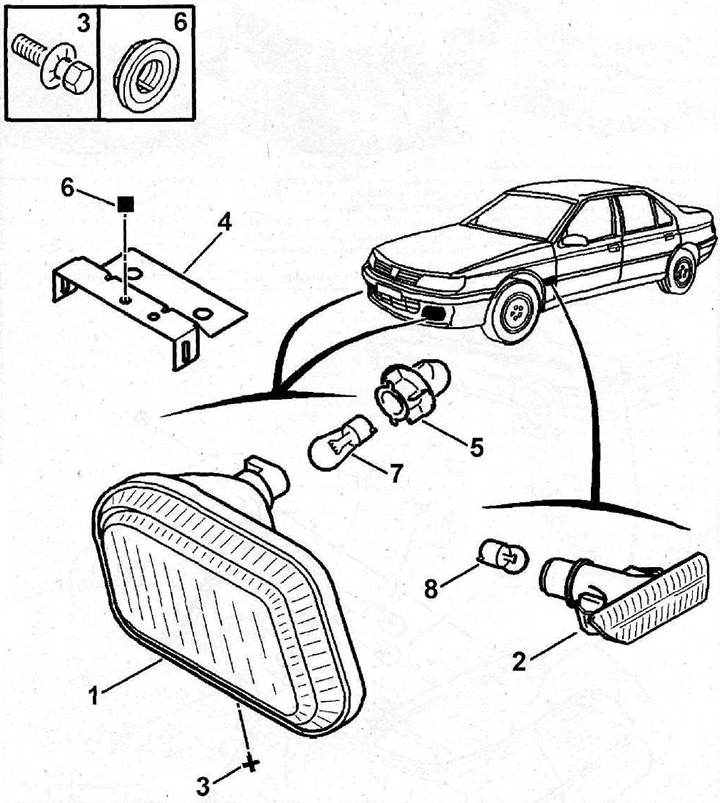

5.0 Direction indicators and side repeaters

5.0 Direction indicators and side repeaters
1 - direction indicator
2 - side turn signal repeater
3 - mounting bolt
4 - bracket
5 - bulb socket
6 - nut
7 - direction indicator bulb PY21W
8 - repeater bulb W5W
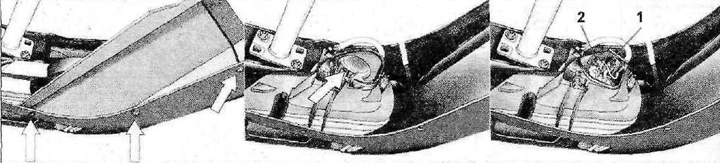

5.0a Unscrew by unscrewing four screws (see arrows), remove the front part of the fender liner and…

5.0a Unscrew by unscrewing four screws (see arrows), remove the front part of the fender liner and take out the bulb by pressing the clamp
1 - direction indicator light
2 - fog light bulb


Rear headlights


11. Open the trunk lid and remove the cover that covers the corresponding headlight in the trunk.

12. Squeeze the tabs that hold the bulb holder B in the headlight and remove it (see illustration).
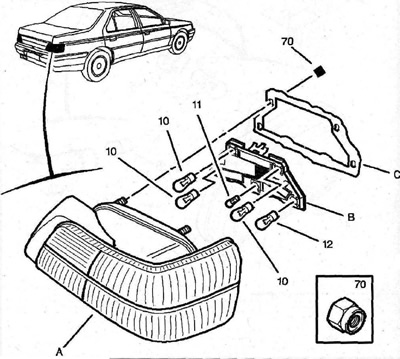
5.12 Squeeze the leashes that hold the bulb holder B in the headlight and remove it

5.12 Squeeze the leashes that hold the bulb holder B in the headlight and remove it
A - diffuser
10-12 - light bulbs
C - seal
70 - diffuser mounting nut


13. Remove the burnt-out bulb from the holder and replace it with a new one (see illustration).
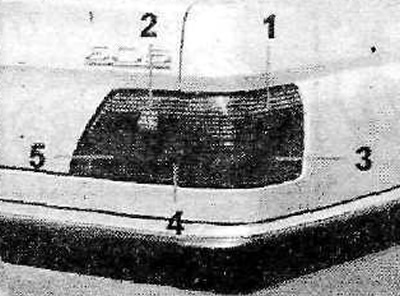
5.13 Remove the burnt-out bulb from the holder and replace it with a new one

5.13 Remove the burnt-out bulb from the holder and replace it with a new one
1 - direction indicator light
2 - reversing light bulb
3 - brake light/parking lamp
4 - clearance light
5 - rear fog light bulb
This article is available at russian, bulgarian, belarusian, ukrainian, serbian, croatian, romanian, polish, slovak, hungarian
Article reviewed by editor: Nikonova Veronica
Share information:
Previous
Peugeot 605: Power devices
Next

Generator — removal
Generator — check
Generator — device
Starter — removal and installation
Battery capacity — check
Windscreen wiper — removal and installation
Battery tray — removal and installation
Instrument cluster — removal and installation
Ignition System — General Information and Precautions
Spark plugs — general information
See similar information for other Peugeot models

➨ Controlled headlights Peugeot 207 (2006-2014)
➨ Headlights — removal, replacement of bulbs and installation Peugeot 305 (1977-1989)
➨ Headlights and direction indicators — removal and installation Peugeot 405 (1987-1997)
➨ Peugeot Partner: Diagram 3. Fog lights, brake lights, side… Peugeot Partner I (1996-2008)
Link to this article in different formats
Comments and feedback from visitors
No comments yet


Add two numbers 45 + 43


Peugeot 605 (1989-2000) 
  • General information
  • User manual
  • Maintenance
  • Troubleshooting
  • Power unit
  • Petrol engines «XU»
  • Petrol engines «ZPJ»
  • Petrol engines «ES9J4»
  • Diesel engines
  • Cooling and heating
  • Fuel system
  • Exhaust system
  • Transmission
  • Clutch
  • Mechanical gearbox
  • Automatic gearbox
  • Chassis, running gear
  • Brake system
  • Car suspension
  • Steering
  • Body and interior
  • Body elements
  • Electrical equipment
  • Power devices
  • Electrical circuits
PeugeotBook.ru © 2018–2026 | Mobile version | Sitemap: EN BG BY UA RS HR RO PL SK HU | Write message | Site search | Add to bookmarks | Peugeot owners
106 (1991-2003) | 206 (1998-2012) | 207 (2006-2014) | 305 (1977-1989) | 306 (1993-2002) | 307 (2001-2008) | 405 (1987-1997) | 406 (1995-2004) | 605 (1989-2000) | Partner-I (1996-2008) | Eurovans-807 (2002-2014) | Eurovans-806 (1994-2002) | J5 (1981-1993) |
Cookies are used to ensure the correct display of pages on the site.