
- protect the rear seats and luggage compartment;
Note. Four top and bottom spacers, a center top spacer and three flared rivets should be supplied with a new rear window.
- remove the inner upholstery of the tailgate;
- remove the wiper motor;
- remove the wiper axle support;
- remove the rear shelf;
- remove the center top trim panel of the tailgate;
- remove the upper side panels of the tailgate upholstery;
- disconnect the wires from the electric glass heater;

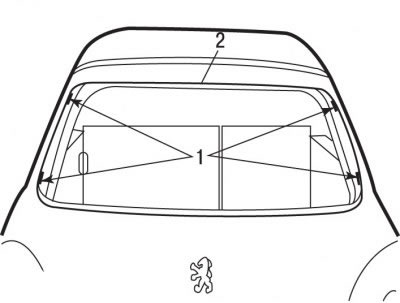
Pic. 10.58. Shila venue (1) and the direction of cutting off the adhesive layer when removing the rear window
- swipe awl 1 (pic. 10.58) through a layer of glue in the direction from the inside to the outside at the level of the ball joint of the left gas-filled rack;
- insert the split string into the awl and draw it inward about 50 cm;
- insert a split string into a special device with a coil and secure it;
- pass the split string under the rear window in the direction from left to right (clockwise);
Attention! When cutting out the layer of glue, make sure that the string does not touch the beveled edge of the glass.
- pass the awl through the layer of glue in the direction from the inside to the outside at the level of the ball joint of the right gas-filled rack;
- insert the split string into the awl and pass it inside;
- fix the end of the string on the support of the right gas-filled rack;
- start cutting the adhesive from the bottom of the rear window. In the absence of a special device with a coil, the split string can be pulled by hand, having previously protected the hands from being cut by the string;
- as soon as the string stops moving, move the devices with the coil so as to ensure that the glue is cut sequentially and clockwise when looking at the rear window from inside the car;
- continue cutting until all of the adhesive from the bottom of the rear window has been cut off;
- pass the awl through the layer of glue in the direction from the inside to the outside at the level of the ball joint of the right gas-filled rack;
- insert the split string into the awl and draw it inward about 50 cm;
- insert a split string into a special device with a coil and secure it;
- pass the split string under the rear window from right to left;
- pass the awl through the layer of glue in the direction from the inside to the outside at the level of the ball joint of the left gas-filled rack;
- insert the split string into the awl and pass it inside;
- fix the end of the string on the support of the left gas-filled rack;
- start cutting the adhesive from the top of the rear window. In the absence of a special device with a coil, the split string can be pulled by hand, having previously protected the hands from being cut by the string;
- as soon as the string stops moving, move the spool fixtures so as to ensure consistent cutting of the glue;
- continue cutting until all of the adhesive from the top of the rear window has been cut off;
- Using suction cups, remove the rear window from the car.
To prepare the rear window for gluing, do the following:
- in the case of reusing undamaged glass, cut off the remains of glue and sealant from the glass and the edge of the opening in the body with an electric knife;
- do not completely remove adhesive and sealant residues. These residues serve as a soft support during installation, and also improve adhesion to the surfaces of the new adhesive and sealant;
Attention! Do not apply primary adhesive to the bonding surface and do not treat it with a solvent cleaner.
- when installing new glass, clean the adhesive area around the entire perimeter of the glass with the glass cleaner supplied with the bonding kit;
- Apply the first layer of glass adhesive selected from the bonding kit. Drying time is 10 minutes;
- if the glass opening was coated with an anti-corrosion compound or replaced, it is necessary to restore the paintwork and, if necessary, perform anti-corrosion treatment operations;
- first clean the anti-corrosion treated area with a solvent cleaner selected from the bonding kit, and then apply a primary metal adhesive to it.
Note. Drying time is 10 minutes.
To prepare the door opening for gluing, do the following:
Pic. 10.59. Top and bottom installation locations (1) and center top (2) tailgate seals
- install the four top and bottom spacers 1 (pic. 10.59) on the tailgate;
- install the central upper gasket 2 on the tailgate;
- place the glass against the opening of the tailgate. Two people are required to attach and adjust the position of the tailgate glass;
- First of all, align the glass to the height of the tailgate and corners;
- stick adhesive tape stickers on the top and sides of the glass, which will serve as marks during the final installation of the glass;
- cut the labels from the adhesive tape and remove the rear window.
To install the rear window:
- fill the extruding gun with a set of two-component mastic;
- install the nozzle tip that is in the gluing kit;
- cut off the tip of the tapered tip at 8 mm in diameter at a height of 12 mm using a special clip for cutting tapered nozzles;
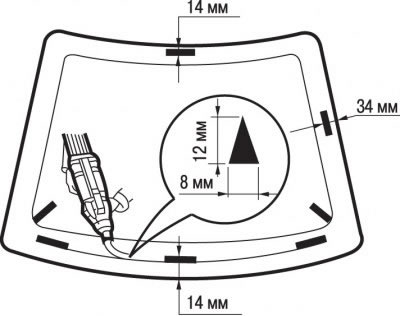
Pic. 10.60. Distances from rear window edge for adhesive application
- apply a layer of adhesive around the perimeter of the rear window so that it is located at the top and bottom of the glass at a distance of 14 mm from the edge, and on the sides at a distance of 34 mm (pic. 10.60);
Attention! The time interval between the application of mastic on the glass and its installation on the car should not exceed 8 minutes (for quick-setting mastics).
- using grips with suction cups, attach the glass to the doorway, aligning the marks in the form of adhesive tapes;
- constantly press the glass with suction cups;
- Allow the adhesive to dry depending on the adhesive kit used.
Further installation is carried out in the reverse order of removal, taking into account the following:
- check the operation of electrical equipment;
- check the tightness of the windshield seal;
- wipe the glass.