
Note. Two lower gaskets should be supplied with a new windshield.
To remove the windshield:
- remove the interior rear view mirror;
- remove the upholstery of the front pillar;
- remove the sun visors;
- remove the ceiling handles;
- remove the ceiling console;
- remove the decorative elements of the ceiling trim;
- between the ceiling and the roof, install two spacers so as to slightly lower the front of the headlining;
- remove the wiper blades and arms;

Pic. 8.2. Bolt location (2) compensation tank fasteners (1)
- remove two screws 2 (see fig. 8.2) fasteners and take aside the compensation tank with brake fluid;
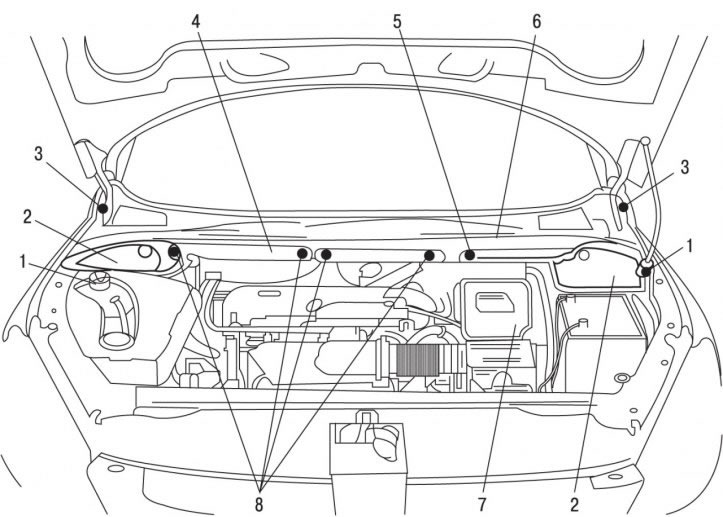
Pic. 9.32. Panel grille in front of the windshield: 1 - bolts; 2 - side soundproof coatings; 3 - clamps; 4 - soundproof coating; 5 - cross member; 6 - lattice; 7 - battery support; 8 - clamps
- remove bolts 1 (see fig. 9.32) and remove the cross member 5 from the bottom of the windshield opening;
- remove the fasteners 3 fastening the grille of the panel in front of the windshield;
- remove the grille 6 of the panel in front of the windshield;
Pic. 10.52. Removing windshield profiles: 1 - profiles; 2 - an awl when punching a layer of glue; 3 - bolt for fastening the string; 4 - adhesive tape for glass protection
- remove profiles 1 (pic. 10.52) at the bottom of the windshield;
- fasten one end of the cutting string to bolt 3;
- stick adhesive tape 4 on both sides of the windshield to protect the glass;
- from the car interior in the lower corner of the windshield with an awl 2, pierce the layer of glue with which the glass is glued;

Pic. 10.53. Conducting a split string (1) under the seal (2) windshield
- pass split string 1 (pic. 10.53) under the seal 2 of the windshield, starting from the lower left corner and then along the perimeter in a counterclockwise direction;
- insert the second end of the split string into the awl and draw it inward, about 50 cm;
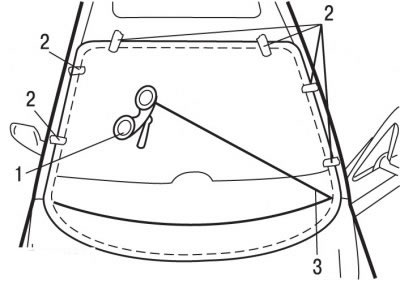
Pic. 10.54. Installing adhesive tapes: 1 - special device (1) with coil; 2 - sticky tapes; 3 - split string
- when reusing the windshield, stick adhesive tapes 2 (pic. 10.54), which serve as marks when reinstalling. Cut the adhesive tapes along the edge of the windshield;
- when pulling the split string, make sure that the string is correctly installed under the windshield seal and under the windshield;
- fix the second end of the split string 3 in a special tool 1 with a spool;
- install a special tool or a flat wooden wedge between the cut string and the instrument panel to protect it when cutting off the glue at the bottom of the windshield;
- start cutting the adhesive from the bottom of the windshield. In the absence of a special device with a coil, the split string can be pulled by hand, having previously protected the hands from being cut by the string;
- as soon as the string stops moving, move the spool tools so as to ensure that the glue is cut sequentially and clockwise, when looking at the windshield from outside the car;
Attention! Cutting off the adhesive in this area requires special attention as the bottom of the windshield is held in place by two layers of adhesive. Therefore, special care must be taken not to break the split string.
- continue cutting until the entire layer of glue is cut off;
- Using suction cups, remove the windshield from the car.
Attention! If the windshield is replaced, install a new rain sensor. Protect your dashboard and car interior. If you are reusing undamaged glass, use an electric cutter to cut off the remaining adhesive and sealant from the glass and the edge of the opening in the body. Do not completely remove adhesive and sealant residues. These residues provide soft support during installation and improve adhesion to new adhesive and sealant surfaces.
To install the windshield:
- clean the adhesive area around the entire perimeter of the glass with the glass cleaner supplied with the bonding kit;
- Apply the first layer of glass adhesive selected from the bonding kit to the glass. Drying time is 10 minutes;
- if the glass opening was coated with an anti-corrosion compound or replaced, restore the paintwork and, if necessary, perform anti-corrosion treatment operations;
- First of all, clean the anti-corrosion-coated area of the glass opening with a solvent-cleaner selected from the bonding kit, and then apply a primary metal adhesive to it. Drying time is 10 minutes;
- apply the primary components of the adhesive to the glass, choosing them from the gluing kit;
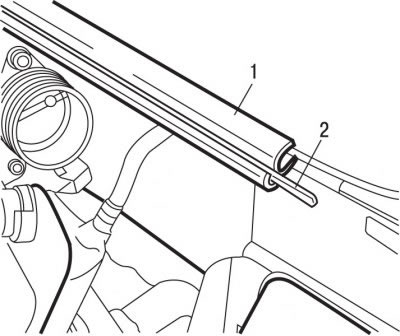
Pic. 10.55. The location of the plastic molding (2) in profile (1) windshield
- in case of removing the windshield, reinstall the profiles at the bottom of the glass, making sure that the marks on the windshield are correctly positioned. Lift plastic moldings 2 profiles 1 (pic. 10.55);
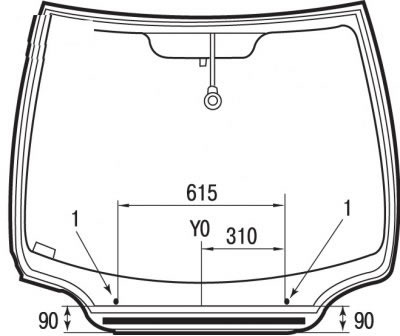
Pic. 10.56. Dimensions for installing gaskets (1) on the windshield: Y0 - axis of symmetry of the windshield
- install two gaskets 1 (pic. 10.56) at a distance of 90 mm from the lower central profile and at a distance of 310 mm on both sides of the Y0 symmetry axis of the windshield;
- fill the extruding gun with a set of two-component mastic;
- install the nozzle tip that is in the gluing kit;
- cut the tip of the tapered tip at 8 mm in diameter at a height of 12 mm using a special clip for cutting tapered nozzles;
Attention! The adhesive layer must never touch the windshield seal.
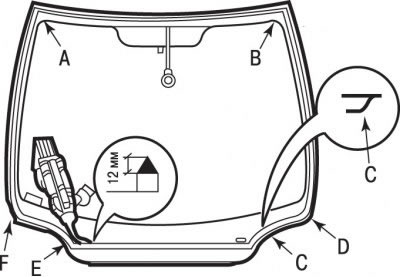
Pic. 10.57. Checkpoints (A, B, C, D, E, F) for applying glue to the windshield
- apply a layer of glue as follows (pic. 10.57):
- from point A to point B at a distance of 14 mm from the edge of the windshield;
- from point B to point D at a distance of 14 mm from the edge of the windshield;
- from point D to point C at a distance of 2 mm from the bottom profile of the windshield;
- from point C to point E at a distance of 77 mm from the bottom profile of the windshield;
- from point E to point F at a distance of 2 mm from the bottom profile of the windshield;
- from point F to point A at a distance of 14 mm from the edge of the windshield;
- apply a second layer of adhesive from point C to point E at a distance of 56 mm from the lower profile of the windshield;
- position the windshield correctly in relation to the adhesive tapes, lifting the lower part above the hood so as not to wipe the adhesive from the front panel;
Attention! To guarantee the soundproofing of the passenger compartment, the two layers of adhesive must be sealed when applied. Do not apply excess glue at the points (C - E) and arrange the layers of glue in parallel. The time interval between the application of mastic on the glass and its installation on the car should not exceed 8 minutes (for quick-setting mastics).
- constantly press the glass with suction cups;
- wait for the adhesive to polymerize for 30 minutes before continuing work;
- install the wiper arms together with the brushes on the windshield marks;
- carry out further installation in the reverse order of removal, taking into account the following:
- check the operation of electrical equipment;
- check the tightness of the windshield seal;
- wipe the glass.