
Removing
Remove the windshield in the following order:
- remove the washer tube;
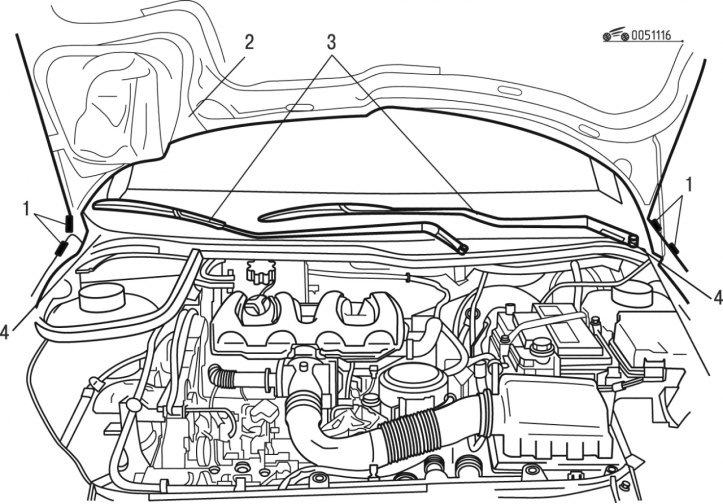
Pic. 11.16. Removing the hood: 1 - hood mount; 2 - hood; 3 - wiper arms; 4 - shield grilles
- disconnect fasteners 1 (pic. 11.16) hood and remove the hood 2;
- remove the hood seal;
- remove levers 3 of a screen wiper with brushes in gathering by means of a puller;
- remove the grille 4 of the shield in front of the windshield;
- remove the bottom pillars of the opening;
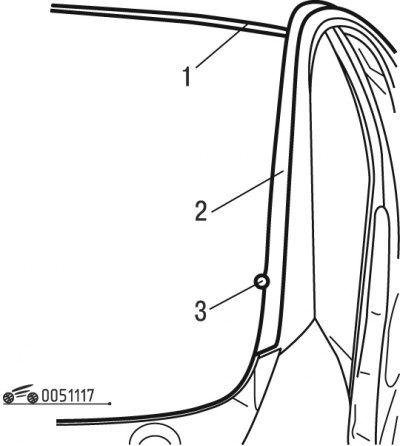
Pic. 11.17. Removing the decorative element of the windshield: 1 - profile; 2 - decorative element; 3 - latch
- remove retainer 3 (pic. 11.17) fixing the decorative element 2;
- remove decorative element 2;
- remove profile 1;
- stick labels at the top and bottom of the windshield, which will serve as guidelines for its correct subsequent installation;
- cut marks;
Attention! Tape the rain sensor power cable to the ceiling console so that it is not damaged when cutting out the windshield. Wear protective gloves and goggles for the following steps.
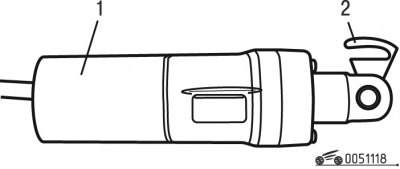
Pic. 11.18. Electric knife: 1 - knife; 2 - blade
- insert into electric knife 1 (pic. 11.18) blade 2;
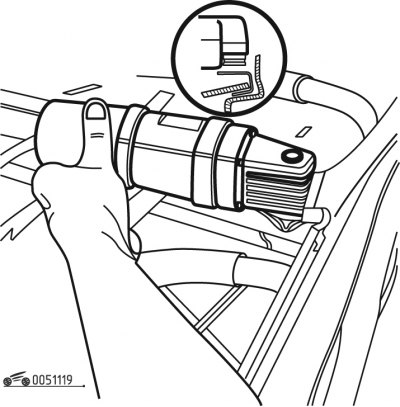
Pic. 11.19. Installing an electric knife
- insert the knife into the adhesive cord at the top of the windshield (pic. 11.19);
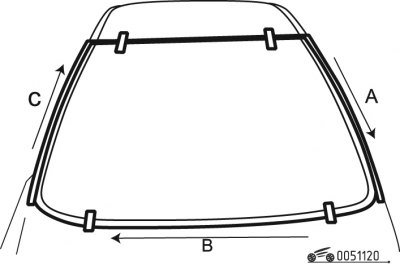
Pic. 11.20. Windshield cutting direction
- cut the windshield in the direction from A to B and C (pic. 11.20);
Note. Cut out only the sides and the bottom outside.
- continue the cutting operation at the top of the windshield still outside;
- remove the windshield.
Windshield hole repair
- run in the following order:
- protect the control panel;
- insert a blade into an electric knife;
- lay adhesive cords on the surface of the windshield and opening;
Note. If replacing the windshield, insert the windshield into the opening, stick marks on the top and bottom of the windshield, which will serve as guidelines for its correct installation.
- apply an anti-corrosion coating;
- degrease the surfaces of the opening and the windshield using a composition selected from the gluing kit;
- dry for 10 minutes;
- apply the primary components of the adhesive to glass and metal, selecting them from the gluing kit;
- install gaskets of the specified thickness in the indicated places at the bottom of the opening.
Installation
Install the windshield in the following order:
- fill the extruding gun with a set of two-component mastic;
- install the nozzle tip that is in the gluing kit;
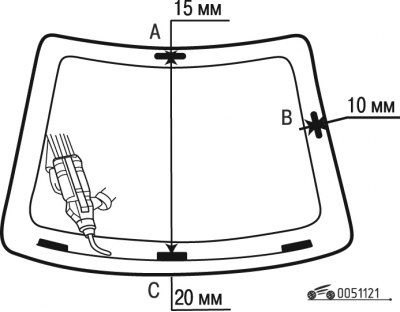
Pic. 11.21. Glue application: A, B, C - glue application zones
- apply a layer of glue in area A (pic. 11.21) 15 mm from the edge;
- apply a layer of glue in zone B 10 mm from the edge;
- apply a layer of glue to zone C 20 mm from the edge;
- install shaped profile 1 (see fig. 11.17) on the windshield;
Attention! The time interval between the application of mastic on the glass and its installation on the car should not exceed 8 minutes (for quick-setting mastics).
- place the windshield against the opening opposite the indicators using suction cups;
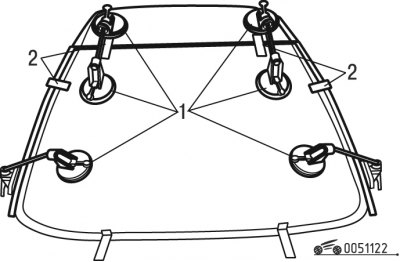
Pic. 11.22. Windscreen installation: 1 - suckers; 2 - gaskets
- apply constant pressure with string grippers with suction cups 1 (pic. 11.22);
- let the glue dry for a certain time, which depends on the type of gluing kit;
- remove the gaskets 2 holding the glass;
- Complete installation in the reverse order of removal.