
Clutch Release Lever

1 - sleeve fastening on the ball joint
2 - flaring of the protrusions of the fastening of the sleeve on the clutch release lever
The clutch is removed after removing the gearbox.
Removing
1. Mark the position of the leading part of the clutch relative to the flywheel using a marker or paint.
2. Evenly and sequentially, diagonally, loosen the pressure plate mounting bolts by turning them half a turn until the spring pressure is relieved and the bolts can be unscrewed by hand.
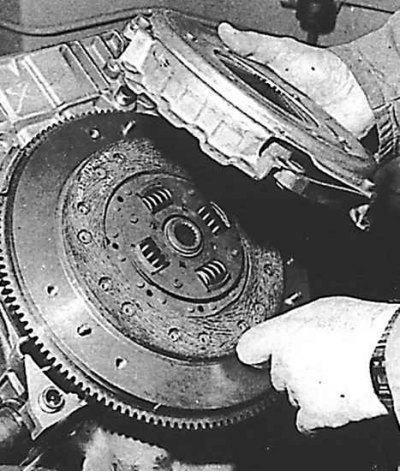
3. Using a lever, remove the clutch master assembly from the guide pins and remove the clutch disc.
Examination
Attention! It is advisable to replace the clutch disc, clutch drive assembly and release bearing as a set if at least one of them needs to be replaced. Brake cleaner or methyl alcohol can be used to flush the drive unit and clutch disc.
1. Check clutch disc linings for wear, mechanical damage or oil contamination.
2. If these defects are present, the clutch disc must be replaced.
3. If the friction linings are in good condition and not worn to the grooves, the damper springs are securely fastened and the rivet connections are not loose, then the clutch disc can be installed in the car.
4. If the clutch disc is contaminated with oil, check the left oil seal of the crankshaft or transmission input shaft. If necessary, replace the O-rings before installing a new clutch disc.
5. Check the drive plate assembly for wear on the pressure plate, mechanical damage, reliability of the rivet connection, damage to the clutch diaphragm spring. If the diaphragm spring is worn or damaged, or there is a suspicion that the spring elasticity has changed, then the drive disc assembly must be replaced.
6. Check the working surfaces of the pressure plate and flywheel, mating with the lining of the clutch disc. They must be clean, flat, free of scratches and wear. If heat warping or cracks are present, they must be replaced.
7. Check the release bearing, which should rotate easily, evenly and silently. The working surface of the bearing acting on the pressure spring must be smooth, without cracks, local corrosion or wear. If these defects are present, the release bearing must be replaced. On the leading clutch units of the second type, it is necessary to replace the entire assembly.
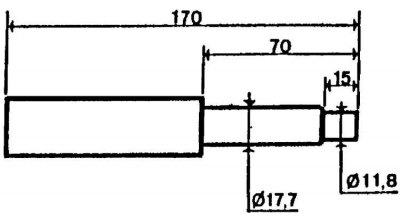
Clutch disc centering mandrel
Installation
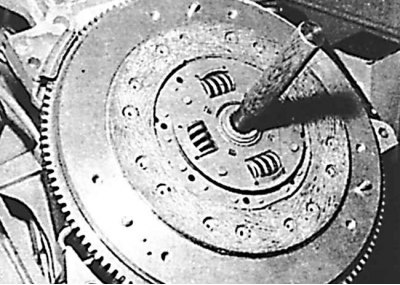
1. Install the clutch disc with the spring hub facing outward from the flywheel. The clutch disc may be marked to indicate correct installation of the clutch disc.
2. Install the clutch master assembly according to the marks made during removal. Hand-tighten the master clutch bolts.
3. Center the clutch disc with a drift so that the input shaft of the gearbox passes through the grooves in the center of the clutch disc.
4. Centering of the clutch disc can be done using a special mandrel or a self-made mandrel, the dimensions of which correspond to the transaxle shaft of the gearbox.
5. Tighten the clutch drive bolts evenly and diagonally.
6. Install gearbox.
Attention! If the clutch release lever was removed, then it is imperative to replace the plastic sleeve (1) (see fig. Clutch Release Lever). For this you should:
- install a new bushing on the clutch release lever;
- heat the ledges (2) so as to soften the plastic;
- easy to flare protrusions;
- lubricate the bushing (1).
7. Lubricate the clutch shaft and release bearing bushing with a thin layer of special agent Molykote 321 R.
8. Install gearbox.
9. Adjust the clutch control assembly.