
Attention! If the removed brake pads can be reinstalled, they should be marked accordingly to ensure that they are reinstalled. In this case, it is also recommended to note which block is internal and which is external. Otherwise, the pad wear warning light will not work. In addition, if the old pads are not installed correctly, the front brakes can pull to the side.
All front wheel disc brakes have a single piston floating caliper. All car calipers are Bendix or Lucas products (Girling). Lucas calipers have the designation «C57», a Bendix - «episode 5».
Replacement of the brake pads is necessary if the brake pads, including the metal backing plate, have reached a certain minimum allowable thickness. This minimum thickness is the same for all vehicle models and is approximately 4 mm.
1. Measure the thickness of the brake pads (see illustration).
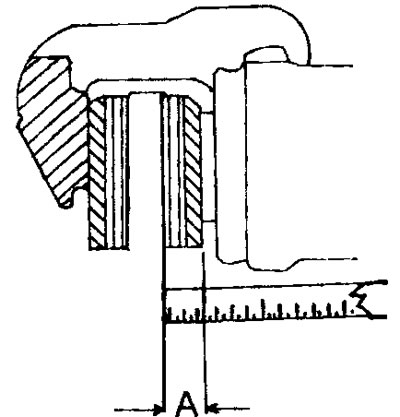
2.1 Measure the thickness of the brake pads. Thickness A is measured, i.e. including base plate
The illustration shows the measurement of non-dismantled pads. The wheels must be removed to take the measurement. When checking the residual thickness of the brake pads, be sure to check the pads of both brake mechanisms, because their wear can be different. Brake pads are always replaced as a set.
Lucas brakes (Girling)
2. Loosen the wheel bolts.
3. Stand in front of the car on the goats and remove the wheels.
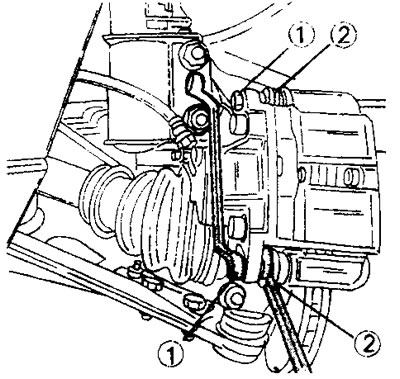
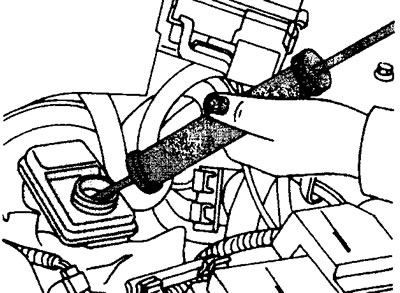
4. Disconnect the brake pad wear warning light wire that runs near the junction of the lower part of the shock absorber with the steering knuckle (see illustration).

2.4 Lucas caliper mounting bolts 1 (Girling) are above and below. The top bolt is loosened and the bottom bolt is completely unscrewed
Attention! The brake pad wear warning light wire can be attached to the inner or outer brake pad, depending on the model. This should be taken into account when purchasing new brake pads.
5. Grab the caliper with your hand and move it outward with a sharp movement. In this case, the piston of the wheel cylinder will go into the hole.
Attention! If the brake fluid level in the expansion tank is at its maximum, fluid may be squeezed out of the master cylinder reservoir. Therefore, first check the fluid level and select if necessary.
If the caliper is firmly seated and cannot be displaced, then you can use a screwdriver to push the caliper, and with it the piston, back.
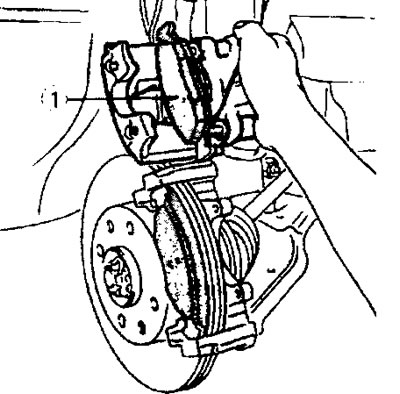
6. Loosen the upper guide bolt of the caliper with a ring wrench, while holding the bolt by the internal hexagon against turning with a wrench (see illustration). The bottom bolt is completely unscrewed. The bolts are self-locking and should be replaced with new ones. In addition, during installation, their threads should be lubricated with a protective agent «Loctite».
2.6 Removing the Lucas caliper (Girling). The upper bolt 1 is only loosened, and the lower bolt 1 is completely unscrewed. In this case, both bolts should be held with a wrench by the hexagon socket to prevent them from turning
7. Tilt the caliper up (see illustration) and remove the outer and inner brake pads. Typically, one of the brake pads remains on the wheel cylinder and will need to be removed from the cylinder.
2.7 Tilt the caliper up, securing it with a wire to the body and remove the outer and inner brake pads. As a rule, the inner brake pad 1 remains on the wheel cylinder and will need to be removed from the cylinder
Attention! When removing the brake pads or caliper, do not press the brake pedal.
8. Check the condition of the anti-dust rubber piston caps, as well as both guide pins. If they need to be replaced, the piston and both bolts should first be cleaned with brake fluid and then lubricated with brake grease. After that, you can install rubber caps.
9. Press the piston into the wheel cylinder. To perform this operation, you can use an appropriate press or a wooden drift and carefully press the piston into the cylinder (see illustration).
2.9 Press the piston into the wheel cylinder using a press
Attention! This increases the level of brake fluid in the expansion tank and the fluid may leak out. If the fluid level in the reservoir is high enough, it is recommended that before pressing the piston into the wheel cylinder, take a certain amount of fluid from the reservoir so that it does not splash out (see illustration 2.9a).
2.9a Remove the brake fluid from the expansion tank so that it does not splash out
10. Install new brake pads. The brake pad with a white insulated wire for the pad wear warning light is external.
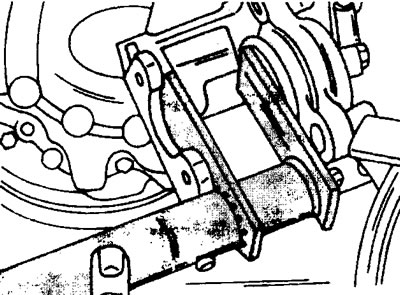
11. Lower the caliper down to the brake pads and insert a new caliper bottom mounting guide pin (see illustration).
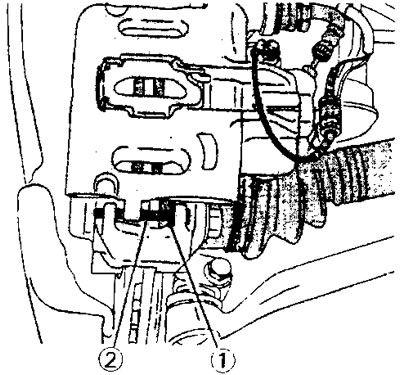
2.11 The Bendix caliper is mounted at the bottom with a guide pin 2 with a thrust pin 1. The top of the caliper is fixed with a guide pin, as with Lucas calipers (Girling). Finger tightening torque 85 Nm
Lubricate the threads of the new guide pin with protective grease before installation «Loctite».
12. Turn out the top directing finger of a support and replace it with new. Also lubricate the threads of this bolt with protective grease «Loctite».
13. Tighten both fingers with a torque of 30 Nm. First, the lower finger is tightened, and then the upper one. At the same time, keep your fingers from turning on the internal hexagon (see illustration 2.6).
14. Connect the plug of the brake pad wear warning light. Make sure that the wire is laid in such a way that it will not fray while driving.
15. Depress the brake pedal several times to set the brake pads. Do not forget that new brake pads must be worn in.
16. Lower the car and tighten the wheel bolts to 100 Nm.
Brake Bendix
Removal and installation of the caliper of this mechanism are carried out in the same way as the Lucas caliper (Girling). The difference is in the order of attachment of the wheel cylinder. At the bottom of the caliper is a guide pin held on the inside by a thrust pin (see illustration 2.11). In order to remove the brake pads, it is necessary to remove the thrust pin and knock out the guide pin. After that, the caliper leans up (see illustration 2.7), providing access to the brake pads, which are removed.
In order to remove the caliper completely, you need to unscrew the guide pin at the top. When installing the lower guide pin, make sure that the bore of the wheel cylinder and the bore of the caliper match. The guide pin must first be inserted into the holes, and then hammered in to the stop and fixed with a thrust pin. Lubricate the threads of the upper guide pin with protective grease «Loctite» and put it in place. Tighten the top guide pin to 85 Nm.
Further work is carried out in the same order as for the Lucas brakes.
After removing the brake pads, you can also remove the caliper. In this case, it is necessary to unscrew the guide pin at the top and disconnect the wheel cylinder. The brake hose can be disconnected from the caliper or from the brake pipe. If the brake hose is disconnected from the caliper, this must be done before the caliper guide pins are turned out. In the second case, unscrew the union nut, which, when connecting the brake hose, install a new copper ring between the hose and the caliper. The hose is tightened on the caliper, holding it by the hexagon with a wrench from turning. The final tightening of the hose on the caliper is performed after the caliper is installed.
17. Grease bolts of fastening of directing blocks to a rotary fist with protective greasing «Loctite» and tighten them (if the guide was removed). For all models, the bolts are tightened with a torque of 120 Nm.
18. Lubricate the guide pins of the caliper with protective grease «Loctite» and tighten them with a torque of 30 Nm (Lucas/Girling caliper). As for the Bendix caliper, a protective lubricant «Loctite» only the upper guide pin is lubricated, the tightening torque of which is 85 Nm. The lower guide pin of the Bendix caliper is inserted and secured with a thrust pin.
If the brake hose was disconnected from the main pipeline, then it should be fixed on the pipeline, while preventing the hose from twisting or stretching. To check the brake hose gasket, turn the steering wheel in one and the other directions from lock to lock and make sure that the hose does not come into contact with the suspension parts anywhere and will not be rubbed when driving. Tighten the fastening cap nut with the appropriate torque, and hold the hose itself from turning by the hexagon with a wrench.
The brake system after installing the caliper should be pumped. If the expansion tank has been sealed as recommended above, then the excess brake fluid in the tank should be removed so that its level is correct. To speed up the bleeding process, you can pour a little brake fluid into it before connecting the brake hose to the caliper. After installing all parts of the brake mechanism in place, press the brake pedal several times so that the brake pads are installed on the brake disc.