
English Русский
Български
Беларускі
Український
Српски
Hrvatski
Română
Polski
Slovenský
Magyar
Bookmark Articles Sitemap Contacts
Company Hyundai Company Opel Company Skoda Company Kia Company Mitsubishi Company LADA Company Audi
PeugeotBook.ru


Series 100   Series 200   Series 300   400-500   Series 600   Crossovers   Others
 
Partner I (1996-2008) Peugeot 807 (2002-2014) Peugeot 806 (1994-2002) Peugeot J5 (1981-1993)

Parking brake adjustment (Peugeot Eurovans 806)

  • Main
  • Пежо
  • Peugeot 806 (1994-2002)
  • Chassis, running gear
  • Brake system
  • Parking brake adjustment
0
Table of contents: Drum brake mechanism 🠇 Disc brake mechanism 🠇 Replacing the parking brake cable 🠇

Drum brake mechanism


The rear wheels should not turn when the parking brake lever is tightened to 4 or 5 notches. Repeat tightening the parking brake lever approximately four times. To check the wheel braking, the car is placed on jack stands. If the parking brake action requires adjustment, proceed as follows.

1. Tighten the parking brake lever to the fifth tooth of the sector.

2. Place the rear of the vehicle on jack stands.

3. Loosen the outer nut on the parking brake cable equalizer located under the vehicle (see illustration).
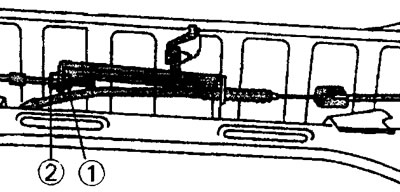
8.3 Adjusting the tension of the parking brake cable. After unscrewing nut 2 on the cable…

8.3 Adjusting the tension of the parking brake cable. After unscrewing nut 2 on the cable equalizer, tighten the adjusting nut 1 so that friction noise is felt when turning the wheels


4. Tighten the second nut located underneath it until you feel a certain resistance and friction noise when turning the wheels.

5. Replace the outer nut on the cable equalizer.

6. Check the operation of the parking brake. To do this, apply the parking brake to the five notches of the sector and make sure that both rear wheels are locked.


7. Release the parking brake and check that both rear wheels rotate freely without any extraneous noise.

8. Lubricate the cable equalizer with multi-purpose grease.

Disc brake mechanism


Locking the rear wheels with the parking brake should occur in the same way as with drum brakes. Adjusting the tension of the parking brake cable is performed in the same way as described above (see illustration 8.3).

However, before adjusting the tension of the parking brake cable, it is necessary to adjust the position of the brake pads in the inner recess of the disc.

9. Release the parking brake lever and remove the bolts securing both rear wheels.

10. Place the rear of the vehicle on jack stands.

11. Turn the brake disc so that the hole plug on the outer side of the brake disc is facing down. Grasp the plug with pliers and twist it a quarter turn to remove it.

12. Install the brake disc as shown in the illustration. In this position, the hole on the brake disc is located opposite the brake pad adjusting gear.
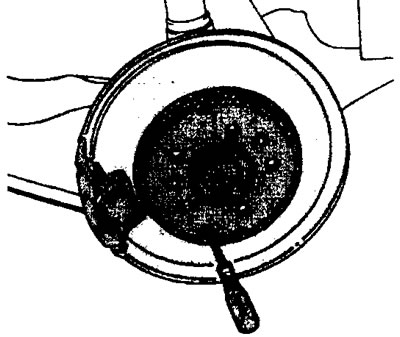
8.12 Adjusting the rear wheel disc parking brake. Insert a screwdriver into the hole on the brake…

8.12 Adjusting the rear wheel disc parking brake. Insert a screwdriver into the hole on the brake disc. Depending on which wheel mechanism is being adjusted, the screwdriver should be moved up or down


13. Insert a screwdriver into the hole on the brake disc. The disc may need to be turned slightly to allow the screwdriver to engage the adjustment gear.

14. Rotate the adjusting gear until the brake disc locks. When working on the left rear wheel, the adjusting gear must be turned upwards, and on the right wheel - downwards.

15. Rotate the adjusting gear in the opposite direction. The offset is approximately 6 gear teeth. This ensures the required clearance between the brake disc and the brake pads.

16. Replace the hole plug on the brake disc. To do this, turn the brake disc so that the hole into which the screwdriver was inserted is at the bottom. After installing the plug, use pliers to turn it half a turn until it locks into place.

17. Adjust the parking brake cable tension as described above. After completing the adjustment, install the wheels and tighten their mounting bolts to a torque of 100 Nm.

Replacing the parking brake cable


When replacing the parking brake cable, the brake pads must be removed. The cable should be lubricated with a universal lubricant before installation.

After replacing the cable, the parking brake must be adjusted by following the steps listed above.
This article is available at russian, bulgarian, belarusian, ukrainian, serbian, croatian, romanian, polish, slovak, hungarian
Article reviewed by editor: Shirokov Arseny
Share information:
Previous
Peugeot 806: Brake system
Next

Brake system — bleeding
Vacuum booster brake drive
Brake Master Cylinder — removal, installation, and repair
Rear disc brakes — removal, installation, and replacement of…
Rear drum brakes
Brake force regulator
Vacuum pump
ABS system
See similar information for other Peugeot models

➨ Rear brake pressure-regulating valves — adjustment, removal and… Peugeot 106 (1991-2003)
➨ Parking brake Peugeot 207 (2006-2014)
➨ Parking brake Peugeot 307 (2001-2008)
➨ Seat belts — description and adjustment Peugeot 405 (1987-1997)
➨ Parking brake — adjustment Peugeot 605 (1989-2000)
Link to this article in different formats
Comments and feedback from visitors
No comments yet


Add two numbers 26 + 31


Partner I (1996-2008) 
  • General information
  • Introduction to the guide
  • Faults en route
  • Weekly checks
  • User manual
  • Maintenance (petrol)
  • Maintenance (diesel)
  • Power unit
  • Petrol engines
  • Diesel engines «XUD»
  • Diesel engines «DW»
  • Overhaul of petrol engines
  • Overhaul of diesel engines
  • Cooling and heating
  • Power and exhaust (petrol)
  • Power and exhaust (XUD diesels)
  • Power and exhaust (DW diesels)
  • Emission reduction
  • Starting and charging system
  • Transmission
  • Clutch
  • Mechanical gearbox
  • Drive shafts
  • Chassis, running gear
  • Brake system
  • Car suspension
  • Steering
  • Body and interior
  • Exterior (external elements)
  • Interior (internal elements)
  • Doors, locks and windows
  • Electrical equipment
  • Equipment and devices
  • Electrical circuits
Peugeot 807 (2002-2014) 
  • General information
  • Operating instructions
  • Maintenance
  • Troubleshooting
  • Power unit
  • Gasoline engines
  • Diesel engines
  • Cooling and heating
  • Fuel injection (petrol)
  • Fuel system (diesel)
  • Fuel system
  • Exhaust system
  • Ignition system
  • Transmission
  • Clutch
  • Manual gearbox
  • Automatic gearbox
  • Chassis, running gear
  • Brake system
  • Car suspension
  • Steering system
  • Body and interior
  • Exterior (external elements)
  • Interior (internal elements)
  • Electrical equipment
  • Power devices
  • Electrical circuits
Peugeot 806 (1994-2002) 
  • General information
  • User manual
  • Maintenance
  • Power unit
  • Petrol engines
  • Diesel engines
  • Lubrication system
  • Cooling system
  • Fuel injection (petrol)
  • Fuel system (diesel)
  • Ignition and exhaust systems
  • ECM Bosch Motronic MP 3.2
  • ECM Magneti-Marelli (MM)
  • Transmission
  • Clutch
  • Mechanical gearbox
  • Chassis, running gear
  • Brake system
  • Car suspension
  • Steering
  • Electrical equipment
  • Equipment and devices
  • Electrical circuits
Peugeot J5 (1981-1993) 
  • General information
  • Introduction to manual
  • Specifications
  • Gasoline engine
  • Engine repair
  • Lubrication system
  • Cooling system
  • Fuel system
  • Ignition system
  • Diesel engine
  • Engine repair (DB9)
  • Lubrication system (DB9)
  • Cooling system (DB9)
  • Fuel injection (DB9)
  • Engine repair (U25)
  • Lubrication system (U25)
  • Cooling system (U25)
  • Fuel injection (U25)
  • Transmission
  • Clutch
  • Gearbox
  • Drive shafts
  • Chassis, running gear
  • Steering system
  • Car suspension
  • Brake system
  • Electrical equipment
  • Power devices
  • Electrical circuits
PeugeotBook.ru © 2018–2026 | Mobile version | Sitemap: EN BG BY UA RS HR RO PL SK HU | Write message | Site search | Add to bookmarks | Peugeot owners
106 (1991-2003) | 206 (1998-2012) | 207 (2006-2014) | 305 (1977-1989) | 306 (1993-2002) | 307 (2001-2008) | 405 (1987-1997) | 406 (1995-2004) | 605 (1989-2000) | Partner-I (1996-2008) | Eurovans-807 (2002-2014) | Eurovans-806 (1994-2002) | J5 (1981-1993) |
Cookies are used to ensure the correct display of pages on the site.