
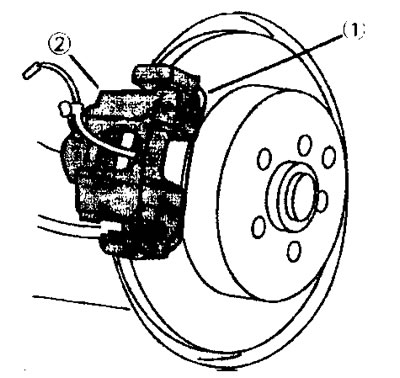
4.0 Rear wheel disc brake caliper. Disconnect the spring 1, and then unscrew the guide pins at the top and bottom and remove the caliper
When installing the caliper, the guide pins should be lubricated with protective grease «Loctite». The tightening torque of the fingers is 30 Nm.
1. Install the caliper spring in place. All recommendations related to the removal and installation of pads, replacement of calipers or disc brakes of the front wheels should be fully taken into account when doing similar work on the disc brakes of the rear wheels, because the procedure is the same in both cases.
Replacement of brake pads
Brake pads on both drum and disc brakes are used to stop the vehicle with the parking brake. Brake pads can be replaced, however, when installing new pads, you will need a vernier caliper to measure their fit to the inside diameter of the brake disc. If this correspondence is not observed, the brake pads will not self-align on the brake disc (see illustration 4.5).

4.5 Measure the inner diameter of the brake disc and record the value
The removal of the brake pads of the disc mechanisms of the rear wheels is carried out in the same way as with the drum ones, with the only difference that it is necessary to remove the caliper and the brake disc. After disconnecting the parking brake cable from the lever (like the brake pads) spread the brake shoes, holding them at the bottom, until the adjusting mechanism at the top of the shoes can be removed. At the top of the pads there is an expander bar, which is detached along with the brake adjustment mechanism. When disassembling the rear wheel disc brake, mark or note the mounting position of the parts so that they can be correctly installed during assembly.
Installation of parts of the disc brake mechanism is carried out in the reverse order of disassembly.
2. Install the rear brake adjuster between the top of both brake shoes so that the adjusting gear fits into the groove on the rear brake shoe (see illustration).
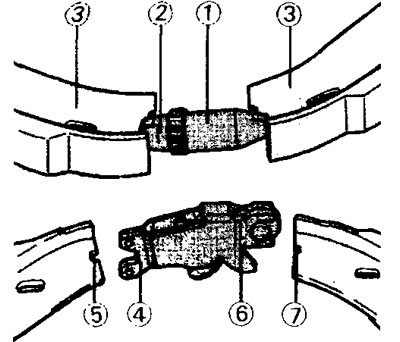
4.2 Install the rear wheel brake adjuster between the top of both brake shoes so that the adjusting gear fits into the groove on the rear brake shoe
1 - brake adjustment mechanism
2 - adjusting gear
3 - brake pads
4 - expander fork
5 - notch on the brake shoe
6 - expander fork
7 - notch on the brake shoe
3. Install the spreader bar. Matching forks on both sides of the bar fit into recesses on both brake pads (see illustration 4.2).
All subsequent work is carried out in the reverse order of removal. After installation, the brake pads should be adjusted. The parking brake is also adjustable.
Adjusting the position of the brake pads
With regard to adjusting the brake shoes, a distinction must be made between the proper shifting of the shoes and adjusting the tension of the parking brake cables (see relevant chapter).
4. Make sure the parking brake cable is completely loose.
5. Measure the inner diameter A of the brake disc with a vernier caliper and record the value obtained. Do the same with the brake disc of the second wheel (see illustration).
6. Measure the diameter of the circle formed by the installed brake pads with a caliper (see illustration).The caliper is installed at the points that form the maximum diameter.
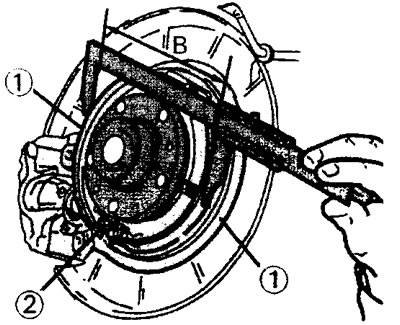
4.6 Measure the diameter of the circle B formed by the installed brake shoes with a caliper. The caliper is installed at points 1 that form the maximum diameter
7. Turning adjusting gear 2 (see illustration 4.7), install the brake pads so that the diameter of the circle formed by them is 0.6 mm smaller than the inner diameter A (see illustration 4.5).
8. Repeat the above measurements with the second rear wheel brake. Diameter dimension A on the brake disc of the second wheel must be the same. However, if the disc has been reworked, then the value of the inner diameter will be slightly larger.
9. Install the brake disc and tighten its fastening bolt to 25 Nm.
10. Adjust parking brake (see relevant chapter).