
English Русский
Български
Беларускі
Український
Српски
Hrvatski
Română
Polski
Slovenský
Magyar
Bookmark Articles Sitemap Contacts
Company Hyundai Company Opel Company Skoda Company Kia Company Mitsubishi Company LADA Company Audi
PeugeotBook.ru


Series 100   Series 200   Series 300   400-500   Series 600   Crossovers   Others
 
Peugeot 605 (1989-2000)

Gear shift mechanism — removal and installation (Peugeot 605)

  • Main
  • 60X
  • Peugeot 605 (1989-2000)
  • Transmission
  • Automatic gearbox
  • Gear shift mechanism — removal and installation
0
1. Set the gearshift lever to position "P".

2. Remove the 1 pocket cover by pressing the locking tabs (see illustration).
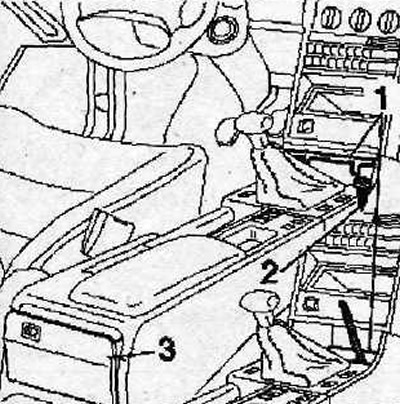
6.2 Remove the 1 pocket cover by pressing the locking tabs

6.2 Remove the 1 pocket cover by pressing the locking tabs


3. Unscrew the bolts 2 (see illustration 6.2).

4. Remove the rear ashtray 3 (see illustration 6.2).

5. Pry up and lift the gearshift lever boot, disconnect the connectors, unscrew the two bolts 4 (see illustration)
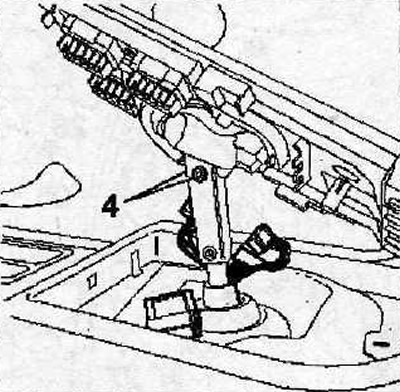
6.5 Pry up and lift the gearshift lever boot, disconnect the connectors, unscrew the two bolts 4

6.5 Pry up and lift the gearshift lever boot, disconnect the connectors, unscrew the two bolts 4


6. Push the gearshift lever up and then turn it counterclockwise 90° (see arrows in the illustration). Then return the lever to its original position.
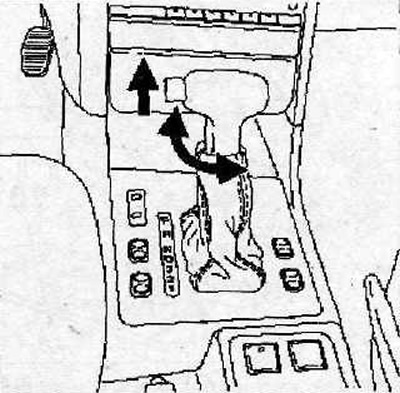
6.6 Drop the gearshift lever up and then turn it counterclockwise 90° (see arrows)

6.6 Drop the gearshift lever up and then turn it counterclockwise 90° (see arrows)


7. Remove the gearshift lever head.


8. Unscrew bolts 5 and 6 (see illustration)
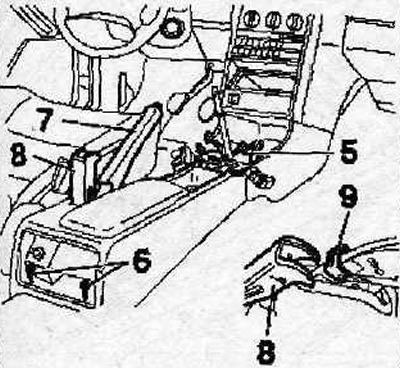
6.8 Unscrew bolts 5 and 6

6.8 Unscrew bolts 5 and 6


9. Remove the protective cover 7 of the parking brake lever (see illustration 6.8).

10. Remove the protective cover 8 of the parking brake by prying it with a flat screwdriver at the connection area with the holder 9 (see illustration 6.8).

11. Disconnect the plugs, then disconnect the reversing light switch plug.

12. Tighten the parking brake lever ("on" position). Make sure that the transmission control lever is in the "P" position.

13. Release the rear cover 10 of the center console from the fasteners, move it in the direction indicated by the arrow in the illustration and remove the cover.
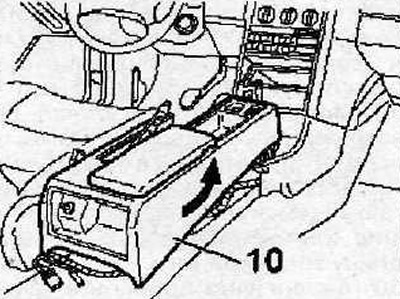
6.13 Release the rear cover 10 of the central console from the fastenings and move it in the…

6.13 Release the rear cover 10 of the central console from the fastenings and move it in the direction shown (see arrow)


14. Unscrew bolts 11 and 12 and remove bracket 13 (see illustration).
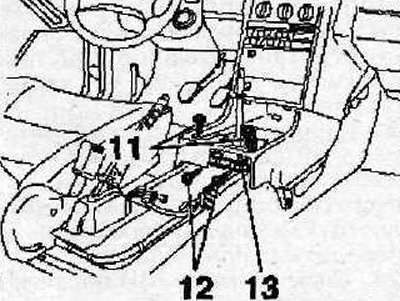


6.14 Unscrew bolts 11 and 12 and remove bracket 13

6.14 Unscrew bolts 11 and 12 and remove bracket 13


15. Remove the foam soundproofing insert.

16. Unscrew the nuts 14 (see illustration).
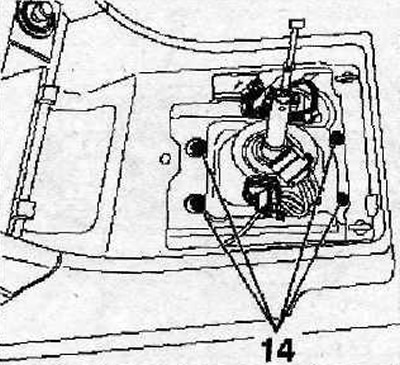
6.16 Unscrew the nuts 14

6.16 Unscrew the nuts 14


17. Remove the air intake duct.

18. Disconnect the gear selection/shift cable end from the ball joint 15 on the rod using special puller 0336-G, then unscrew the bolts 16 (see illustration).

[Original can be viewed at: PeugeotBook.ru]
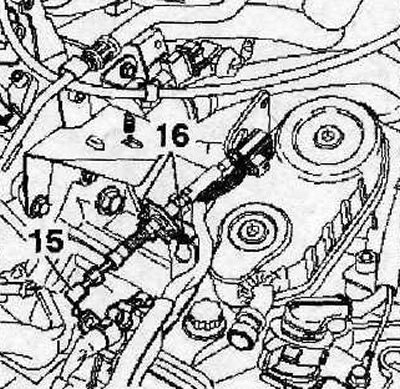
6.18 Disconnect the gear selection/shift cable end from the ball joint 15 on the rod using special…

6.18 Disconnect the gear selection/shift cable end from the ball joint 15 on the rod using special puller 0336-G, then unscrew the bolts 16


19. Working from underneath the vehicle, unscrew bolts 17 and 18 (see illustration).
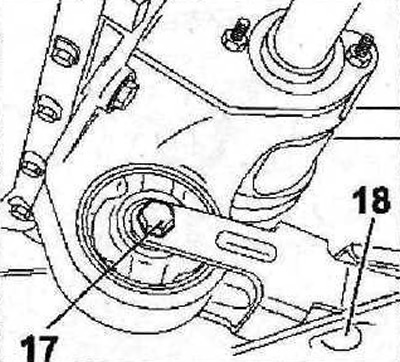


6.19 Working from underneath the vehicle, unscrew bolts 17 and 18

6.19 Working from underneath the vehicle, unscrew bolts 17 and 18


20. Remove the exhaust pipe suspension cushions (see illustration). Place a support under the exhaust pipes to prevent them from falling.
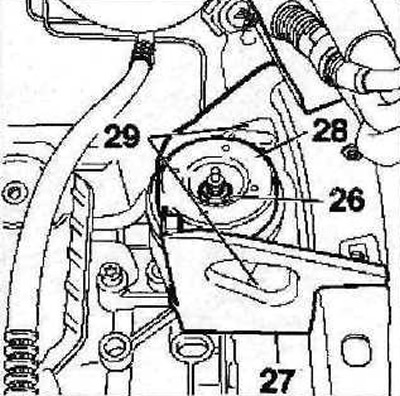
6.20 Remove the exhaust pipe suspension cushions

6.20 Remove the exhaust pipe suspension cushions


21. Remove the heat shield 19 (see illustration).
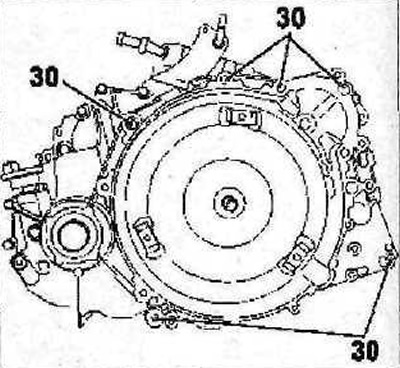
6.21 Remove the heat shield 19

6.21 Remove the heat shield 19


22. Move the exhaust pipes to the side to gain access to the gear shift mechanism (see illustration).
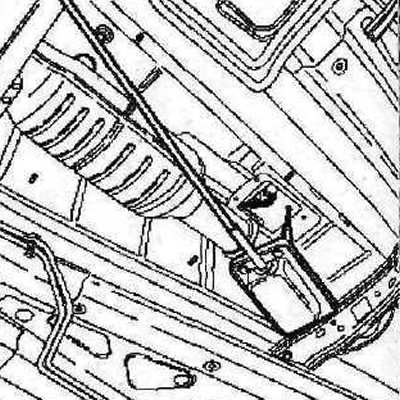


6.22 Move the exhaust pipes to the side to gain access to the gearshift mechanism

6.22 Move the exhaust pipes to the side to gain access to the gearshift mechanism


23. Remove the gear shift mechanism.

The gear shift mechanism is installed in the reverse order of removal.
This article is available at russian, bulgarian, belarusian, ukrainian, serbian, croatian, romanian, polish, slovak, hungarian
Article reviewed by editor: Nikonova Veronica
Share information:
Previous
Peugeot 605: Automatic gearbox
Next

Speedometer sensor — removal and installation
Modulator — installation
Modulator — removal
Torque converter — installation
Torque Converter — Removal
Gear shift mechanism — adjustment
Gearshift box-removal
Gearbox — installation
See similar information for other Peugeot models

➨ Clutch adjustment check and control mechanism lubrication Peugeot 106 (1991-2003)
➨ Adjusting the gear shift mechanism Peugeot 206 (1998-2012)
➨ Gear shift lever mechanism — overhaul and adjustment Peugeot 305 (1977-1989)
➨ Steering wheel, gear shift and brake Peugeot 405 (1987-1997)
➨ Gear shift lever mechanism — removal and installation Peugeot Partner I (1996-2008)
Link to this article in different formats
Comments and feedback from visitors
No comments yet


Add two numbers 48 + 30


Peugeot 605 (1989-2000) 
  • General information
  • User manual
  • Maintenance
  • Troubleshooting
  • Power unit
  • Petrol engines «XU»
  • Petrol engines «ZPJ»
  • Petrol engines «ES9J4»
  • Diesel engines
  • Cooling and heating
  • Fuel system
  • Exhaust system
  • Transmission
  • Clutch
  • Mechanical gearbox
  • Automatic gearbox
  • Chassis, running gear
  • Brake system
  • Car suspension
  • Steering
  • Body and interior
  • Body elements
  • Electrical equipment
  • Power devices
  • Electrical circuits
PeugeotBook.ru © 2018–2026 | Mobile version | Sitemap: EN BG BY UA RS HR RO PL SK HU | Write message | Site search | Add to bookmarks | Peugeot owners
106 (1991-2003) | 206 (1998-2012) | 207 (2006-2014) | 305 (1977-1989) | 306 (1993-2002) | 307 (2001-2008) | 405 (1987-1997) | 406 (1995-2004) | 605 (1989-2000) | Partner-I (1996-2008) | Eurovans-807 (2002-2014) | Eurovans-806 (1994-2002) | J5 (1981-1993) |
Cookies are used to ensure the correct display of pages on the site.