
1. Brush the protruding ends of the bolts with a wire brush before loosening their nuts to remove accumulated dirt and rust. After cleaning the bolt, treat the threaded connection with a rust converter. If necessary, remove the bolt from the welded nut (usually on the body), it is recommended to machine the threads on the back of the nut, if possible. Often, the bolts of such connections break when unscrewed or the welded nut breaks out.
Screwdriver-head bolts or screws are usually difficult to access. The screwdriver slips out, breaking the slot. In these cases, you can use the following method.
2. Insert a screwdriver into the hollow cylindrical rod and fix them on the screw head, and then hit the screwdriver with a hammer. As a rule, the seat of the bolt is loosened and it can be unscrewed quite easily.
Difficulties also arise when unscrewing bolts with a head for a hexagonal socket wrench or with heads for a polyhedral (usually 12-sided) key. Before starting work, carefully clean the hole for the socket wrench (e.g. with a small screwdriver). You can use an appropriate replacement end insert, as well as loosen the fit of such a bolt by hitting a hammer on a key or end insert. Sometimes it's best to use an angled socket wrench. In this case, to increase the applied force, you can put a ring wrench on the socket wrench.
Small socket head bolts can be removed with clamshell pliers (grapple). The same applies to socket head bolts, in which the internal hexagon is broken (see illustration 3.0a).
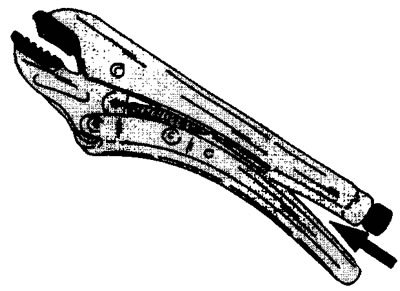
3.0a Small socket head bolts can be removed with grapple pliers (grapple). The same applies to socket head bolts, in which the internal hexagon is broken
It is often necessary to remove bolts whose heads have been damaged by using a larger wrench. The same damage is often found in nuts. You can unscrew such bolts or unscrew the nuts using the already mentioned pliers with a clamshell grip. Nuts can also be broken or cut. If there is enough space, a nut puller can be used to remove a nut with a damaged hex. The damaged nut is clamped into the puller and the puller bolt is tightened until the nut crumbles (see illustration H.0b).
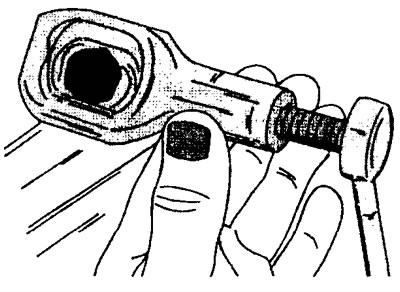
3.0b Puller for damaged nuts. The damaged nut is clamped into the puller and the puller bolt is tightened until the nut crumbles
The advantage of using a puller is that the bolt threads are not damaged.
The term appears frequently in the text «self-locking nut», meaning that such a nut locks itself during installation. However, when unscrewing, it loses this property. Therefore, such nuts should be replaced with new ones without fail.
It often happens that when the bolt is unscrewed, its head is twisted. The rest of the bolt can be unscrewed by drilling a hole in it and inserting a self-tapping roller with a left-hand thread into it. When it is tightened, it cuts into a damaged bolt and unscrews it. Such self-tapping rollers are sold in parts stores (see illustration Z.0v).

3.0v Self-tapping rollers with left-hand thread for unscrewing bolts
You can remove a damaged bolt by drilling with a drill of almost the same diameter (a bit less). After that, the thread of the bolt hole should be renewed.
The studs can be unscrewed using two lock nuts relative to each other. When unscrewing the stud, the key is installed on the inner nut, and when screwing in, on the outer (see illustration 3.0g).
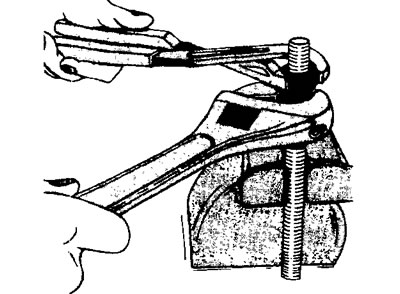
3.0g Unscrewing the stud with the help of two nuts locking against each other
Thread cutting
The thread on light metal quickly goes astray. If the thread is slightly knocked down, then it can be updated by slightly expanding the hole. Otherwise, a threaded bushing is installed, followed by threading. This work should be entrusted to the workshop. Appropriate taps are used for threading, the threading process itself consists of three passes: pre-cutting, fitting and final cutting. When performing the stage, use the appropriate taps. For preliminary threading, a tap with one ring on the shaft is used, for fitting - a tap with two rings and for final cutting - a tap without rings or with three rings on the shaft.
Each tap is used exclusively for its operation with a constant oil supply. The hole is cut gradually. In this case, the tap moves forward, and after a while it unscrews a little back. This is necessary so that the tap does not break due to jamming with metal chips.
Tightening torques
This manual contains the tightening torques specified by the manufacturer. It is possible that a tightening torque of, for example, 47 Nm can be rounded up and realized as 50 Nm. However, we recommend that you follow the instructions of the vehicle manufacturer. In order to withstand the required tightening torques, a torque wrench and interchangeable sockets are required. In some cases, access to the nut or bolt is so difficult that it is not possible to use a torque wrench. In such and similar cases, experience is needed that allows you to tighten with the right moment by intuition.
For the most common threaded connections (bolts and nuts) generally accepted tightening torques apply:
| Thread diameter (mm) | Torque (Nm) |
| 6 | 10 |
| 8 | 25 |
| 10 | 49 |
| 12 | 85 |
| 14 | 135 |
The use of lubricants and sealants
Each manufacturer recommends the use of grease from certain companies, which was selected when creating the car. For this reason, the text contains the names of lubricants recommended by the manufacturer.
The remedy is often mentioned «Loctite». This liquid consistency agent is applied to the threads of nuts and bolts and is intended to protect it, as well as to prevent spontaneous loosening of nuts. There are the same tools from other manufacturers that can be used after consulting upon purchase.
If the text contains an indication of the need to apply a sealing mass (sealant), it is recommended to consult with the workshop which composition is needed and for which parts. Basically, the sealing mass is needed to seal the engine. However, its use in one case is necessary to prevent oil leaks, and in the other, to seal the cooling system.