
Typically, a fluid leak from a hose occurs on the way and you have to take emergency measures. Gas stations offer so-called repair kits. We are talking about adhesive tape, with which you can close the leak on the hose, having previously cleaned it well. If the crack in the hose is large enough. It is recommended to loosen the cap on the expansion tank one turn to reduce the pressure in the system. Using the repair kit and constantly monitoring the level of coolant in the system and its temperature, you can get to the nearest workshop.
1. Drain the coolant from the system.
2. Loosen the clamp on the hose by unscrewing the clamping screw with a screwdriver. If the hose is secured with a clamp, release the ends of the clamp.
3. Remove the hose from the nozzle. If it sits tight, then the fit can be loosened by inserting a screwdriver between the nozzle and the hose.
4. Put on a branch pipe a new hose and fix it with a collar. When fastening the hose with a clamping collar, do not exceed the tightening torque of the screw. You can strip the thread or even cut the hose with a clamp.
The cooling system hoses can also be fastened with the help of so-called quick-release fasteners, without the use of clamps. There are two types of these hose mounts and are identified by the manufacturer's name: Conrad hose and Ofelie hose (see illustrations 9.0 and 9.0a).
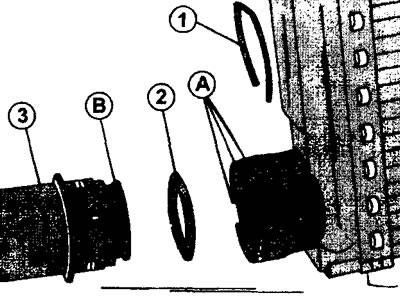
9.0 Conrad Hose.
1 - bracket
2 - sealing ring
3 - hose
A - slots for the bracket
B - groove for sealing ring
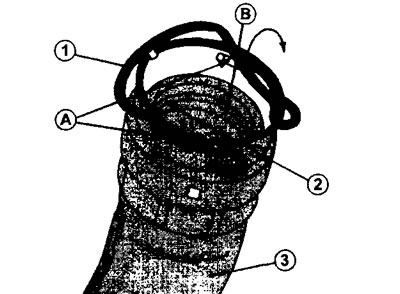
9.0a Hose with Ofelie fitting.
1 - bracket
2 - sealing ring
3 - hose
A - slots for the bracket
B - groove for sealing ring
To disconnect the hose with the Conrad fitting, the clip I must be removed.
5. Check the condition of the O-ring. When connecting the hose, the clamp I must be inserted into the slots A, and the sealing ring must be installed in the groove B (if necessary, replace the ring with a new one).
6. Push the hose onto the nozzle. To make sure the hose is secure, pull it towards you. To disconnect the Ofelie hose, remove the clip 1 using snap ring pliers and remove the hose 3 at the same time.
7. Remove sealing ring 2 from groove B. When connecting the hose, insert clamp 1 into slots A. If necessary, replace the sealing ring with a new one and put the hose on the connecting pipe so that it fits into the guides.
8. Feed the hose onto the nozzle so that the bracket snaps into place. To make sure the hose is secure, pull it towards you.