
English Русский
Български
Беларускі
Український
Српски
Hrvatski
Română
Polski
Slovenský
Magyar
Bookmark Articles Sitemap Contacts
Company Hyundai Company Opel Company Skoda Company Kia Company Mitsubishi Company LADA Company Audi
PeugeotBook.ru


Series 100   Series 200   Series 300   400-500   Series 600   Crossovers   Others
 
Peugeot 605 (1989-2000)

Accessory Drive Belt — Installation (Peugeot 605)

  • Main
  • 60X
  • Peugeot 605 (1989-2000)
  • Power unit
  • Diesel engines
  • Accessory Drive Belt — Installation
0
Table of contents: Cars with 2.1L XUD series engines 🠇 Cars with 2.5L DK5ATE engine, power…🠇

Cars with 2.1L XUD series engines


11. Move the tension roller by the square 6 (see illustration 3.4).

12. Install the stop pin "a" (see illustration 3.4).

13. Place the belt on the accessory pulleys and corresponding rollers.

14. Turn tension roller 4 clockwise to release stop pin "a" from hole 5 (see illustration 3.4).

15. Tighten bolt 3 of the tension roller with a force of 50 Nm.

16. Remove the stop pin "a" (see illustration 3,4).

17. Turn the crankshaft four revolutions in the direction of engine rotation.

18. Make sure that the stop pin "a" enters the hole 5 without any obstacles. Otherwise, repeat the installation procedure.

19. Next, the installation of the dismantled components is carried out in the reverse order of removal.

20. Tighten the wheel bolts to 90 Nm.

Cars with 2.5L DK5ATE engine, power steering and air conditioning


21. Check the ease of movement of rollers 3 and 4 (see illustration 3.7).

22. Carefully place the belt on the accessory pulleys and corresponding rollers (see illustration).
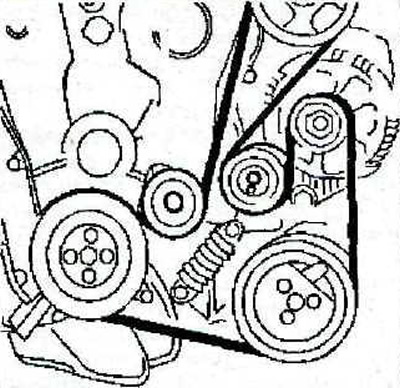
3.22 Carefully place the belt on the accessory pulleys and corresponding rollers

3.22 Carefully place the belt on the accessory pulleys and corresponding rollers


23. Adjust the tension of the accessory drive belt. If a new belt is being installed, move roller 3 so that the stop pin "a" can be removed (see illustration)
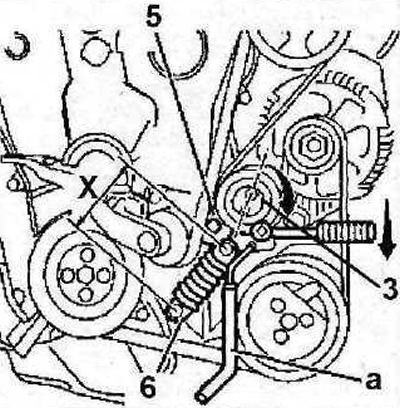


3.23 Adjust the tension of the accessory drive belt. If a new belt is being installed, move roller…

3.23 Adjust the tension of the accessory drive belt. If a new belt is being installed, move roller 3 so that the stop pin "a" can be removed


24. Tighten the roller mounting bolt 3 with a force of 32 Nm

25. Turn the crankshaft five revolutions in the direction of engine rotation.

26. Check the belt tension: if the stop pin "a" with a diameter of 2 mm enters the corresponding hole without hindrance (see illustration 3.23), then the belt is tensioned correctly. Otherwise, repeat the adjustment procedure.

27. If the old accessory drive belt is installed, measure the length X of the dynamic tensioner 6 (see illustration 3.23)if the distance X is less than 95 mm, the belt is tensioned correctly (properly). If the distance X exceeds 95 mm, the tension adjustment procedure must be repeated or the belt must be replaced.

28. Next, the installation of the dismantled components is carried out in the reverse order of removal.
This article is available at russian, bulgarian, belarusian, ukrainian, serbian, croatian, romanian, polish, slovak, hungarian
Article reviewed by editor: Nikonova Veronica
Share information:
Previous
Peugeot 605: Diesel engines
Next

Accessory Drive Belt — Removal
Timing belt of the gas distribution mechanism drive —…
Timing belt of the gas distribution mechanism drive — removal
General information
Specification of cars with diesel engines
Camshaft — Removal
Camshaft — Installation
Cylinder head — general information
Power unit — removal and installation
See similar information for other Peugeot models

➨ Timing belt covers — removal and refitting Peugeot 106 (1991-2003)
➨ Replacing the accessory drive belt (petrol engines) Peugeot 207 (2006-2014)
➨ Accessory drive belt Peugeot 307 (2001-2008)
➨ Checking the auxiliary drive belt (10,000 km/6 months) Peugeot 405 (1987-1997)
➨ Checking and replacing the accessory drive belt Peugeot Partner I (1996-2008)
Link to this article in different formats
Comments and feedback from visitors
No comments yet


Add two numbers 21 + 21


Peugeot 605 (1989-2000) 
  • General information
  • User manual
  • Maintenance
  • Troubleshooting
  • Power unit
  • Petrol engines «XU»
  • Petrol engines «ZPJ»
  • Petrol engines «ES9J4»
  • Diesel engines
  • Cooling and heating
  • Fuel system
  • Exhaust system
  • Transmission
  • Clutch
  • Mechanical gearbox
  • Automatic gearbox
  • Chassis, running gear
  • Brake system
  • Car suspension
  • Steering
  • Body and interior
  • Body elements
  • Electrical equipment
  • Power devices
  • Electrical circuits
PeugeotBook.ru © 2018–2026 | Mobile version | Sitemap: EN BG BY UA RS HR RO PL SK HU | Write message | Site search | Add to bookmarks | Peugeot owners
106 (1991-2003) | 206 (1998-2012) | 207 (2006-2014) | 305 (1977-1989) | 306 (1993-2002) | 307 (2001-2008) | 405 (1987-1997) | 406 (1995-2004) | 605 (1989-2000) | Partner-I (1996-2008) | Eurovans-807 (2002-2014) | Eurovans-806 (1994-2002) | J5 (1981-1993) |
Cookies are used to ensure the correct display of pages on the site.