
English Русский
Български
Беларускі
Український
Српски
Hrvatski
Română
Polski
Slovenský
Magyar
Bookmark Articles Sitemap Contacts
Company Hyundai Company Opel Company Skoda Company Kia Company Mitsubishi Company LADA Company Audi
PeugeotBook.ru


Series 100   Series 200   Series 300   400-500   Series 600   Crossovers   Others
 
Peugeot 605 (1989-2000)

Fuel tank — removal and installation (Peugeot 605)

  • Main
  • 60X
  • Peugeot 605 (1989-2000)
  • Power unit
  • Fuel system
  • Fuel tank — removal and installation
0

Removal


1. Drain the fuel from the tank. If necessary, use a special drain pump.

2. Remove clamp 1, disconnect crankcase ventilation hose 2 (see illustration).
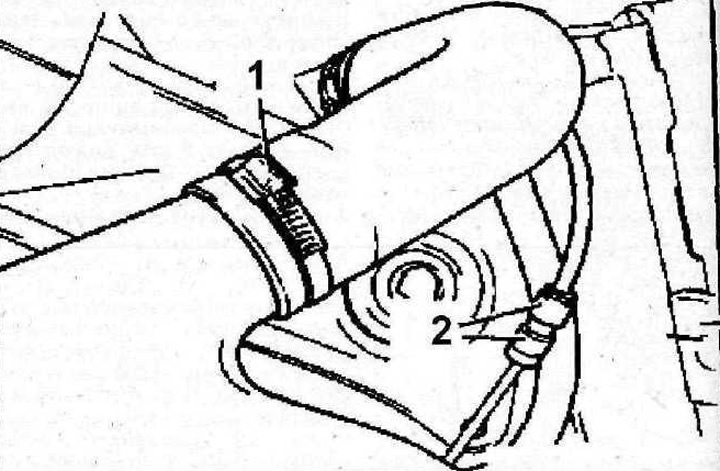
2.2 Remove clamp 1, disconnect crankcase ventilation hose 2

2.2 Remove clamp 1, disconnect crankcase ventilation hose 2


3. Remove the intake pipe 3 and heat reflectors 4 and 5 (see illustration).

Original is contained on the portal [peugeotbook.ru]
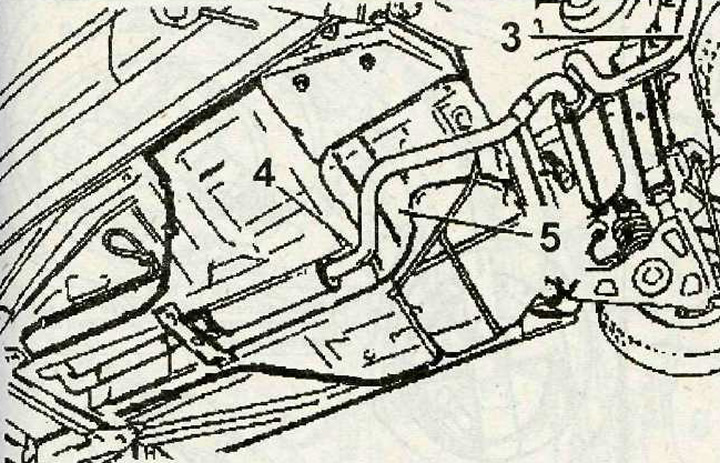
2.3 Remove the intake pipe 3 and heat reflectors 4 and 5

2.3 Remove the intake pipe 3 and heat reflectors 4 and 5


4. Release the parking brake lever 6. Then disconnect the cable end 7 from the parking brake actuator lever on the rear wheel brake mechanism and release the cable 8 from the fasteners (see illustration).
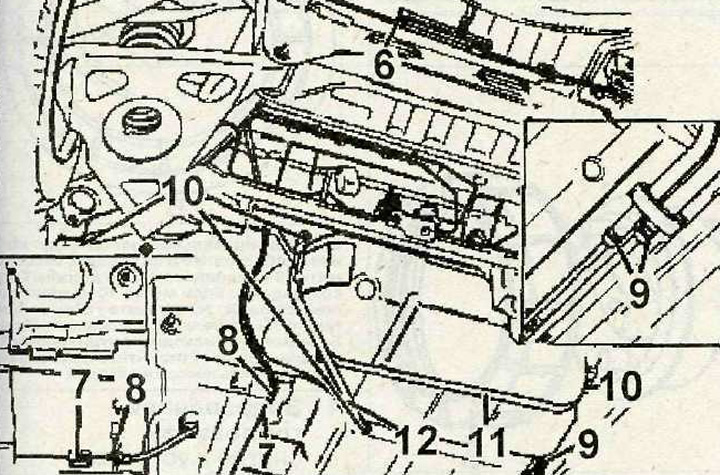
2.4 Release the parking brake lever 6. Then disconnect the cable end 7 from the parking brake…

2.4 Release the parking brake lever 6. Then disconnect the cable end 7 from the parking brake actuator lever on the rear wheel brake mechanism and release the cable from the fasteners


5. Release the fuel supply and return lines from the mountings on the underbody 9 of the vehicle (see illustration 2.4).


6. Install the support under the fuel tank, unscrew bolt 10, and then remove clamps 11 and 12 of the fuel tank mount (see illustration 2.4).

7. Carefully lower the fuel tank.

8. Disconnect the fuel tank ventilation hose 13 (see illustration).
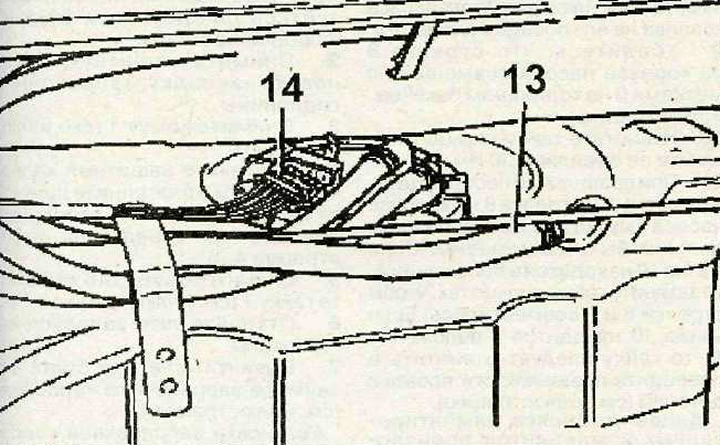
2.8 Disconnect the fuel tank ventilation hose 13

2.8 Disconnect the fuel tank ventilation hose 13


9. Disconnect wiring harness 14 and remove the fuel tank.
This article is available at russian, bulgarian, belarusian, ukrainian, serbian, croatian, romanian, polish, slovak, hungarian
Article reviewed by editor: Nikonova Veronica
Share information:
Previous
Peugeot 605: Fuel system
Next

Cleanliness and safety rules when working with the fuel system
Fuel System — General Information and Precautions
Intake manifold — removal and installation
High pressure fuel pump — removal, installation and adjustment
Injectors — removal and installation
Fuel tank — check
Fuel (fuel lift) pump with fuel gauge sensor — removal
Fuel (fuel booster) pump with fuel gauge sensor — installation
Filler neck — removal and installation
See similar information for other Peugeot models

➨ Fuel tank — removal and refitting Peugeot 106 (1991-2003)
➨ Removal and installation the fuel tank (all engines) Peugeot 207 (2006-2014)
➨ Fuel tank — general information Peugeot 305 (1977-1989)
➨ Fuel level sensor in the tank Peugeot 405 (1987-1997)
➨ Fuel tank cap Peugeot 806 (1994-2002)
Link to this article in different formats
Comments and feedback from visitors
No comments yet


Add two numbers 44 + 14


Peugeot 605 (1989-2000) 
  • General information
  • User manual
  • Maintenance
  • Troubleshooting
  • Power unit
  • Petrol engines «XU»
  • Petrol engines «ZPJ»
  • Petrol engines «ES9J4»
  • Diesel engines
  • Cooling and heating
  • Fuel system
  • Exhaust system
  • Transmission
  • Clutch
  • Mechanical gearbox
  • Automatic gearbox
  • Chassis, running gear
  • Brake system
  • Car suspension
  • Steering
  • Body and interior
  • Body elements
  • Electrical equipment
  • Power devices
  • Electrical circuits
PeugeotBook.ru © 2018–2026 | Mobile version | Sitemap: EN BG BY UA RS HR RO PL SK HU | Write message | Site search | Add to bookmarks | Peugeot owners
106 (1991-2003) | 206 (1998-2012) | 207 (2006-2014) | 305 (1977-1989) | 306 (1993-2002) | 307 (2001-2008) | 405 (1987-1997) | 406 (1995-2004) | 605 (1989-2000) | Partner-I (1996-2008) | Eurovans-807 (2002-2014) | Eurovans-806 (1994-2002) | J5 (1981-1993) |
Cookies are used to ensure the correct display of pages on the site.