



Table of contents: 1.3.1. Checking the engine oil level 🠇 1.3.2. Checking the brake fluid level 🠇 1.3.3. Checking brake lights 🠇 1.3.4. Checking the lighting 🠇 1.3.5. Checking the air pressure in…🠇 1.3.6. Checking the coolant level 🠇 1.3.7. Fuel and air filters 🠇 1.3.8. Checking the oil level in the…🠇 1.3.9. Oil level in the rear axle…🠇
Most regular operational and routine maintenance work can be done independently. Sometimes, however, it makes sense to have the maintenance carried out at a service station, that is, when the necessary equipment or experience is lacking, measuring instruments are lacking, or simply when the work can be carried out more quickly at a service station.
The vehicle maintenance booklet contains a list of regularly performed maintenance work. These tasks, such as changing engine oil, checking coolant and oil levels, checking the thickness of brake pads, brake cylinders, etc., are usually described in detail in the relevant sections.
The most important regular checks and controls are as follows. After a certain mileage or after a certain period of time, the necessary work must be carried out without exception.
The instructions given apply to all models.
1.3.1. Checking the engine oil level
The engine oil level should be checked every 600 km, but not less than once a week. Although this work is not always performed regularly, its importance must be emphasized. It is necessary to park the car on a level surface. Remove the oil dipstick and wipe it with a clean cloth. Insert the oil dipstick and pull it out again. With the vehicle level, the oil level should be between the upper and lower marks on the dipstick. If the level is below the lower mark, add oil. The volume of oil between both marks on the dipstick is approximately 2.0 liters, which is an estimate of how much oil needs to be added. Never add too much oil to the engine, i.e. the oil level should not exceed the upper mark on the dipstick.
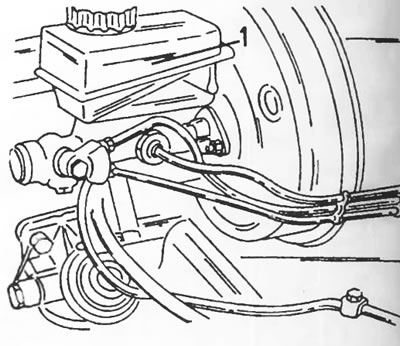
Figure 5. Location of the brake fluid expansion tank (1) on the master cylinder.
1.3.2. Checking the brake fluid level
The brake fluid reservoir is located on the master cylinder on the left side of the engine compartment. The reservoir is transparent, making it easy to determine the brake fluid level. The level should be between the "Min" and "Max" marks on the reservoir. If topping up is necessary, use only new brake fluid.
A drop in brake fluid level is a sure sign of worn brake pads. If, for example, the inspection reveals that the fluid level in the reservoir has dropped significantly, the thickness of the brake pads on the front and rear wheels should be checked.
1.3.3. Checking brake lights
Checking brake lights can be done with an assistant, or alone. In the first case, press the brake pedal while an assistant monitors the brake lights. If no assistant is present, back the car up to the garage door. The glow of the lamps is reflected by the garage doors. If the brake light does not come on, replace the bulb; if both brake lights are not working, the brake light switch may be defective. In this case, replace the brake light switch.
1.3.4. Checking the lighting
Turn on all lighting devices in sequence (including high beam and hazard warning lights) and check their functioning. To check the taillights and reversing lights, it is best to back the car up to the garage door in the dark without getting out of the car.
1.3.5. Checking the air pressure in the tires
Tire pressure is checked at a gas station. If the required pressure is unknown, it can be easily determined using the table available at the gas station. In addition, you should pay attention to the sticker inside the car. Not all models have the same tire pressure. You should constantly monitor your tire pressure. When using the vehicle's full load capacity, please adhere to the information on the right side of the sticker. In addition to ensuring driving safety, properly inflated tires save gasoline or diesel fuel.
1.3.6. Checking the coolant level
The cold coolant level should be at the expansion tank mark. If necessary, wait until the liquid cools down and add the missing liquid. If the engine is hot, loosen the expansion tank cap and wait for the pressure to release. After this, unscrew the lid completely.
1.3.7. Fuel and air filters
The fuel filter and fuel pre-filter must be replaced in accordance with the manufacturer's instructions and taking into account the engine type. The relevant instructions are contained in the relevant sections.
When replacing the fuel filter, especially on gasoline engines, remember that leaking fuel may ignite. Observe appropriate safety precautions.
1.3.8. Checking the oil level in the gearbox and replacing the oil in the gearbox
An oil dipstick is located on the top side of the gearbox. After taking it out and wiping it clean. A rag will reveal the "Min" and "Max" marks. The distance between the two marks is very small. If oil needs to be topped up, unscrew the oil filler plug (Figure 6) and add 75W 80W oil. Tighten the plug to a tightening torque of 13 Nm.
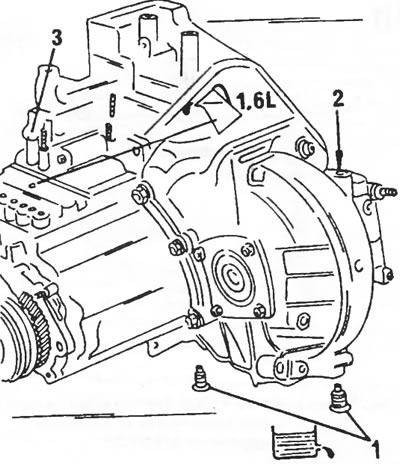
Figure 6. Location of drain plugs (1), oil dipstick (2) and oil filler plug (3) on the gearbox
To drain the oil from the gearbox, you need to unscrew the two drain plugs on the bottom of the box. Their locations are shown in Figure 6. Clean the plugs thoroughly and tighten them again with a tightening torque of 40 Nm. 1.6 liters of oil are poured into the gearbox.
On all-wheel drive vehicles, there are three oil drain plugs screwed into the underside of the transmission. The filling capacity of such a gearbox is 2.5 l, the tightening torque of the drain plugs is 40 Nm.
1.3.9. Oil level in the rear axle gearbox of all-wheel drive vehicles
The plug is screwed into the rear side of the rear axle gearbox (Figure 7) and must be unscrewed when checking the oil level. If the bent oil can reach the oil, the oil level is normal.
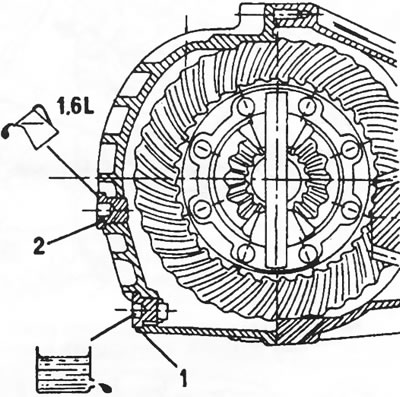
Figure 7. Location of the drain plug (1) and oil filler plug (2) on the rear axle gearbox of all-wheel drive vehicles
The drain plug is located on the bottom side. To drain the oil, unscrew the plug (2) (Figure 7). The rear axle differential capacity is 1.6 liters. A special oil is used for the rear axle differential. For exact information please contact your service station.