



Table of contents: Tightening torques 🠇 Application of lubricants and…🠇
The execution of the works considered in this manual is given in ascending order. It is recommended to study the materials related directly to the model that will be repaired in advance. To avoid repetitions, such self-evident actions as "open the hood" or "unscrew the wheel nuts" are sometimes omitted in the text.
When performing maintenance and repair work on your vehicle, it is recommended that you adhere to some basic rules.
Install bolts and nuts after cleaning them and applying a thin layer of oil. Check the condition of the nuts and bolts and make sure that their threads are normal. Remove any burrs that may have formed. If you have any doubts about the quality of a nut or bolt, replace them with new ones. Self-locking nuts must be replaced if they have been unscrewed. Do not apply grease to bolts and nuts.
Replace all dismantled seals, gaskets, sealing pads, lock washers, cotter pins and sealing rings. Lubricate the working surface of the seal with engine oil. When installing the seal, the working surface of the seal should be facing the side from which oil or grease can flow out.
Considerable attention should be paid to safety measures, especially when performing work under a raised vehicle. The jacked vehicle must be securely fastened to prevent it from shifting during any operation.
Place support trestles under the car raised by the garage lift. They will ensure its stability. Do not use bricks as supports. In this case, it is better to place building blocks under them, placing wooden beams on them. The locking bolt, with which the height of the trestles is adjusted, cannot be replaced with a randomly selected pin of the appropriate diameter. In this case, the pin may break under the weight of the car.
Various lubricants, oils, underbody corrosion protection compounds and other petroleum-based substances are aggressive towards rubber parts and brake system parts. Therefore, do not allow such substances, as well as fuel, to come into contact with hydraulic parts. Brake fluid or alcohol should be used to clean the brake system. However, in this case, it is necessary to remember that brake fluid is poisonous and aggressive towards paintwork.
The prerequisite for the success of repair work is the installation of original parts. To avoid problems during subsequent operation of the car, it is not recommended to use parts produced "on the side". The exception is parts of the electrical system, if the manufacturer guarantees compatibility.
All work on the car, especially on the brake system, steering and suspension, must be carried out with special care and caution. The repairs and maintenance performed must ensure the safety of the car. We do not recommend that you do any work yourself that you are not familiar with or that requires certain experience.
The workplace should be equipped with a workbench and a vice and have good lighting. The workplace must be kept clean at all times. It goes without saying that the workplace should be equipped with a sufficient number of quality tools, including a set of wrenches or combination wrenches, one end of which is a regular wrench, and the other is an overhead wrench. Such wrenches are very convenient when working in hard-to-reach places, as well as when unscrewing tightly tightened nuts.
You also need shaped (phillips) screwdrivers or inserts for screws and bolts with a head with a cross-shaped slot, pliers, pliers, pliers, hammers. In the automotive industry, bolts and screws with Torx heads are increasingly used, the slot of which is an asterisk. For such bolts, a set of special inserts is required.
In addition to the above basic equipment, you can purchase special devices and tools that are necessary for performing specific types of work. These include, for example, a pulse screwdriver, which is necessary for loosening factory-tightened Phillips-head bolts. Without such a screwdriver, these bolts are usually damaged during dismantling. A screwdriver is also used for tightening bolts, especially where tightness is required.
During repair work, you will need needle-nose pliers to remove thrust rings, also called Seger rings. In addition to the aforementioned needle-nose pliers, you will not be able to do without various types of pliers.
The most "useful" tool is a torque wrench, used like a regular wrench, but with the only difference that it is adjusted to a certain value of tightening the bolt or nut, upon reaching which it begins to slip, thus "refusing" to tighten further.
The more "bells and whistles" a car has, the more different tools you need for independent repair and maintenance. In some cases, repair is impossible without special equipment, and in addition, some types of work are still better left to a specialist. Multifunctional devices for checking the electrical system of a car are very useful, but without the proper experience and knowledge, you can only harm yourself with them.
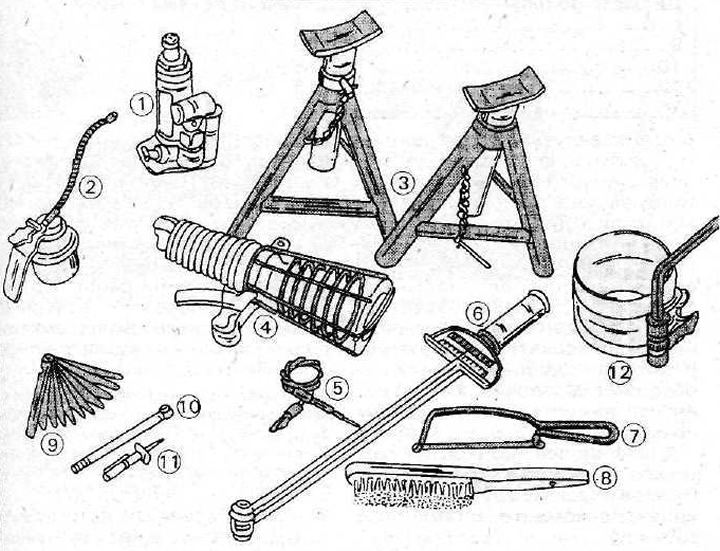
1.0 Recommended set of tools needed for car care
1 - jack
2 - oiler
3 - stand sawhorses
4 - electric flashlight
5 - stroboscope (12 V)
6 - torque wrench
7 - hacksaw for metal
8 - metal brush
9 - Measuring templates
10 - tire pressure gauge
11 - pin for measuring the profile height of tires
12 - mounting sleeve for installing pistons
For removal and installation of many parts, punches of different diameters (3 and 6 mm) are required.
In general, to take care of your car yourself, it is enough to have a certain set of tools and devices, which are acquired gradually (see illustration 1.0).
Warning! Before you start your trip, make sure that the on-board tool kit is in place. Even the best equipment in the garage will not help if you need the tools from the on-board kit on the road. The car should always be equipped with a jack, a Phillips (practical) key for dismantling wheels, screwdrivers, pliers, spare bulbs and fuses, a towing rope, cables for starting the engine from an auxiliary battery and an electric torch. Remember that repairs mean dirty hands. Rags and a towel should also be in the trunk.
Unscrewing bolts or nuts on a new car is not particularly difficult. The situation is different when performing the same operation on cars with a long service life.
Wire brush the exposed ends of the bolts before unscrewing their nuts to remove any accumulated dirt and rust. After cleaning the bolt, treat the threaded connection with a rust converter or appropriate spray. If necessary, remove the bolt from a welded nut (usually on the body), it is recommended to process the thread on the back side of the nut, if possible. Often, the bolts of such connections break when unscrewing or the welded nut breaks off.
Bolts or screws with a screwdriver head are usually difficult to unscrew. The screwdriver then slips out, breaking the slot. In these cases, you can use the following technique.
Insert a screwdriver into a hollow cylindrical rod and secure them to the head of the screw, then hit the screwdriver with a hammer. Typically, the bolt will loosen and can be unscrewed fairly easily.
Difficulties also arise when unscrewing bolts with a head for a hexagonal socket wrench or with heads for a multi-sided wrench (usually 12-sided) key. Before starting work, you should thoroughly clean the hole for the socket wrench (for example, with a small screwdriver). You can use a suitable replacement end insert, and also loosen the seat of such a bolt by hitting the key or end insert with a hammer. Sometimes it is best to use an end wrench bent at an angle. In this case, to increase the applied force, you can put a tubular wrench on the end wrench.
Small socket head bolts can be removed with a clamshell pliers (griftsang). The same applies to socket head bolts with a broken internal hexagon.
Often it is necessary to unscrew bolts whose heads are damaged as a result of using a larger wrench. The same damage often occurs with nuts. You can unscrew such bolts or unscrew nuts using the already mentioned pliers with a clamshell grip. Nuts can also be broken or cut. If there is enough space, you can use a nut puller to remove a nut with a damaged hexagon. The damaged nut is clamped in the puller and the puller bolt is tightened until the nut crumbles. The advantage of using a puller is that the bolt thread is not damaged.
The text of the manual often contains the term "self-locking nut", meaning that such a nut locks itself when installed. However, when unscrewed, it loses this property. Therefore, such nuts must be replaced with new ones after unscrewing them.
It often happens that when unscrewing a bolt, its head twists. The remaining part of the bolt can be unscrewed by drilling a hole in it and inserting a self-tapping roller with a left-hand thread. When tightened, it cuts into the damaged bolt and unscrews it. Such self-tapping rollers are sold in auto parts stores. The damaged bolt can be removed by drilling with a drill of almost the same diameter (a little less). After this, the thread of the bolt hole should be renewed.
The studs can be unscrewed using two nuts locked against each other. When unscrewing the stud, the key is placed on the inner nut, and when screwing in, on the outer nut.
[Source available on the website peugeotbook]
Threads on light metals wear out quite quickly. If the threads are only slightly worn out, they can be renewed by slightly widening the hole. Otherwise, a threaded bushing is installed with subsequent thread cutting. This work should be entrusted to a workshop. The appropriate taps are used to cut the threads, the cutting process itself consists of three passes: preliminary cutting, fitting and final cutting. The appropriate taps are used for each stage. A tap with one ring on the rod is used for preliminary thread cutting, a tap with two rings is used for fitting and a tap without rings or with three rings on the rod is used for final cutting.
Each tap is used exclusively for its own operation with a constant supply of oil. The hole is cut gradually. In this case, the tap is fed forward, and after some time it is unscrewed a little back. This is necessary so that the tap does not break due to its jamming by metal shavings.
Tightening torques
The tightening torques specified by the manufacturer are given in this manual. It is possible that a tightening torque of, for example, 47 Nm can be rounded up and implemented as 50 Nm. However, we recommend that you follow the vehicle manufacturer's instructions. In order to maintain the required tightening torques, you will need a torque wrench and replaceable socket heads. In some cases, access to the nut or bolt is so difficult that it is not possible to use a torque wrench. In such and similar cases, experience is needed to tighten to the required torque intuitively.

For the most common threaded connections (bolts and nuts) generally accepted tightening torques apply (see table).
Application of lubricants and sealants
Each manufacturer recommends using lubricants from specific companies, which were selected when the car was created. For this reason, the text contains names of lubricants recommended by the manufacturer.
The product "Loctite" is mentioned very often. This liquid consistency product is applied to the threads of nuts and bolts and is intended to protect them, as well as to prevent spontaneous unscrewing of bolts and nuts. There are similar products from other manufacturers that can be used, after prior consultation upon purchase.
If the text contains an indication of the need to apply a sealing compound (sealant), it is recommended to consult with the workshop about what composition is needed and for what parts. Basically, the sealing compound is needed to seal the engine.