
Draining the coolant from the cooling system
Attention! Wait for the engine to cool down before starting this procedure. Do not allow antifreeze to come into contact with skin or vehicle paintwork. Splashes should be washed off immediately with plenty of water. Never leave antifreeze in open containers or in puddles on your driveway or garage floor. Its pleasant smell can attract the attention of children and pets, and ingestion of antifreeze can be fatal.
1. On the 1.9L DW series engine, release the clips on the right side and on the top plane of the engine cover, and then remove the cover, being careful not to fall out of the corresponding rubber supports (pic. 4.6, a-c). On the 2.0L engine, release the locks by turning them a quarter of a turn and remove the engine cover (pic. 4.11, a, b).
2. Wait for the engine to cool completely and remove the expansion tank cap. Rotate the cover counterclockwise to the first fixed position. Wait for the residual pressure in the cooling system to be released, then press the cap and turn it counterclockwise to the second locking position, and then remove it.
3. Place a suitable container under the left side of the radiator. On early models, loosen the drain plug (you don't need to unscrew it completely) and allow the coolant to drain into a container. Later models do not have a drain plug, so you will need to disconnect the lower radiator hose to drain the coolant.
4. To facilitate draining the liquid, open the air vent screws from the cooling system. They are located in the nipple connection of the outlet hose of the heater radiator (for easier access, the screw can be located in the extension hose), on the bulkhead of the engine compartment and on the thermostat housing (pic. 25.4, a, b).
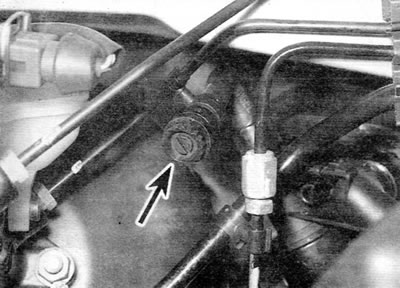
Pic. 25.4, a. Bleed screw on heater hose (marked with an arrow)
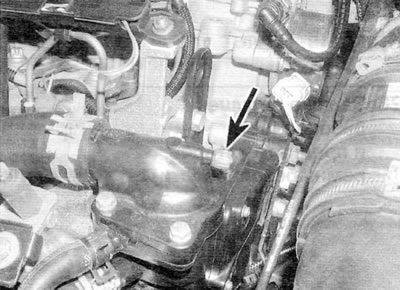
Pic. 25.4, b. Air bleed screw on thermostat housing (marked with an arrow)
5. When coolant stops flowing, move a container under the cylinder block drain plug located on the back of the block.
6. Remove the drain plug and allow the coolant to drain into a container.
7. If the coolant is drained for reasons other than replacement, then if it is clean and less than two years old, it can be reused, but this is not recommended.
8. At the end of the drain, replace the drain plugs of the radiator and cylinder block. Also connect the lower radiator hose (later models), if you do not plan to flush the system.
Flushing the cooling system
9. If the replacement of the coolant was neglected or the concentration of antifreeze dropped, the cooling system may gradually lose efficiency, as the coolant channels are narrowed due to the deposition of rust, scale and other deposits in them. The efficiency of the cooling system can be restored by flushing the system.
10. To avoid additional contamination, the radiator should be flushed separately from the engine.
Flushing the radiator
11. To flush the radiator, first tighten the drain plug and air bleed screw on the radiator (if applicable).
12. Disconnect the upper and lower hoses and all other related hoses from the radiator (see chapter 3).
13. Insert a garden hose into the upper radiator inlet. Direct a stream of clean water into the radiator and continue flushing until clean water comes out of the bottom outlet.
14. If no clear water comes out of the lower hose after a reasonable amount of time, you can flush the radiator with a good commercial cooling system flush cleaner. Carefully follow the product manufacturer's instructions. If the contamination is very strong, remove the radiator, insert a hose into the lower radiator hose and backflush the radiator (countercurrent).
Engine flush
15. To flush the engine, first screw in the drain plug of the cylinder block and tighten the air release screws.
16. Remove the thermostat (see chapter 3) and temporarily install the thermostat cover.
17. With the top and bottom hoses disconnected from the radiator, insert a garden hose into the top radiator hose. Direct a stream of clean water through the engine and continue flushing until clean water comes out of the lower radiator hose.
18. After flushing, replace the thermostat and connect the hoses as described in chapter 3.
Filling the cooling system
19. Before filling the cooling system, make sure that all hoses and clamps are in good condition and that the clamps are tight. Please note that to prevent corrosion of engine components, antifreeze should be used all year round (see below). Also make sure the drain plugs on the radiator and cylinder block are screwed in and tight.
20. Remove the filler cap of the expansion tank.
21. Open all air bleed screws from the cooling system (see point 4).
22. Some of the cooling system hoses are located above the cut of the expansion tank neck. Therefore, when filling the cooling system, it is necessary to use a so-called pressure vessel, which makes it possible to reduce the possibility of air entering the system. Although Peugeot/Citroen dealers use a dedicated pressure vessel, the same effect can be achieved with a suitable plastic bottle, provided there is an airtight seal between it and the filler neck.
Tip. To make «pressure tank» to charge the cooling system, take «old» antifreeze container and cut off the bottom from it. The seal at the point marked by the arrow must be absolutely tight.
23. Install «pressure tank» expansion tank and slowly fill the system. Coolant will flow out through each air bleed screw in turn, starting with the lowest screw. As soon as coolant without air bubbles appears from under the lowest screw, tighten this screw and start watching the next air bleed screw. Repeat this procedure until coolant begins to flow from under the uppermost air bleed screw. Then securely tighten all bleed screws.
24. Continue topping up the cooling system until no more air bubbles appear in the expansion tank. Squeeze the bottom radiator hose several times to help bleed air from the system.
25. When bubbles stop appearing, check that «pressure tank» filled (at least 0.5 liters of coolant), and start the engine. Allow the engine to run at a higher idle speed (do not exceed 2000 rpm) until the cooling fan turns on and off. Turn off the engine.
Warning. The coolant will be very hot. Be extremely careful not to scald.
26. Wait for the engine to cool, and then remove «pressure tank».
27. After the engine has cooled down, check the coolant level (see «Weekly checks»). If necessary, add fluid and install the cap on the expansion tank. Install the top cover on the engine (if applicable).
Antifreeze
28. Antifreeze should be changed at prescribed intervals. This is necessary not only to preserve the properties of the antifreeze, but also to prevent corrosion, which can occur due to the gradual decrease in the effectiveness of corrosion inhibitors.
29. Be sure to use the prescribed brand of ethylene glycol antifreeze (see «Lubricants and operating fluids»), The amount of antifreeze and its protective properties are indicated in «Specifications».
30. Before adding coolant, completely empty the cooling system, it is advisable to flush it and check the condition and tightness of all hoses.
31. After refueling antifreeze, attach a tag to the expansion tank indicating the brand and concentration of antifreeze used, as well as the date of refueling. Any subsequent refueling should use the same brand and concentration of antifreeze.
32. Do not use antifreeze for the engine cooling system in the windshield/liftback glass washer system, as it may damage the vehicle's paintwork. Window washer additive should be added to the washer system in the amounts indicated on the bottle.