



Table of contents: Early models 🠇 Late models 🠇
Note: Before removing the fuel filter/housing, consult your dealer for availability of these items. On some models, the fuel filter/housing may be a single unit.
Warning. When working on the fuel system of HDi engines, absolute cleanliness must be maintained. It is especially important to prevent various types of contaminants from entering the fuel lines (dust, water and other impurities). In addition, please note the following important points:
- When replacing the fuel filter element, rinse the filter housing in a container with a solvent, such as an injector checker, kerosene, or a similar solvent. Do not use compressed air or ordinary rags for drying. The only product approved for this purpose is a special cleaning cloth called Resistel, which is available from Peugeot/Citroen dealers.
- Before any work on the high-pressure side of the fuel system, thoroughly clean the work area with a vacuum cleaner, then wipe the area around the components to be removed with a paint brush dampened with an approved solvent (Sodimac No. 35, Mecanet or similar).
- DO NOT clean the engine with steam or high pressure water. Use one of the solvents mentioned above.
- After disconnecting the union nut of any fuel line, immediately plug the open ends to prevent dirt from entering. Special plugs for this purpose can be purchased from your dealer.
21. Two different filter options can be used and can be identified by the design of the filter housing cover. On early engines, the housing cover has a hexagonal protrusion that allows the cover to be loosened using a suitable socket head. On later engines, the filter housing cover is secured with a ribbed retaining ring that can be loosened with a strap wrench. Determine the type of filter installed and proceed as described under the appropriate subheading.
Early models
22. Release the fasteners by turning them a quarter of a turn and remove the engine cover (figure 4.11, a, b).
23. Remove all traces of dirt from the outside of the filter housing, and then drain the condensate from the fuel filter as described in paragraph 4.
24. Disconnect the quick release couplings of the fuel supply and return hoses on the filter housing cover using a small screwdriver to release the retaining clip (figure 19.24). Seal open hose nipples appropriately to prevent dirt from entering.
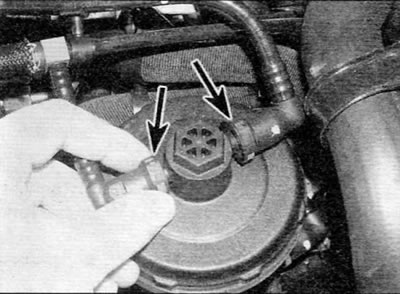
Figure 19.24. Disconnect the quick-release couplings of the fuel supply and return hoses (marked with arrows) on the filter housing cover (early 2.0 L engines)
25. Place a suitable socket head onto the hexagonal recess on the filter housing cover and turn the cover approximately a quarter turn counterclockwise to release the locking elements.
26. Remove the housing cover, metal sealing ring and sealing ring, and then take out the filter element (figure 19.26, a-g).
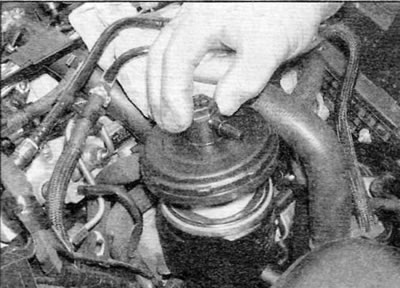
Figure 19.26, a. Remove the filter housing cover...
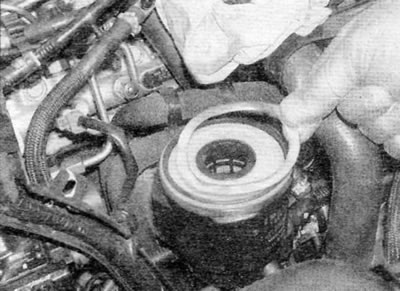
Figure 19.26, b - remove the metal sealing ring...
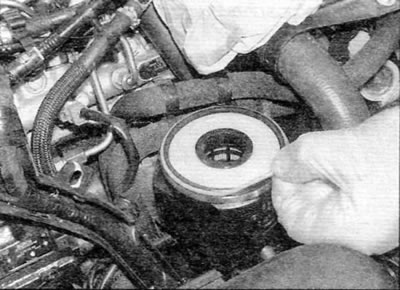
Figure 19.26, c....and the sealing ring...
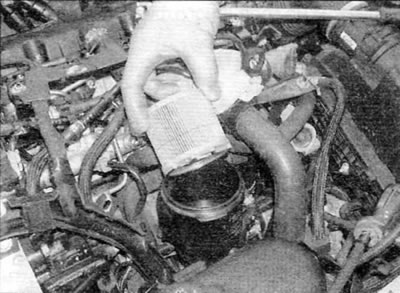
Figure 19.26, d....then remove the filter element (early 2.0 L engines)
27. Remove the two bolts and the filter housing from its supporting bracket. Clean the filter housing and cover thoroughly, taking into account the cleanliness requirements specified above. Once the cleaning operations are completed, install the housing on the support bracket and secure it with two bolts.
28. Install the new filter element onto the housing.
29. Lubricate the new O-ring with clean diesel fuel and install it, then the metal O-ring.
30. Install the housing cover and turn it clockwise until the arrow on the housing cover is aligned with the filter drain port.
31. Connect the fuel supply and return hoses, and then fill the fuel system as described in chapter 4B.
32. Finally, install the engine cover.
Late models
33. Release the fasteners by turning them a quarter of a turn and remove the engine cover (figure 4.11, a, b).
34. Remove all traces of dirt from the outside of the filter housing, and then drain the condensate from the fuel filter as described in paragraph 4.
35. If applicable, disconnect the electrical connector located on the top of the filter housing cover (figure 19.35).
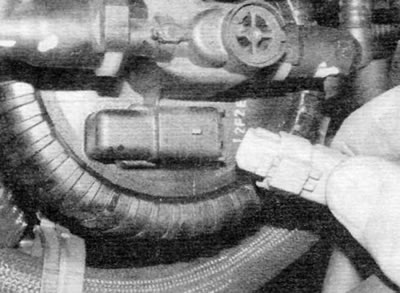
Figure 19.35. Disconnect the electrical connector located on the top of the filter housing cover (late 2.0L engines)
36. Disconnect the fuel line quick release couplings on the filter housing cover using a small screwdriver to release the retaining clip (figure 19.36). Move the fuel lines to the side and suitably plug the open ends to prevent dirt from entering.
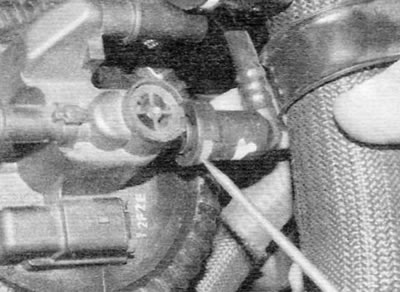
Figure 19.36. Disconnect the quick-release couplings of the fuel supply and return hoses (late 2.0L engines)
37. Using a strap wrench or similar tool, loosen the retaining ring on the filter housing. Remove the housing cover, take out the filter element and remove the sealing ring (figure 19.37). Note: Although it is known in theory that the retaining ring on the filter housing can be loosened, in practice it is often impossible to loosen the retaining ring without damaging the housing, which requires replacing the entire filter housing.
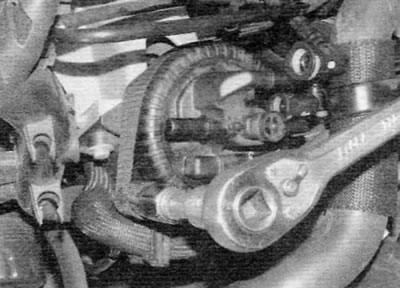
Figure 19.37. Using a strap wrench or similar tool, loosen the retaining ring on the filter housing (late 2.0L engines)
38. Remove the two bolts and the filter housing from its supporting bracket. Clean the filter housing and cover thoroughly, taking into account the cleanliness requirements specified above. Once the cleaning operations are completed, install the housing on the support bracket and secure it with two bolts.
39. Install the new filter element onto the housing.
40. Lubricate the new O-ring with clean diesel fuel and install the O-ring.
41. Install the housing cover and position it so that the inlet and outlet fittings are parallel to the engine.
42. Screw the retaining ring onto the housing and tighten it until the grooves on the ring and the housing are aligned.
43. Connect the fuel supply and return hoses and, if applicable, connect the electrical connector. Fill the fuel system as described in chapter 4B.
44. Finally, install the engine cover.