
English Русский
Български
Беларускі
Український
Српски
Hrvatski
Română
Polski
Slovenský
Magyar
Bookmark Articles Sitemap Contacts
Company Hyundai Company Opel Company Skoda Company Kia Company Mitsubishi Company LADA Company Audi
PeugeotBook.ru


Series 100   Series 200   Series 300   400-500   Series 600   Crossovers   Others
 
Partner I (1996-2008) Peugeot 807 (2002-2014) Peugeot 806 (1994-2002) Peugeot J5 (1981-1993)

Thermostat — removal, checking, and installation (Peugeot Partner I)

  • Main
  • Пежо
  • Partner I (1996-2008)
  • Power unit
  • Cooling and heating
  • Thermostat — removal, checking, and installation
0
Table of contents: Removal 🠇 Examination 🠇 Installation 🠇

Removal


1. Disconnect the ground cable from the battery (see "Disconnecting the battery").

2. On 1.9L DW series diesel engines, release the clamp in the center of the engine cover and remove the screw on the right side. Remove the engine cover. On 2.0L diesel engines, rotate the four plastic fasteners 90° and remove the engine cover (Figure 4.2, a-d).
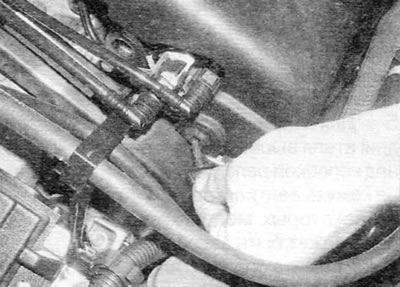
Figure 4.2, a. On 1.9L diesel engines, remove the fasteners on the right side...
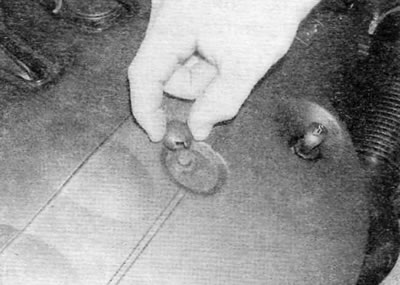
Figure 4.2, a. On 1.9L diesel engines, remove the fasteners on the right side...


Figure 4.2, b....and on the upper plane of the engine cover
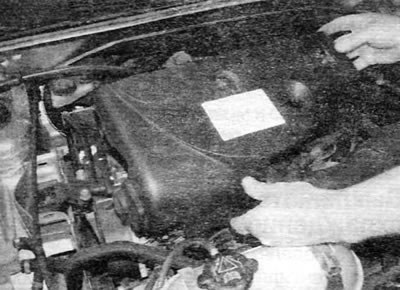
Figure 4.2, b....and on the upper plane of the engine cover


Figure 4.2, c....then remove the engine cover
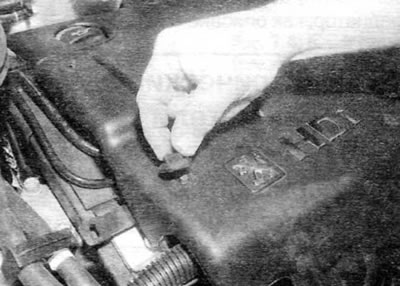
Figure 4.2, c....then remove the engine cover


Figure 4.2, d. On 2.0L diesel engines, to release each lock, turn it 90°...
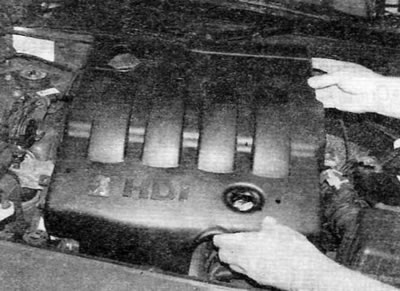
Figure 4.2, d. On 2.0L diesel engines, to release each lock, turn it 90°...


Figure 4.2, d....and then remove the engine cover

Figure 4.2, d....and then remove the engine cover


(Original published on the portal peugeotbook.ru)

3. Drain the coolant from the cooling system (see chapter 1A or 1B).

4. Remove the air cleaner assembly and air intake ducts as described in the chapter 4A, 4B or 4B.

5. Loosen the bolts and carefully remove the thermostat housing cover to expose the thermostat (figure 4.5). Be careful not to deform the coolant hose connected to the cap. Keep in mind that the thermostat housing design varies depending on the engine type, but the thermostat removal technique is the same for each type.
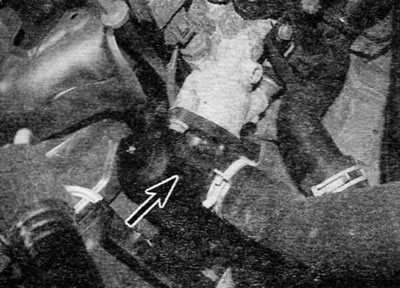
Figure 4.5. Location of the cover on the thermostat housing (marked with an arrow) (model with a…

Figure 4.5. Location of the cover on the thermostat housing (marked with an arrow) (model with a 1.4 L petrol engine)


6. On early models with a separate thermostat, remove the thermostat from the housing, noting how it is installed. Remove the sealing ring (figure 4.6).
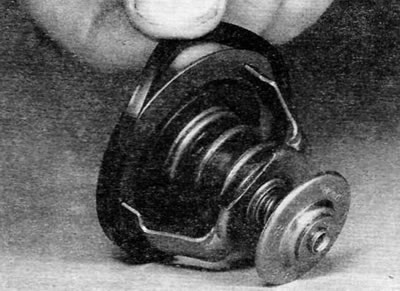
Figure 4.6. Removing the sealing ring from the thermostat flange

Figure 4.6. Removing the sealing ring from the thermostat flange


7. On later models where the thermostat is an integral part of the housing cover, remove the O-ring, release the clamp and remove the cover from the coolant hose.

Examination


8. A rough test of the thermostat can be done by hanging it on a piece of fishing line in a container filled with water. Heat the water until it comes to a boil. The thermostat should open by the time the water boils. If this is not the case, replace it.

9. If you have a thermometer, you can determine the exact temperature at which the thermostat opens. Compare this value with the opening temperature specified in "Specifications". The opening temperature should also be indicated on the thermostat.

10. A thermostat that does not close as the water cools must be replaced.

Installation


11. Installation is carried out in the reverse order of removal, taking into account the following points:
  • a) Inspect the O-ring for damage or deterioration and replace if necessary.
  • b) Make sure that the thermostat is installed in the correct position marked during removal.
  • c) Finally, fill the cooling system as described in chapter 1A or 1B.
This article is available at russian, bulgarian, belarusian, ukrainian, serbian, croatian, romanian, polish, slovak, hungarian
Article reviewed by editor: Nikonova Veronica
Share information:
Previous
Partner I: Cooling and heating
Next

Radiator — removal, inspection and installation
Coolant system hoses — disconnecting and replacing
General information and precautions
Cooling system specifications
Electric cooling fans — removal and installation
Electrical switches and sensors of the cooling system — removal…
Coolant pump — removal and installation
Thermostat/Fuel Filter Housing (1.8L and 1.9L Diesel Models)
Heating and ventilation system — general information
See similar information for other Peugeot models

➨ Valve clearances (8-valve engines) — checking and adjustment Peugeot 106 (1991-2003)
➨ Checking tire pressure Peugeot 207 (2006-2014)
➨ Thermostat — removal, checking, and installation Peugeot 305 (1977-1989)
➨ Thermostat — Removal, Checking and Installation Peugeot 405 (1987-1997)
➨ Engine Oil Level — Checking and Replacing Peugeot 605 (1989-2000)
Link to this article in different formats
Comments and feedback from visitors
No comments yet


Add two numbers 50 + 48


Partner I (1996-2008) 
  • General information
  • Introduction to the guide
  • Faults en route
  • Weekly checks
  • User manual
  • Maintenance (petrol)
  • Maintenance (diesel)
  • Power unit
  • Petrol engines
  • Diesel engines «XUD»
  • Diesel engines «DW»
  • Overhaul of petrol engines
  • Overhaul of diesel engines
  • Cooling and heating
  • Power and exhaust (petrol)
  • Power and exhaust (XUD diesels)
  • Power and exhaust (DW diesels)
  • Emission reduction
  • Starting and charging system
  • Transmission
  • Clutch
  • Mechanical gearbox
  • Drive shafts
  • Chassis, running gear
  • Brake system
  • Car suspension
  • Steering
  • Body and interior
  • Exterior (external elements)
  • Interior (internal elements)
  • Doors, locks and windows
  • Electrical equipment
  • Equipment and devices
  • Electrical circuits
Peugeot 807 (2002-2014) 
  • General information
  • Operating instructions
  • Maintenance
  • Troubleshooting
  • Power unit
  • Gasoline engines
  • Diesel engines
  • Cooling and heating
  • Fuel injection (petrol)
  • Fuel system (diesel)
  • Fuel system
  • Exhaust system
  • Ignition system
  • Transmission
  • Clutch
  • Manual gearbox
  • Automatic gearbox
  • Chassis, running gear
  • Brake system
  • Car suspension
  • Steering system
  • Body and interior
  • Exterior (external elements)
  • Interior (internal elements)
  • Electrical equipment
  • Power devices
  • Electrical circuits
Peugeot 806 (1994-2002) 
  • General information
  • User manual
  • Maintenance
  • Power unit
  • Petrol engines
  • Diesel engines
  • Lubrication system
  • Cooling system
  • Fuel injection (petrol)
  • Fuel system (diesel)
  • Ignition and exhaust systems
  • ECM Bosch Motronic MP 3.2
  • ECM Magneti-Marelli (MM)
  • Transmission
  • Clutch
  • Mechanical gearbox
  • Chassis, running gear
  • Brake system
  • Car suspension
  • Steering
  • Electrical equipment
  • Equipment and devices
  • Electrical circuits
Peugeot J5 (1981-1993) 
  • General information
  • Introduction to manual
  • Specifications
  • Gasoline engine
  • Engine repair
  • Lubrication system
  • Cooling system
  • Fuel system
  • Ignition system
  • Diesel engine
  • Engine repair (DB9)
  • Lubrication system (DB9)
  • Cooling system (DB9)
  • Fuel injection (DB9)
  • Engine repair (U25)
  • Lubrication system (U25)
  • Cooling system (U25)
  • Fuel injection (U25)
  • Transmission
  • Clutch
  • Gearbox
  • Drive shafts
  • Chassis, running gear
  • Steering system
  • Car suspension
  • Brake system
  • Electrical equipment
  • Power devices
  • Electrical circuits
PeugeotBook.ru © 2018–2026 | Mobile version | Sitemap: EN BG BY UA RS HR RO PL SK HU | Write message | Site search | Add to bookmarks | Peugeot owners
106 (1991-2003) | 206 (1998-2012) | 207 (2006-2014) | 305 (1977-1989) | 306 (1993-2002) | 307 (2001-2008) | 405 (1987-1997) | 406 (1995-2004) | 605 (1989-2000) | Partner-I (1996-2008) | Eurovans-807 (2002-2014) | Eurovans-806 (1994-2002) | J5 (1981-1993) |
Cookies are used to ensure the correct display of pages on the site.