
Note. Before starting work, read the warnings given in paragraph 1 of this chapter. To avoid scalding, the hoses should only be disconnected when the engine has cooled down sufficiently.
1. If the checks described in the chapter 1A or 1B, detect a defective hose, it should be replaced by working as described below.
2. Drain the coolant from the cooling system first (see chapter 1A or 1B). If you are not going to change the coolant, it can be reused. To do this, collect the liquid in a clean container.
3. To disconnect the hose, proceed as described below, depending on the type of connection.
Conventional Connections - General Instructions
4. Conventional hose connections can use either standard worm-drive clamps (screw) clamp, or crimp type clamps. Crimp type clamps are not intended to be reused and should be replaced with worm clamps during assembly.
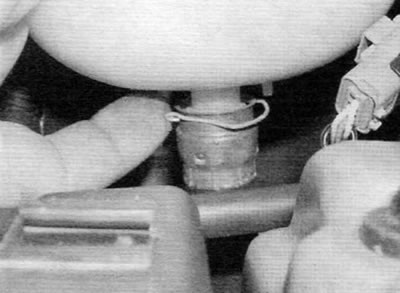
5. To disconnect the hose, loosen the clamps with a screwdriver and slide them along the hose, releasing its ends. Carefully remove the hose from the fittings (pic. 2.5). If the hose is new, it can be removed relatively easily. On a car with high mileage, this can cause some difficulties.
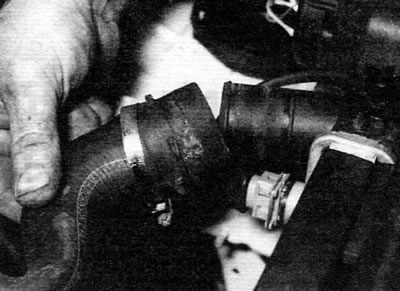
Pic. 2.5. Disconnecting the upper radiator hose
6. If the hose cannot be removed, before removal, try to release it by turning it relative to the nozzle. Gently pry off the end of the hose with a blunt instrument (type of flathead screwdriver), but do not apply too much force and be careful not to damage the fittings or the hose itself. Be aware that the radiator inlet and outlet pipes are very fragile. Do not apply excessive force when removing hoses. If you still cannot remove the hose, cut it with a sharp knife, and then cut it so that you can remove it in two pieces. Although it is expensive, it is still cheaper than buying a new radiator. However, purchase a new hose first.
7. When reinstalling the hose, first put the hose clamps on the hose and then push the hose onto the fittings. If crimp-type clamps were originally used, it is recommended to use worm-type clamps when installing the hose (with screw).
8. With each end of the hose fully seated on the appropriate fitting, check that the hose is routed correctly. Before tightening the clamps, slide each clamp along the hose, behind the flared end of the nozzle.
9. Fill the cooling system with coolant (see chapter 1A or 1B).
Advice. If the hose is tight, lightly dampen it with soapy water as a lubricant. You can soften the hose by dipping it in boiling water. Do not use oil or grease that can corrode rubber.
10. After working on any element of the cooling system, carefully check the system for leaks as soon as possible.
Bayonet connections
Note. A new O-ring must be used when connecting the hose.
Removing
11. On some models, the lower and / or upper hose (-And) can be connected to the radiator with a bayonet type plastic fitting. To disconnect such a connection, proceed as described below.
12. Rotate the retaining ring (2) counterclockwise until it comes into contact with the stopper (1) (pic. 2.12).
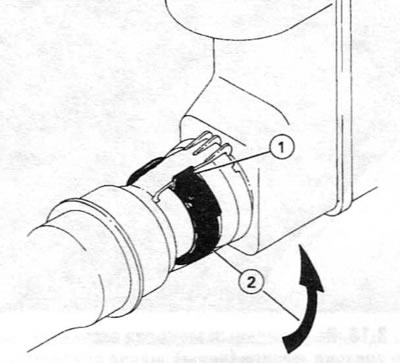
Pic. 2.12. To release the bayonet connection of the radiator hose, turn the retaining ring (2) until it hits the limiter (1)
13. Press the fitting away from the hose to release the two locking tabs (3) (pic. 2.13).

Pic. 2.13. Push the fitting away from the hose to release the two locking tabs (3)
14. Disconnect a hose together with a fitting from a radiator.
15. Remove the o-ring from the fitting and discard it; when installing, use a new one.
Installation
16. Thoroughly wipe the fitting and tube on the radiator with a clean, lint-free cloth.
17. Properly install a new o-ring on the male section of the joint (pic. 2.17).
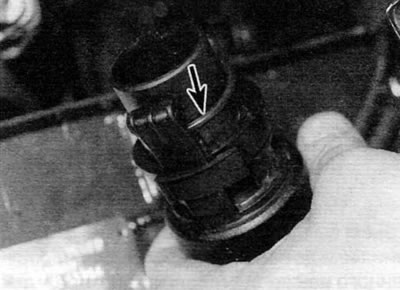
Pic. 2.17. Install a new O-ring when installing (marked with an arrow) on the hose fitting
18. Turn the retaining ring clockwise until it clicks.
19. Lead the hose to the fitting on the radiator so that the installation cutout in the male part of the connection is located at the very bottom (pic. 2.19).
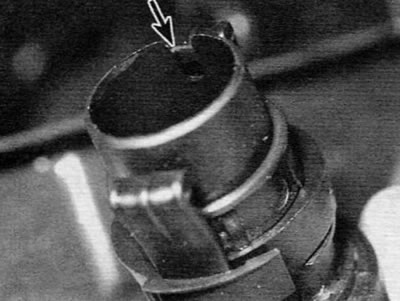
Pic. 2.19. Route the hose to the fitting on the radiator so that the notch (marked with an arrow) was located at the bottom
20. Insert the fitting into the nozzle until both locking tabs engage. Be careful not to pinch the sealing ring.
21. If necessary, pull the fitting back (from the nozzle), to adjust the position of the locking feet.
22. Fill the cooling system (see chapter 1A or 1B).
23. After working on any part of the cooling system, carefully check the system for leaks.
Spring clamp connections
Note. A new O-ring must be used when connecting the hose.
Removing
24. Some coolant hoses can be secured with a wire spring clip. To disconnect such a connection, proceed as described below.
25. Using a small screwdriver, pull out the spring clip and disconnect the connection (pic. 2.25). After disconnecting the hose, install the spring clip on the hose fitting.
Pic. 2.25. When using spring clip connections, remove the spring clip and then disconnect the hose
26. Inspect the hose fitting o-ring for signs of damage or deterioration and replace if necessary.
Installation
27. Install the o-ring and spring clip in their respective grooves and check for correct installation (pic. 2.27).

Pic. 2.27. Install O-ring and spring clip before connecting hose
28. For ease of installation, apply a little soapy water to the O-ring and then push the hose until it clicks into place.
29. Make sure that the hose is securely fixed with a spring clip, and then recharge the cooling system (see chapter 1A or 1B).
30. After working on any part of the cooling system, carefully check the system for leaks.