
Note. If the reason for removing the radiator is a leak, be aware that minor leaks can often be repaired without removing the radiator from the vehicle using a special sealant.
Withdrawal - Pre-September 2002 Release Models
Petrol engine models
1. Disconnect the ground wire from the battery (see «Disconnecting the battery»).
2. Drain the coolant from the cooling system (see chapter 1A).
3. If necessary, remove the air filter assembly and intake ducts for easier access to the radiator as described in chapter 4A.
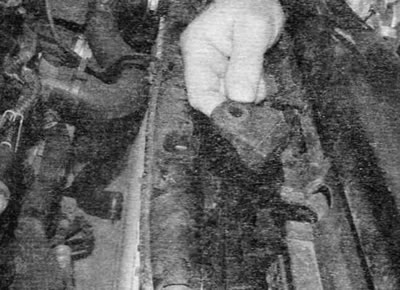
4. Disconnect the coolant hoses from the radiator as described in paragraph 2.
5. On models without air conditioning, if applicable, disconnect the electrical connector for the cooling fan switch or temperature sensor located on the left side of the radiator.
6. Working on top of the heatsink, pry up the ends of the heatsink mounting clips (one on each side) and slide the top of the radiator towards the engine (pic. 3.6). Lift up the radiator to disengage the lower mounting tabs and remove the radiator from the engine compartment. Be careful not to damage the fins/fins when removing the heatsink by rubbing adjacent parts.
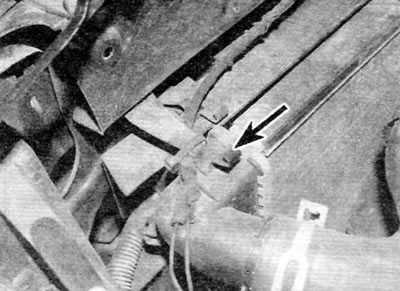
Pic. 3.6. Raise the ends of the radiator mount clips (marked with arrows) and slide the top of the radiator towards the engine
Diesel Models
7. Disconnect the ground wire from the battery (see «Disconnecting the battery»).
8. Drain the coolant from the cooling system (see chapter 1B).
9. If necessary, to facilitate access to the radiator, remove the air filter assembly and intake air lines, as described in chapter 4B or 4B.
10 Release the clamps and disconnect the upper hoses from the expansion tank of the cooling system (pic. 3.10).

Pic. 3.10. On diesel models, disconnect the upper hoses (the left hose is marked with an arrow) on the expansion tank of the cooling system
11 If applicable, disconnect the coolant level sensor electrical connector at the rear of the expansion tank (pic. 3.11).
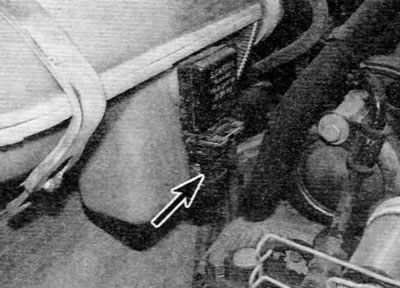
Pic. 3.11. Disconnect the electrical connector (marked with an arrow) coolant level sensor on the expansion tank
12. Release fixing collars and take a broad tank from a corresponding basic arm. Release the clamp and disconnect the hose from the underside of the expansion tank, and then remove the tank.
13. Remove the grille as described in chapter 11, then remove the two bolts and remove the expansion tank support bracket from the front body panel.
14. If applicable, disconnect the electrical connector for the cooling fan switch or temperature sensor located on the left side of the radiator.
15. Disconnect all coolant hoses from the radiator as described in paragraph 2.
16. Working on top of the heatsink, pry up the ends of the heatsink mounting clips (one on each side) and slide the top of the radiator towards the engine (pic. 3.6). Lift up the radiator to disengage the lower mounting tabs and remove the radiator from the engine compartment. Be careful not to damage the fins/fins when removing the heatsink by rubbing adjacent parts.
Withdrawal - Release Models After September 2002
17. Disconnect the ground wire from the battery (see «Disconnecting the battery»).
18. Drain the coolant from the cooling system (see chapter 1A or 1B).
19. If necessary, to facilitate access to the radiator, remove the air filter assembly and intake air ducts, as described in chapter 4A, 4B or 4B.
20. On models without air conditioning, if applicable, disconnect the electrical connector for the cooling fan switch or temperature sensor located on the left side of the radiator.
21. Working on the top of the radiator, remove the nuts (one on each side) fixing the radiator support frame to the front panel of the body. Remove the metal spacer from the rubber bushing (pic. 3.21, a, b).
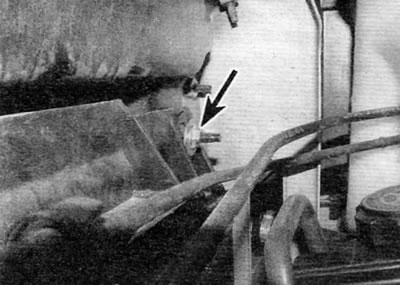
Pic. 3.21 a. Loosen the nut (marked with an arrow) fastening the radiator support frame to the front panel of the body...
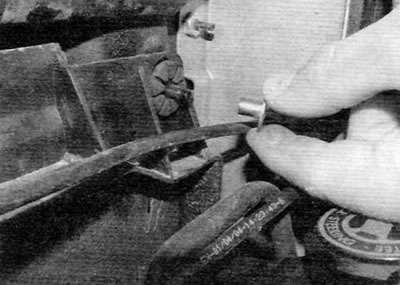
Pic. 3.21b....and then remove the metal spacer from the rubber bushing
22. Slide the top of the radiator support frame toward the engine and remove the bolt securing each top radiator support bracket to the frame (pic. 3.22).

Pic. 3.22. Remove the bolt that secures each upper radiator support bracket to the support frame
23. Remove the brackets from their respective slots in the base frame and remove them from the plastic studs on the heatsink (pic. 3.23).
Pic. 3.23. Remove the brackets from their respective slots in the base frame and remove them from the plastic studs on the heatsink
24. Remove the clips and disconnect the expansion tank hoses from the radiator. Release the hose (-And) clips on the heatsink and slide them to the side.
25. Disconnect the remaining coolant hoses from the radiator as described in paragraph 2.
26. Raise the radiator to unhook the lower mounting tabs and remove the radiator from the engine compartment. Be careful not to damage the fins/fins when removing the heatsink by rubbing adjacent parts.
Inspection
27. If the heatsink was removed due to suspected blockage, backflush as described in chapter 1A or 1B. Remove dirt from heatsink fins/fins with compressed air (in this case, use eye protection) or soft brush.
Warning. Be careful as the blades are very sharp and can be easily damaged.
28. If necessary, a radiator specialist can perform a flow test on the radiator to determine if there is an internal blockage.
29. A leaking radiator should be taken to the appropriate specialist for a quality repair. Do not attempt to weld or solder a leaking heatsink as this may damage the plastic parts.
30. If the radiator is sent somewhere for repair or replacement, remove all hoses and the cooling fan switch from it (in the presence of)
31. Check up a condition of rubber support of a radiator and replace them if necessary.
Installation
32. Installation is carried out in the reverse order of removal, taking into account the following points:
- A) Ensure that the lower tabs on the radiator are properly seated in the rubber mounts in the body panel.
- b) Connect the hoses as described in paragraph 2, where applicable, using new o-rings.
- V) Finally, charge the cooling system as described in chapter 1A or 1B.