
Removing
Camshaft pulley (engines 1.4 l)
1. Remove the timing belt as described in paragraph 6.
2. Remove the crankshaft and camshaft locking tools and use a wrench or socket to reverse the crankshaft at the crankshaft pulley bolt (counterclock-wise) 90°. This is to prevent any accidental contact between pistons and valves.
3. Release a bolt of fastening of a gear pulley of a camshaft and remove it together with a corresponding washer. To prevent the camshaft from turning when the bolt is released, you will need to hold the toothed pulley. In the absence of a special tool from the manufacturer, an acceptable replacement can be made as described below. Take two steel strips (long and short) and three pairs of nuts and bolts, drill the necessary holes and assemble the fixture. One nut with a bolt forms the axis of the fork tool, and the other two nuts with bolts are fixed at the ends of the fork and, when using the fixture, must enter the holes in the spokes of the toothed pulley.
Tip: Use a homemade tool to hold the camshaft sprocket while tightening the bolt (shown on removed cylinder head).
Warning. Do not attempt to use tools to block the toothed pulleys to prevent the respective pulleys from turning when the bolts are loosened.
4. After unscrewing the bolt, remove the toothed pulley from the end of the camshaft. If the timing pin of the timing pulley is loose, remove it and store it in a safe place. Inspect the camshaft seal for signs of oil leakage and, if necessary, replace it as described in paragraph 8.
Camshaft pulleys (engines 1.6 l)
5. Remove the cylinder head covers as described in paragraph 4.
6. Remove the timing belt as described in paragraph 6.
7. Remove the crankshaft and camshaft locking tools and use a wrench or socket to reverse the crankshaft by the crankshaft pulley bolt (counterclock-wise) 90°. This is to prevent any accidental contact between pistons and valves.
8. Holding the camshaft with an open-end wrench by the rectangular section, unscrew the toothed pulley mounting bolt (pic. 7.8).
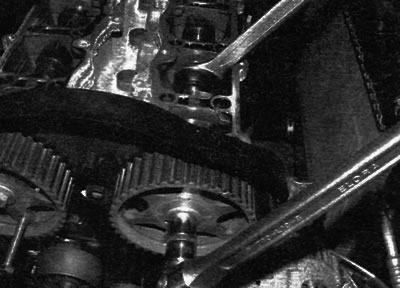
Pic. 7.8. Use an open end wrench to hold the camshaft while loosening the timing pulley bolt (engines 1.6 l)
Warning. Do not attempt to use tools to block the toothed pulleys to prevent the respective pulleys from turning when the bolts are loosened.
9. After unscrewing the bolt, remove the toothed pulley from the end of the camshaft. Note that the key is integrated with the toothed pulley. Inspect the camshaft seals for signs of oil leakage and, if necessary, replace them as described in paragraph 8.
Crankshaft pulley
10. Remove the timing belt as described in paragraph 6.
11. Release a bolt of fastening of a gear pulley of a cranked shaft. To prevent the crankshaft from turning when the bolt is released, select a higher gear and have an assistant fully depress the brake pedal. If the engine has been removed from the vehicle, the flywheel will need to be locked (see paragraph 15). Warning. Do not attempt to use a flywheel locking tool to prevent crankshaft rotation. Before releasing the pulley bolt, temporarily remove the locking tool and then re-insert it once the bolt is released.
12. Turn out a bolt and remove it together with a washer. Then remove the toothed pulley from the end of the crankshaft (pic. 7.12, a, b).
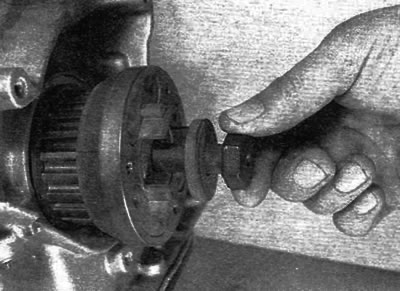
Pic. 7.12, a. Loosen the bolt and remove it along with the washer...
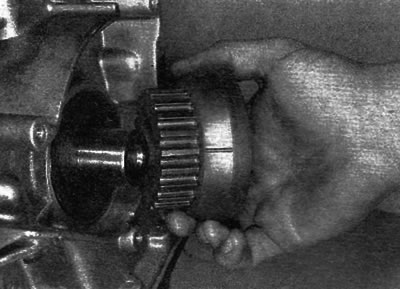
Pic. 7.12b....then remove the crankshaft sprocket
13. If the segment key is not fixed in the crankshaft, remove it and store it in a safe place along with the toothed pulley. If necessary, also remove the flange spacer from the end of the crankshaft (in the presence of) (pic. 7.13). Inspect the crankshaft seal for signs of oil leakage and, if necessary, replace it as described in paragraph 14.
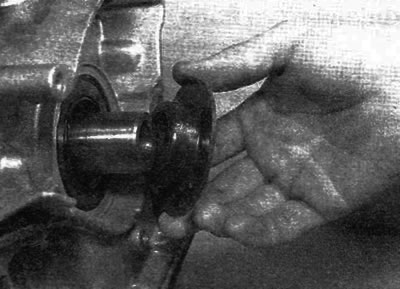
Pic. 7.13. Remove the key and flanged spacer (in the presence of) from the crankshaft
Idler pulley
14. Remove the lower timing belt cover (see paragraph 5).
15. Lock the camshaft and crankshaft at TDC for cylinder No. 1 as described in paragraph 3.
16. Turn away a nut of fastening of a pulley of a tensioner of a timing belt and remove a pulley from a basic hairpin. Inspect the support pin for signs of damage and replace if necessary.
Intermediate pulley
17. Remove the lower timing belt cover (see paragraph 5).
18. Lock the camshaft and crankshaft at TDC for cylinder No. 1 as described in paragraph 3.
19. Loosen the timing belt tensioner pulley nut to release tension from the timing belt.
20. Turn away a nut of fastening of an intermediate pulley of a timing belt and remove a pulley from a basic hairpin. Inspect the support pin for signs of damage and replace if necessary.
Inspection
21. Thoroughly clean toothed pulleys and replace those that show signs of wear, damage or cracks.
22. Clean the tensioner pulley and intermediate pulley, but do not use strong solvents that can penetrate the pulley bearings. Check that the pulleys rotate freely about their respective hubs, with no signs of binding or play. Replace them if there is any doubt about their condition or if there are obvious signs of wear or damage.
23. Inspect the timing belt (see paragraph 6). Replace the belt if there is any doubt about its condition.Installation
Camshaft pulley
24. Install the dowel pin (if removed), then install the toothed pulley on the end of the camshaft. Make sure that the dowel pin fits correctly into the toothed pulley and into the cutout on the end of the camshaft. Keep in mind that on 1.6L engines, the sprocket for the exhaust camshaft is marked «E», and the toothed pulley for the intake shaft is marked «A» (pic. 7.24, a, b).
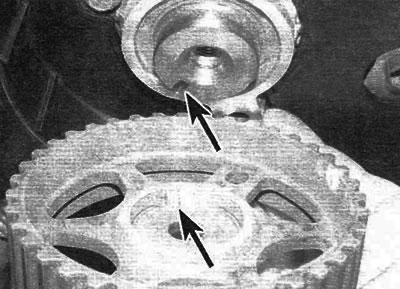
Pic. 7.24 a. The dowel pin must fit into the groove (marked with arrows)
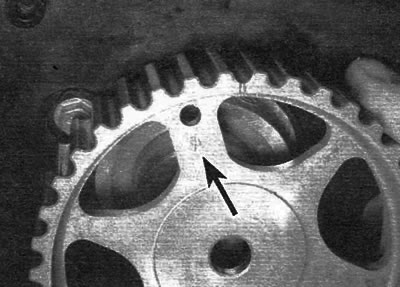
Pic. 7.24b. On 1.6L engines, the intake camshaft sprocket is marked «A» (marked with an arrow), and graduation - marking «E»
25. Screw in the toothed pulley mounting bolt (with puck). Tighten the bolt to the specified torque while holding the toothed pulley/camshaft as when removing.
26. Align the mounting hole in the camshaft sprocket (see paragraph 3) with the corresponding hole in the cylinder head and install the locking rod.
27. Rotate the crankshaft 90°in the normal direction of rotation (clockwise) just enough to insert the crankshaft locking rod.
28. Install the timing belt as described in paragraph 6. On 1.6L engines, install the cylinder head cover as described in paragraph 4.
Crankshaft pulley
29. Install the key on the end of the crankshaft, and then fit the flange spacer (in the presence of), combining the groove in it with the segment key.
30. Align the groove in the crankshaft sprocket with the key and fit the sprocket onto the end of the crankshaft.
31. Temporarily remove the locking tool from the hole on the back of the flywheel, and then screw in the bolt securing the crankshaft timing pulley (do not forget to put the puck). Tighten the bolt to the specified torque, keeping the crankshaft from turning, as when removing. Insert a locking tool into the hole on the back of the flywheel.
32. Install the timing belt as described in paragraph 6.
Intermediate pulley
33. Install the intermediate pulley on the support pin, screw on the nut and tighten it to the prescribed torque.
34. Make sure that the front section of the belt is tensioned, that is, that all the slack falls on the section of the belt where the pulley is located. Make sure that the teeth of the belt are centered on the teeth of the toothed pulleys. Turn the idler pulley counterclockwise to remove all slack in the belt, and then tighten the pulley nut securely.
35. Tension the timing belt as described in paragraph 6.
36. Once the belt is properly tensioned, install the timing belt cover as described in paragraph 5.
Idler pulley
37. Install the idler pulley on the support pin, making sure that the notch is aligned with the locating pin (pic. 7.37), and tighten the nut.
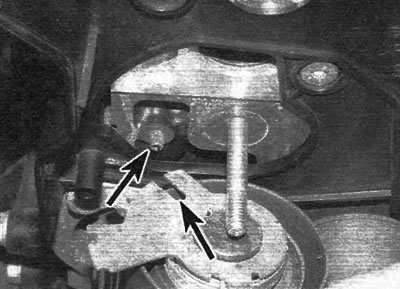
Pic. 7.37. The notch must line up with the dowel pin (marked with an arrow)
38. Make sure that the front section of the belt is tensioned, that is, that all the slack falls on the section of the belt where the pulley is located. Make sure that the teeth of the belt are centered on the teeth of the toothed pulleys. Turn the idler pulley counterclockwise to remove all slack in the belt, and then tighten the pulley nut securely.
39. Tension the timing belt as described in paragraph 6.
40. Once the belt is properly tensioned, install the timing belt cover as described in paragraph 5.