
Hood assembly
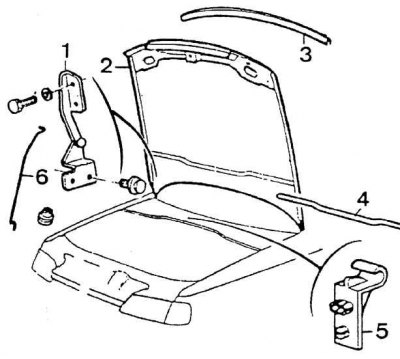
1 - hood hinge, 2 - hood, 3 - seal, 4 - separating seal, 5 - stop clip, 6 - stop
Removing
1. Open the hood. Mark with paint the position of the hood hinges relative to the two fastening elements.
2. Unscrew the bolt securing the ground bar to the hood.
3. Loosen the two bolts securing each hinge to the hood.
4. Install the brush holder to hold the hood open.
5. Unscrew the four screws securing the hood to the hinges (two on each side).
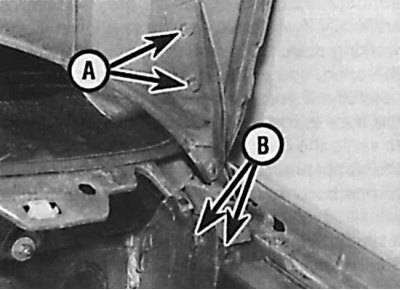
6. unscrew the bolts (A) hood hinges and bolts (B) attaching hinges to the body.
7. Remove the hood. In order not to damage the varnished surface of the front fenders, the hood should be removed by two people.
Repair
When working on the hood, do not apply too much polyester resin, because it tends to crack on sudden closings or vibrations.
1. Before varnishing the hood, sealing compound should be applied to the connections of the internal reinforcements of the hood.
2. To avoid corrosion and reduce noise, a special anti-corrosion agent should be sprayed on the inside of the hood.
3. Allow the hood to dry overnight at 20°C before proceeding with the following steps.
4. In closed profiles (inside the hood reinforcements) a special wax liquid should be injected into the aerosols.
Installation
1. Lubricate pivot bolts.
2. Install the hood on the hinges without finally screwing the connections. This action must be performed by two people.
3. Position and screw in the hood hinges.
4. Adjust the gap between the hood and fenders, as well as between the hood and the grille.
5. To do this, follow these steps. Adjust the hood fastening elements to its position in the horizontal plane.
6. Adjust the position of the hinges in the vertical plane with the elements of the side fastening.
7. Make sure the hood opens properly.
8. Finally screw in the hinge fasteners.
9. Close the hood and make sure it opens and closes normally.