
Attention! Brake pads should be replaced on BOTH front wheels at the same time. NEVER change pads on only one wheel, as this can cause uneven braking. Be aware that the dust generated from pad wear may contain asbestos, which is hazardous to health. Never blow this dust out with compressed air or inhale it. When working on the brakes, use a respirator or a cotton-gauze bandage. DO NOT use gasoline or petroleum-based solvents to clean brakes. Use only brake cleaner or denatured alcohol.
Note. When installing, use new drive pin bolts.
Caliper Lucas
1. Apply the parking brake. Raise the front of the vehicle and securely jack stands under it (see «Lifting and placing the car on supports»). Remove both front wheels.
2. Disconnect the brake pad wear sensor electrical connector at the steering knuckle. Make a note of how the wiring is routed and release it from all appropriate clamps.
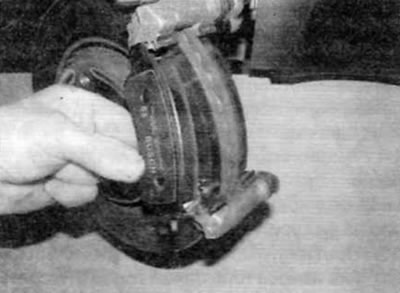
3. Press the piston into the cylinder by pulling the caliper out.
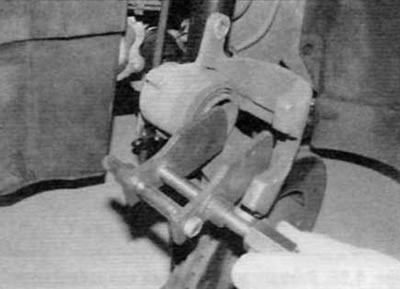
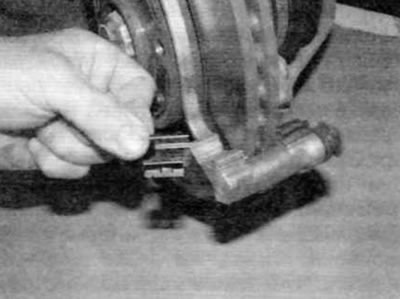
4. Turn out a bolt of fastening of the bottom directing finger of a support, holding a finger the second tight-fitting wrench (pic. 4.4). Discard the guide pin mounting bolt; new bolts must be used for installation.
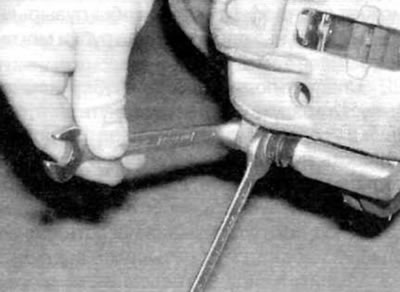
Pic. 4.4. When unscrewing the guide pin mounting bolt, hold the pin with a wrench
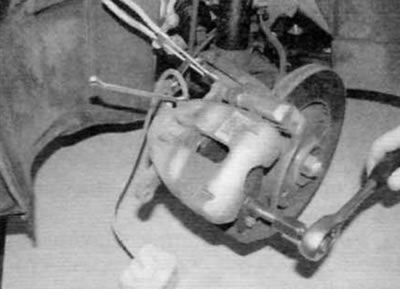
5. Loosen the top guide pin mounting bolt while holding the guide pin with an open end wrench as above. Move the caliper up from the brake pads and tie it to the suspension strut to lock it in place (pic. 4.5).
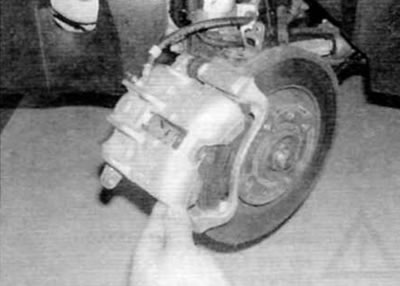
Pic. 4.5. Loosen the upper guide pin bolt and move the caliper up away from the brake pads
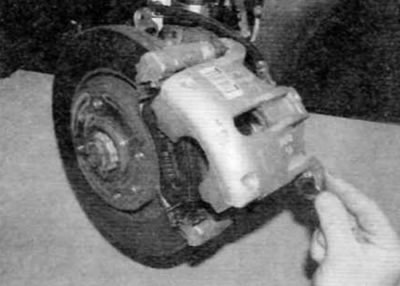
6. Remove the two brake pads from the caliper support bracket, noting their installation position if they are to be reused (i.e. inner and outer pads) (pic. 4.6).
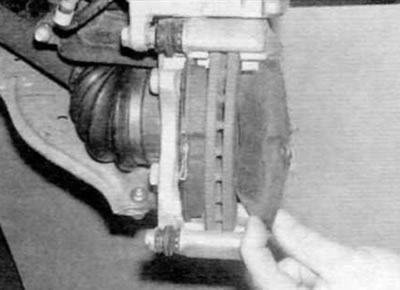
Pic. 4.6. Remove both brake pads from the caliper support bracket
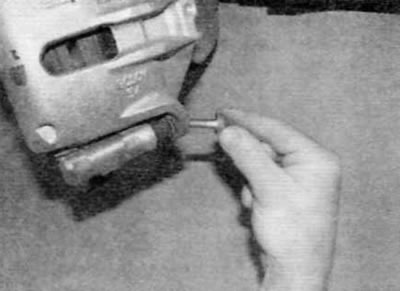
7. First measure the remaining thickness of the friction lining on each brake pad (pic. 4.7). If the pad wear in any place has reached or exceeded the limit, all four front pads should be replaced. The pads must also be replaced if they are oiled, since there is no effective way to degrease a contaminated friction lining. If the brake pads are unevenly worn or oily, find the cause and fix it before reassembling the brake. New brake pads and repair kits are available from Peugeot/Citroen dealers.
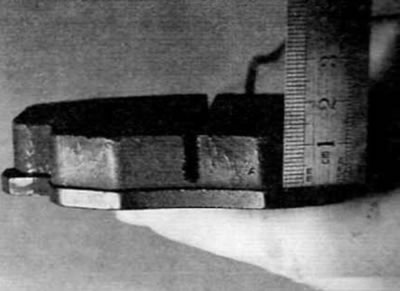
Pic. 4.7. Measuring the thickness of the friction material on the brake pad
8. If the brake pads are still serviceable, carefully clean them with a clean fine wire brush or similar tool. In this case, pay special attention to the sidewalls and the back of the metal base. Clean the grooves in the friction material and remove all large inclusions of dirt and other foreign particles from it. Thoroughly clean the pad mounting locations in the caliper support bracket.
9. Before installing the brake pads, make sure that the guide pins move freely in the bushings of the caliper housing/support bracket. Make sure. that the rubber boots on the guide pins are not damaged. Use a brush to clean the dirt from the caliper and piston. Under no circumstances should you inhale the resulting dust, as this is hazardous to your health. Inspect the dust seal on the piston for damage and the piston itself for brake fluid leaks, corrosion, or damage. If any of these items require attention, refer to paragraph 8.
10. If new brake pads are to be fitted, the caliper piston must be pressed into the cylinder to provide room for them to be installed. To do this, you can use a special tool to retract the piston or a clamp, or even just suitable boards as levers. Pinch off the brake hose to the caliper and then connect the brake bleeder kit to the caliper bleeder nipple. Open the air outlet nipple as the piston retracts. Excess brake fluid will be collected in the bleed kit container (pic. 4.10, a, b). Close the bleed nipple just before the caliper piston is fully seated in the caliper. This is to prevent air from entering the hydraulic system.
Pic. 4.10, a. Using a suitable tool, push the caliper piston inward...
Pic. 4.10b....and by opening the bleed nipple, allow the brake fluid to flow into a container
Note. The ABS modulator contains hydraulic components that are very sensitive to the presence of dirt in the brake fluid. Even the smallest particles can cause system blockage and failure. The pad retraction method described here prevents the dirt contained in the brake fluid exiting the caliper from penetrating back into the ABS modulator. and completely eliminates the possibility of damage to the master cylinder seals.
11. Install the brake pads in the caliper support bracket so that the friction linings of each pad are facing the brake disc and, in the case of installing previously removed brake pads, the brake pads are installed in their original places. If new brake pads are worn, the pad with the white wear sensor wire must be located on the outside.
12. Lower the caliper onto the brake pads and pass the pad wear sensor wiring through the hole in the caliper.
13. Apply an appropriate thread locking compound to the threads of the two new guide pin bolts if the bolts were not already coated with it. Screw in the lower bolt and tighten it to the prescribed torque. When tightening the guide pin bolt, hold the guide pin with an open end wrench.
14. Turn out an original bolt of fastening of the top directing finger, screw in a new bolt and tighten it to the prescribed torque.
15. Mate the brake pad wear sensor electrical connector and route the wiring appropriately through the loop on the caliper bleed screw cap.
16. Depress the brake pedal several times until the pads come into firm contact with the brake disc and normal operation is restored (without vacuum enhancement effect) pedal pressure.
17. Repeat the above procedure on the other front brake caliper.
Bosch caliper
18. Apply the parking brake. Raise the front of the vehicle and securely jack stands under it (see «Lifting and placing the car on supports»). Remove both front wheels.
19. Press the piston into the cylinder by pulling the caliper out.
20. Turn out a bolt of fastening of the bottom directing finger of a support (pic. 4.20). Discard the guide pin mounting bolt; when installing, use a new bolt.
Pic. 4.20. Remove the lower caliper guide bolt...
21. Move the caliper up from the brake pads and tie it to the suspension strut to lock it in place (pic. 4.21).
Pic. 4.21....then move the caliper up away from the brake pads
22. Remove the two brake pads from the caliper support bracket, noting their installation position if they are to be reused (i.e. inner and outer pads). Remove the shims from the top and bottom of the caliper support bracket (pic. 4.22, a, b).
Pic. 4.22 a. Remove the brake pads from the caliper support bracket...
Pic. 4.22b....and then remove the top and bottom shims
23. Continue as described in paragraphs 7-10.
24. Install the shims on the top and bottom of the caliper support bracket, positioning them correctly.
25. Install the brake pads in the caliper support bracket so that the friction linings of each pad are facing the brake disc and, in the case of installing previously removed brake pads, the brake pads are installed in their original places.
26. Untie the caliper and lower it onto the brake pads. Position the lower guide pin so that the flat on it is horizontal and properly mates with the machined surface on the caliper seat tab (pic. 4.26).
Pic. 4.26. Position the lower guide pin so that the flat (marked with an arrow) on it was positioned horizontally and correctly mated with the machined surface on the support ledge of the caliper
27. Apply an appropriate thread locking compound to the threads of the new lower guide pin mounting bolt if the bolts were not already coated with it. Install the bolt and tighten to the specified torque.28 Depress the brake pedal several times until the pads come into firm contact with the brake disc and normal (without vacuum enhancement effect) pedal pressure.
29. Repeat the above procedure on the other front brake caliper. All calipers
30. Install the wheels, lower the vehicle and tighten the wheel bolts to the specified torque.
31. Finally, check the brake fluid level in the brake fluid reservoir as described in «weekly checks».
32. Keep in mind that new brake pads will not provide full braking performance until they are worn in. Be prepared for this and, after changing the pads, avoid hard braking if possible for the first few hundred kilometers.