
Removing
Warning. If the preheating system has just been energized or the engine has recently been running, the glow plugs may be very hot.
1. Disconnect the wire «masses» from battery (see «Disconnecting the battery»).
2. On models with a 1.9L D9B engine, remove the air distribution housing. If necessary, also remove the air intake duct and disconnect the vent hose from the oil filler pipe. For more information, please refer to chapter 4B.
3. On models with a 1.9L engine with a top cover, release the latches on the right side and the top plane of the engine cover, and then carefully remove the cover so as not to lose the rubber supports. On models with a 2.0L engine, release the locks (turn them 90°to release) and remove the engine cover.
4. Loosen the nut on the terminal (-Oh) corresponding glow plug and remove the washer (-s) (pic. 2.4). Note that the main power cable is connected to the No. 1 cylinder glow plug. and install the connecting wire between the four glow plugs.
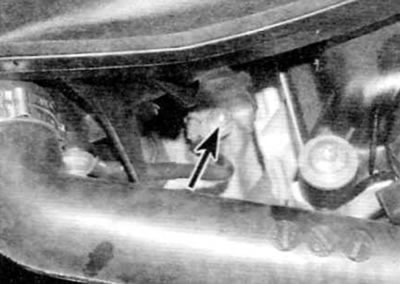
Pic. 2.4. Loosen the nut (marked with an arrow) and disconnect the electrical connector at the glow plug terminal (later 1.9L engine shown)
5. If applicable, carefully move the piping or wires to the side to access the appropriate glow plug (-am).
6. Remove the glow plug (-And) and remove it from the cylinder head (pic. 2.6).
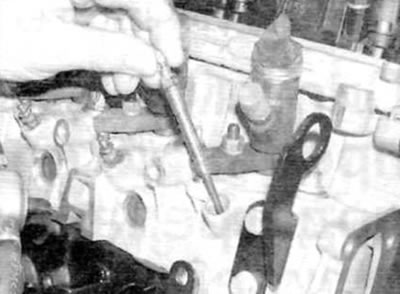
Pic. 2.6. Remove glow plug (-And) and take it off (their) from cylinder head (2.0L engine shown with fuel rail removed)
Inspection
7. Inspect each glow plug for mechanical damage. Burning or corroding of the glow plug tip can be caused by a bad nozzle jet shape. If such damage is found, check the injectors.
8. If the spark plugs are in good condition, electrically test them with a 12 volt test light or continuity tester as described in the previous paragraph.
9. To ensure that the glow plugs heat up evenly and in approximately the same amount of time, apply 12 volts to them to activate them. Observe the following precautions:
- A) Clamp the glow plug to be checked in a vise or self-tightening wrench. Remember that when working, it is red-hot.
- b) Make sure there is a fuse or circuit breaker built into the power or test lead (overload triggered), designed to prevent damage due to short circuits.
- V) After checking, allow the spark plug to cool for a few minutes before handling.
10. The tip of a healthy glow plug becomes red hot after applying current to the plug for approximately 5 seconds. A spark plug that starts glowing much later, or that starts glowing in the middle rather than the end, is considered faulty.
Installation
11. Installation is carried out in the reverse order of removal. Apply a small amount of copper-based grease to the threads of the spark plugs and tighten the spark plugs to the specified torque. Do not overtighten as this may damage the spark plug.