
English Русский
Български
Беларускі
Український
Српски
Hrvatski
Română
Polski
Slovenský
Magyar
Bookmark Articles Sitemap Contacts
Company Hyundai Company Opel Company Skoda Company Kia Company Mitsubishi Company LADA Company Audi
PeugeotBook.ru


Series 100   Series 200   Series 300   400-500   Series 600   Crossovers   Others
 
Peugeot 405 (1987-1997) Peugeot 406 (1995-2004)

Glow Plugs — Removal, Checking and Installation (Peugeot 406)

  • Main
  • 40X
  • Peugeot 406 (1995-2004)
  • Power unit
  • Engine electrical equipment
  • Glow Plugs — Removal, Checking and Installation
0
Table of contents: Removal 🠇 Examination 🠇 Installation 🠇

Removal


Caution: If the glow plug system has just been running or the engine has just been turned off, the glow plugs will be very hot.


1. Disconnect the negative battery terminal.

2. Remove the air intake duct system and disconnect the crankcase ventilation hose from the oil filler neck.
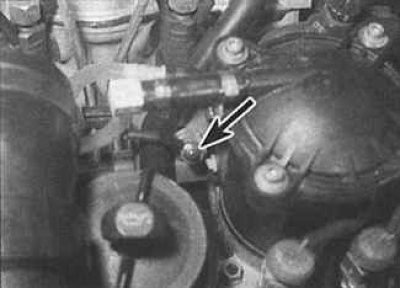
3. Unscrew the fastening nut (indicated by the arrow) current bus to the glow plug. Note that the…


3. Unscrew the fastening nut (indicated by the arrow) current bus to the glow plug. Note that the supply wire is connected to the current bus on the glow plug of cylinder #2.

4. If necessary, move any pipes and wires to the side to improve access to the glow plug being removed.
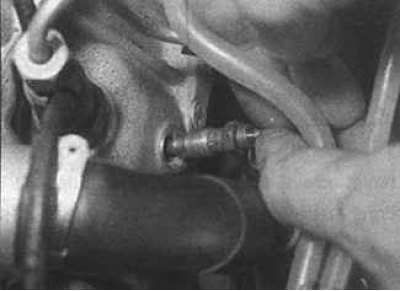
5. Unscrew the glow plug and remove it from the cylinder block.


5. Unscrew the glow plug and remove it from the cylinder block.


Examination


1. Check each glow plug for mechanical damage. Burnt or broken glow plug tips may be caused by poor fuel spray from the injector. If such damage is present, the fuel injectors must be checked and replaced if necessary.

2. If the glow plugs are not mechanically damaged, check their electrical resistance, which should be less than 1 Ohm.

3. The glow plugs can be tested for efficiency by applying 12 volts to them. They should heat up evenly and within the required time interval.

4. In this case, it is necessary to observe the following precautions:
  • hold the glow plug with a special clamp or pliers;
  • the glow plug power supply circuit must have a fuse;
  • after checking, the glow plug should cool for several minutes.

5. A glow plug in good condition heats up to the working tip turning red within 5 seconds. If it heats up longer or heats up in the middle part rather than at the end of the plug, the plug is faulty and should be replaced.

Installation


1. Installation is carried out in the reverse order of removal.

2. In this case, the threaded part of the spark plug must be lubricated with a copper-based non-stick compound.
This article is available at russian, bulgarian, belarusian, ukrainian, serbian, croatian, romanian, polish, slovak, hungarian
Article reviewed by editor: Vinogradov Robert
Share information:
Previous
Peugeot 406: Engine electrical equipment
Next

Pre-heating system (diesel engines)
Setting the ignition timing
Ignition coil — removal and installation
Checking the ignition system
Ignition system (petrol engines) — description
Pre-heating system control unit
See similar information for other Peugeot models

➨ Glow plugs — removal, inspection and refitting Peugeot 106 (1991-2003)
➨ Removal, checking and installation glow plugs Peugeot 206 (1998-2012)
➨ Glow plugs Peugeot 306 (1993-2002)
➨ Engine Oil Level — Checking and Replacing Peugeot 605 (1989-2000)
➨ Glow Plugs — removal and installation Peugeot 806 (1994-2002)
Link to this article in different formats
Comments and feedback from visitors
No comments yet


Add two numbers 39 + 41


Peugeot 406 (1995-2004) 
  • General information
  • User manual
  • Maintenance (gasoline)
  • Maintenance (diesel)
  • Power unit
  • Gasoline engines
  • Diesel engines
  • Engine overhaul
  • Cooling and heating
  • Fuel system (gasoline)
  • Fuel system (diesel)
  • Engine electrical equipment
  • Transmission
  • Clutch and drive shafts
  • Mechanical gearbox
  • Automatic gearbox
  • Chassis, running gear
  • Brake system
  • Car suspension
  • Steering
  • Body and interior
  • Exterior (external elements)
  • Interior (internal elements)
  • Doors, locks and windows
  • Electrical equipment
  • Equipment and devices
  • Electrical circuits
Peugeot 405 (1987-1997) 
  • General information
  • User manual
  • Maintenance
  • Power unit
  • Petrol engines 1.4 l
  • Petrol engines 1.6-2.0 l
  • Diesel engines
  • Ignition system
  • Fuel system (carburetor)
  • Single point fuel injection
  • Multipoint fuel injection
  • Cooling and lubrication system
  • Exhaust system
  • Transmission
  • Clutch
  • Manual gearbox MA
  • Manual gearbox BE
  • Automatic gearbox
  • Drive shafts
  • Chassis, running gear
  • Steering
  • Front suspension
  • Rear suspension
  • Brake system
  • Body and interior
  • Exterior (external elements)
  • Interior (internal elements)
  • Doors, locks and windows
  • Electrical equipment
  • Equipment and devices
  • Electrical circuits
PeugeotBook.ru © 2018–2026 | Mobile version | Sitemap: EN BG BY UA RS HR RO PL SK HU | Write message | Site search | Add to bookmarks | Peugeot owners
106 (1991-2003) | 206 (1998-2012) | 207 (2006-2014) | 305 (1977-1989) | 306 (1993-2002) | 307 (2001-2008) | 405 (1987-1997) | 406 (1995-2004) | 605 (1989-2000) | Partner-I (1996-2008) | Eurovans-807 (2002-2014) | Eurovans-806 (1994-2002) | J5 (1981-1993) |
Cookies are used to ensure the correct display of pages on the site.