
English Русский
Български
Беларускі
Український
Српски
Hrvatski
Română
Polski
Slovenský
Magyar
Bookmark Articles Sitemap Contacts
Company Hyundai Company Opel Company Skoda Company Kia Company Mitsubishi Company LADA Company Audi
PeugeotBook.ru


Series 100   Series 200   Series 300   400-500   Series 600   Crossovers   Others
 
Peugeot 106 (1991-2003)

Bonnet and support struts — removal, refitting and adjustment (Peugeot 106)

  • Main
  • 10X
  • Peugeot 106 (1991-2003)
  • Body and interior
  • Exterior (external elements)
  • Bonnet and support struts — removal, refitting and adjustment
0
Table of contents: Bonnet 🠇 Support struts 🠇

Bonnet


Removal


1. Open the bonnet and have an assistant support it Using a pencil or felt tip pen, mark the outline of each bonnet hinge relative to the bonnet, to use as a guide on refitting. On later models, release the spring clips using a screwdriver and pull the bonnet support struts from the balljoints on the bonnet.

2. Disconnect the windscreen washer supply pipe from its non-return valve on the righthand side (see illustration). Withdraw the hose from the bonnet, noting its routing.
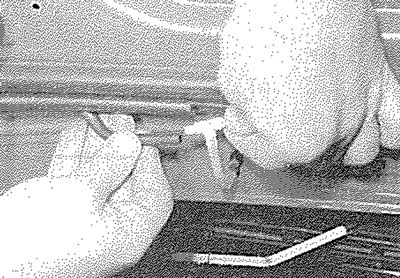
8.2. Disconnecting the windscreen washer supply pipe

8.2. Disconnecting the windscreen washer supply pipe


[Original publication on the website PeugeotBook.ru]

3. Unscrew the bonnet retaining boits and recover the washers. With the heip of an assistant, carefully lift the bonnet clear (see illustration). Store the bonnet out of the way in a safe place.
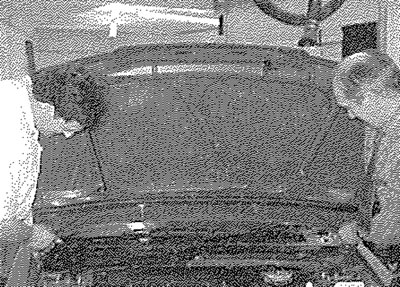
8.3. Removing the bonnet

8.3. Removing the bonnet


4. Inspect the bonnet hinges for signs of wear and free play at the pivots and if necessary, renew them. Each hinge is secured to the body by two bolts.

Refitting


5. With the aid of an assistant, offer up the bonnet and loosely fit the retaining bolts and washers. Align the hinges with the marks made on removal, then tighten the retaining bolts securely. Reconnect the windscreen washer supply pipe, ensuring that it is routed as noted before removal. On later models, reconnect the support struts and secure with the spring clips.

6. Adjust the alignment of the bonnet as follows.

Adjustment


7. Close the bonnet and check for alignment with the adjacent panels. If necessary, slacken the hinge bolts and re-align the bonnet to suit. Once the bonnet is correctly aligned, tighten the hinge bolts securely.

8. If the lock striker has been removed from the bonnet, ensure that the washer is in place between the bonnet and the striker when refitting.

9. Once the bonnet is correctly aligned, check that the bonnet fastens and releases in a satisfactory manner. If adjustment is necessary, slacken the bonnet lock retaining bolts and adjust the position of the lock to suit. Once the lock is operating correctly, securely tighten its retaining bolts.

Support struts


10. On later models fitted with bonnet support struts, proceed as described for the tailgate support struts on Hatchback models in Section 15.
This article is available at russian, bulgarian, belarusian, ukrainian, serbian, croatian, romanian, polish, slovak, hungarian
Article reviewed by editor: Matveev Demid
Share information:
Previous
Peugeot 106: Exterior (external elements)
Next

Rear bumper — removal and refitting
Front bumper — removal and refitting
Major body damage — repair
Minor body damage — repair
Maintenance — upholstery and carpets
Bonnet release cable — removal and refitting
Bonnet lock — removal and refitting
Body exterior fittings — removal and refitting
See similar information for other Peugeot models

➨ Headlight adjustment Peugeot 207 (2006-2014)
➨ Cylinder liner protrusion value — checking and adjustment Peugeot 305 (1977-1989)
➨ Seat belts — description and adjustment Peugeot 405 (1987-1997)
➨ High pressure fuel pump — removal, installation and adjustment Peugeot 605 (1989-2000)
➨ Height adjustment of the seat belt fastening Peugeot 806 (1994-2002)
Link to this article in different formats
Comments and feedback from visitors
No comments yet


Add two numbers 45 + 45


Peugeot 106 (1991-2003) 
  • General information
  • Introduction to manual
  • Weekly checks
  • Maintenance (petrol)
  • Maintenance (diesel)
  • Troubleshooting
  • Power unit
  • Petrol engines
  • Diesel engines
  • Engine overhaul
  • Cooling and heating
  • Fuel system (carburetor)
  • Single point injection (petrol)
  • Multipoint injection (petrol)
  • Fuel system (diesel)
  • Emission control system
  • Engine electrical equipment
  • Ignition system
  • Diesel heating
  • Transmission
  • Clutch
  • Manual gearbox
  • Automatic gearbox
  • Drive shafts
  • Chassis, running gear
  • Brake system
  • Car suspension
  • Steering
  • Body and interior
  • Exterior (external elements)
  • Interior (internal elements)
  • Doors, locks and windows
  • Electrical equipment
  • Equipment and devices
  • Electrical diagrams
PeugeotBook.ru © 2018–2026 | Mobile version | Sitemap: EN BG BY UA RS HR RO PL SK HU | Write message | Site search | Add to bookmarks | Peugeot owners
106 (1991-2003) | 206 (1998-2012) | 207 (2006-2014) | 305 (1977-1989) | 306 (1993-2002) | 307 (2001-2008) | 405 (1987-1997) | 406 (1995-2004) | 605 (1989-2000) | Partner-I (1996-2008) | Eurovans-807 (2002-2014) | Eurovans-806 (1994-2002) | J5 (1981-1993) |
Cookies are used to ensure the correct display of pages on the site.