
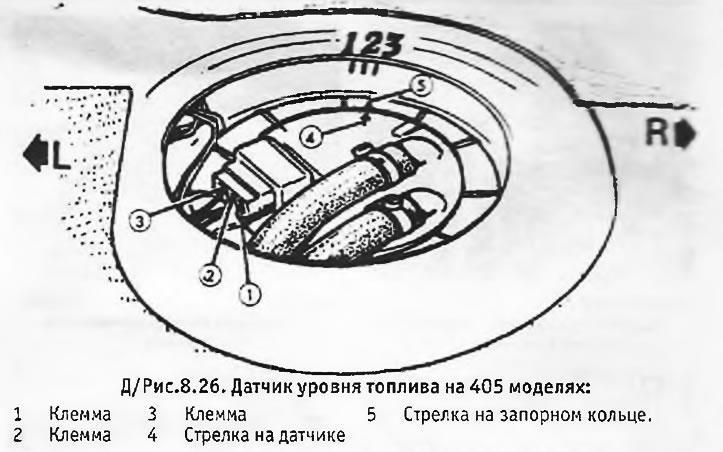
2. On vehicles with a service code from 1238 (from identification number 70237064) the fuel level sensor should be aligned to the right, not the center mark (see d/fig. 8.26).
3. For a more thorough check of the sensor, it should be removed from the fuel tank. Turn the transducer over and let the lever move on its own to check that the lever can move freely through its full range of motion. Do not move the lever by hand. Keep in mind that the lever is equipped with a silicone damper and may take up to 10 minutes to move through its full range of travel.
4. Position the transducer vertically and allow the lever to lower to its lowest position. In this case, the float should be flush with the bottom of the sensor.
5. Connect an ohmmeter between terminals 1 and 2 on the sensor and check that it shows a resistance of 280±10 ohms.
6. Connect an ohmmeter between terminals 1 and 3 and check that the resistance here is 9±2 ohms.
7. Connect the wiring to the sensor and place it vertically. When the ignition is turned on, the fuel gauge should show an empty tank and a warning light "reserve" on the dashboard should light up.
8. Turn the sensor over and wait 10 minutes for the lever to move into position "full tank". The gauge should now show a full tank.
9. Disconnect the wiring from the sensor and connect an ohmmeter between terminals 1 and 3. The ohmmeter should show a resistance of 3±3 ohms.
10. If you do not get the desired results, the sensor should be replaced.
11. To install the sensor on a full tank, first of all check that the sealing ring is correctly positioned in the tank opening.
12. Lubricate the threads of the locking ring and the surface of the sensor with soap and then manually screw the ring onto the sensor until it stops. Tighten the ring again so that the arrow on it is flush with the arrow on the sensor or slightly beyond it. In workshops "Peugeot" a special tool is used to tighten the ring, however, in principle, an ordinary screwdriver can be dispensed with.