
Removing the right drive shaft
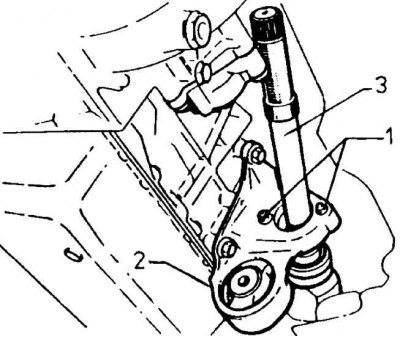
1 - nuts for fastening the bearing of the right drive shaft,
2 - rear engine mount bracket,
3 - right drive shaft
Installing the right drive shaft
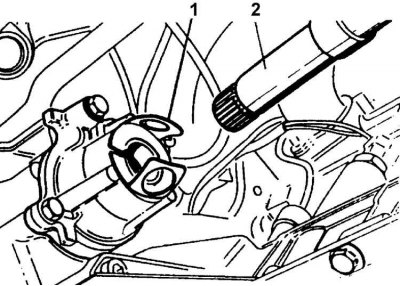
1 - plastic mounting casing,
2 - right drive shaft
Removing
The gearbox is removed from under the car.
1. Install the hood in a vertical position.
2. Remove the battery and its holder.
3. Remove the air filter assembly.
4. Disconnect the clutch cable from the clutch lever.
5. Disconnect the three shift control connectors from the shift lever.
6. Disconnect ground wire from gearbox.
7. Remove the reversing light switch connector.
8. Remove starter.
9. Remove power steering pump power cable (in vehicles with power steering systems).
10. Unscrew the bolts securing the stabilizer connectors to the lever.
11. Remove the front wheels of the car.
12. Remove lower transmission cover (if available).
13. Drain the oil from the gearbox by unscrewing the plug at the bottom of the outer differential housing.
14. Remove clutch cover from below.
15. Using a special puller, remove the lower ball joints from the steering knuckles.
16. Disconnect the speedometer drive cable from the transmission.
17. Disconnect the front exhaust pipe from the exhaust manifold.
18. Remove crankshaft position sensor (TDC sensor), located in the rear wall of the engine block (if present in the ignition system).
19. Remove the retainer connecting the rear engine mount bracket to the body.
20. Loosen the nuts securing the right drive shaft bearing to the rear engine mount bracket and turn their bolts a half turn.
21. Move knuckle outwards and pull drive shafts out of gearbox.
22. Hook the gearbox to the hole in the upper rib of its crankcase with a lift located above the engine compartment.
23. Remove the metal-rubber element of the gearbox bracket.
24. Slightly lower the power unit so that the gearbox is at the very bottom.
25. Hold the power unit in this position with the help of an appropriate beam with a holder hooked on the engine ear.
26. Unscrew the bolts at the gearbox-engine connection.
27. Remove the gearbox from under the car.
Installation
1. Lubricate the input shaft splines, drive shaft splines and lips of the drive shaft seals with Molykote BR2 Plus.
2. Bring the gearbox to the engine and tighten the mounting bolts.
3. Install the power unit in a horizontal position in the engine compartment.
4. Install the metal-rubber element of the gearbox holder. Tighten the two outer nuts to 15.5 Nm, the middle nut to 35 Nm.
5. Install the right axle shaft O-ring plastic mounting cover.
6. Insert the left and right drive shafts into the gearbox. Remove the mounting cover of the right drive shaft and tighten the nuts securing the right drive shaft bearing to the rear engine mount bracket to 17.5 Nm.
7. Install the bracket that connects the rear engine mount bracket to the body. Tighten the mounting bolts of the holder to the engine to a torque of 35 Nm, the bolt of mounting the holder to the body - to a torque of 45 Nm.
8. Connect the steering knuckle to the levers by installing the lower ball joints (tightening torque 30 Nm).
9. Install stabilizer bar connectors (tightening torque 30 Nm).
10. Install the front wheels and lower the car.
11. Pour oil into the gearbox.
12. Adjust clutch pedal travel.
13. Attach the three shift control connectors to the shift lever.
14. Connect the rest of the elements in reverse order with respect to the removal process.