English Русский
Български
Беларускі
Український
Српски
Hrvatski
Română
Polski
Slovenský
Magyar
Bookmark Articles Sitemap Contacts
Company Hyundai Company Opel Company Skoda Company Kia Company Mitsubishi Company LADA Company Audi
PeugeotBook.ru


Series 100   Series 200   Series 300   400-500   Series 600   Crossovers   Others
 
Peugeot 305 (1977-1989) Peugeot 306 (1993-2002) Peugeot 307 (2001-2008)

Engine/gearbox mounts — removal and installation (Peugeot 305)

  • Main
  • 30X
  • Peugeot 305 (1977-1989)
  • Power unit
  • Diesel engines
  • Engine/gearbox mounts — removal and installation
0
Table of contents: Right pillow 🠇 Right engine mount rubber (all…🠇 Left engine mount 🠇 Bottom pillow 🠇

Right pillow


1. Secure a hoist to the engine or support it with a jack, placing a wooden block under the tray.

2. Unscrew the nuts and remove the right support bracket.

3. Unscrew the lower nut of the pillow (under the right front fender). Unscrew the nuts of the rubber stops and remove the stops, paying attention to the location of the adjusting linings (if any).

4. Install the pillow in reverse order. Tighten the nuts to the specified torque. For an engine supported by mounts, the gap between the support bracket and each rubber stop should be 1.0 ± 0.7 mm. If necessary, adjust this gap using adjusting shims placed under the stops.

Right engine mount rubber (all models) - removal and installation


1. Reach the support rubber (see above).

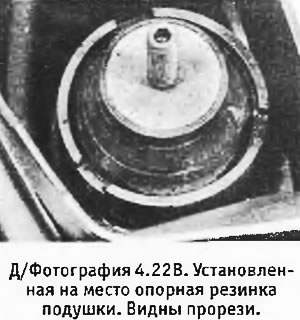
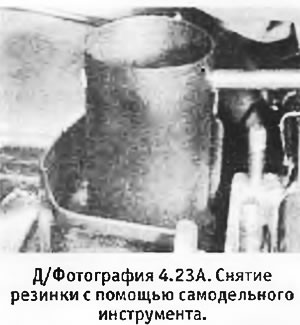
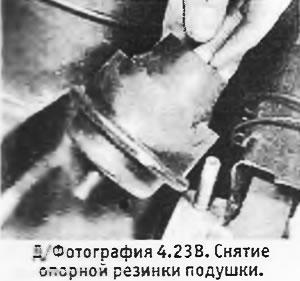
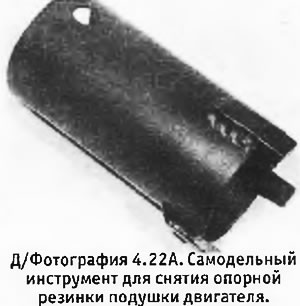
2. Make a tool similar to the one shown in the photo, designed to fit into the slots on the rubber band rim (see photos). If you are going to replace the rubber band, the new one can be used as a template when making the tool.

3. Using a tool, unscrew the old rubber from the body.

4. Installing a new rubber band is done in reverse order. Tighten the rubber band securely using the tool (tightening torque specified in Specifications, is approximate, since a torque wrench cannot be used with a homemade tool).
4. Installing a new rubber band is done in reverse order. Tighten the rubber band securely using…

4. Installing a new rubber band is done in reverse order. Tighten the rubber band securely using…


Left engine mount


5. Connect a hoist to the gearbox or support it with a jack, placing a wooden block under the pallet.

6. Remove the air cleaner with the air duct.

7. Remove the battery and its platform.

8. Unscrew the nut and bolt and remove the support rubber. Remove the nuts and bolts and remove the support bracket.

9. If necessary, unscrew the mounting pin (if any) from the gearbox housing.

Bottom pillow


11. Jack up and support the front of the engine.

12. Unscrew and remove both bolts from the splined joint. Remove the spline joint.

13. Drive or press the pillow out of the housing.

14. Hammer or press the new cushion into place, install the splined joint and tighten the bolts to the required torque.

15. Lower the car to the ground.
This article is available at russian, bulgarian, belarusian, ukrainian, serbian, croatian, romanian, polish, slovak, hungarian
Article reviewed by editor: Ostrovsky Fedor
Share information:
Previous
Peugeot 305: Diesel engines
Next

Flywheel — removal and installation
Pistons and connecting rods — removal and installation
Oil pump — removal, inspection and installation
Pallet — removal and installation
Oil seals — replacement
Engine — removal method
Engine and gearbox — removal
Engine and gearbox — disconnection
Engine disassembly — general part
Engine — complete disassembly
See similar information for other Peugeot models

➨ Engine oil and filter renewal Peugeot 106 (1991-2003)
➨ Starting the engine with an additional battery Peugeot 207 (2006-2014)
➨ Removal and installation of engine and gearbox Peugeot 406 (1995-2004)
➨ Starting the engine Peugeot 605 (1989-2000)
➨ Engine/Gearbox Mounts — inspection and replacement Peugeot Partner I (1996-2008)
Link to this article in different formats
Comments and feedback from visitors
No comments yet


Add two numbers 19 + 17


Peugeot 307 (2001-2008) 
  • User manual
  • Keys, doors and alarm
  • Controls and instruments
  • Driving and operation
  • Maintenance
  • Power unit
  • Petrol engines TU3 and TU5
  • Petrol engines EW10
  • Diesel engines DV10
  • Diesel engines DW10
  • Transmission
  • Clutch and drive shafts
  • Mechanical gearbox
  • Automatic gearbox
  • Chassis, running gear
  • Front suspension
  • Rear suspension
  • Steering
  • Brake system
  • Body and interior
  • Exterior (external elements)
  • Interior (internal elements)
  • Doors, locks and windows
  • Heating and air conditioning
  • Electrical equipment
  • Equipment and devices
  • Power devices
  • Airbags
  • Electrical circuits
Peugeot 306 (1993-2002) 
  • General information
  • Introduction to manual
  • Specifications
  • Gasoline engine
  • Engine repair
  • Lubrication system
  • Cooling system
  • Fuel injection
  • Ignition system
  • Diesel engine
  • Engine repair
  • Lubrication system
  • Cooling system
  • Fuel injection
  • Transmission
  • Clutch
  • Gearbox
  • Drive shafts
  • Chassis, running gear
  • Steering system
  • Front suspension
  • Rear suspension
  • Brake system
  • Electrical equipment
  • Power devices
  • Electrical circuits
Peugeot 305 (1977-1989) 
  • General information
  • Maintenance
  • Power unit
  • Gasoline engines
  • Diesel engines
  • Cooling system (gasoline)
  • Cooling system (diesel)
  • Fuel system (gasoline)
  • Fuel system (diesel)
  • Ignition system
  • Transmission
  • Clutch
  • Mechanical gearbox BB8
  • Mechanical gearbox BE1
  • Automatic gearbox ZF4
  • Shafts, hubs and wheels
  • Chassis, running gear
  • Brake system
  • Car suspension
  • Steering
  • Body and interior
  • Exterior (external elements)
  • Interior (internal elements)
  • Electrical equipment
  • Equipment and devices
  • Headlights and lighting
  • Power devices
  • Electrical circuits
  • Wiring diagrams (diesel)
PeugeotBook.ru © 2018–2026 | Mobile version | Sitemap: EN BG BY UA RS HR RO PL SK HU | Write message | Site search | Add to bookmarks | Peugeot owners
106 (1991-2003) | 206 (1998-2012) | 207 (2006-2014) | 305 (1977-1989) | 306 (1993-2002) | 307 (2001-2008) | 405 (1987-1997) | 406 (1995-2004) | 605 (1989-2000) | Partner-I (1996-2008) | Eurovans-807 (2002-2014) | Eurovans-806 (1994-2002) | J5 (1981-1993) |
Cookies are used to ensure the correct display of pages on the site.