
English Русский
Български
Беларускі
Український
Српски
Hrvatski
Română
Polski
Slovenský
Magyar
Bookmark Articles Sitemap Contacts
Company Hyundai Company Opel Company Skoda Company Kia Company Mitsubishi Company LADA Company Audi
PeugeotBook.ru


Series 100   Series 200   Series 300   400-500   Series 600   Crossovers   Others
 
Peugeot 405 (1987-1997) Peugeot 406 (1995-2004)

Checking the working clearance of the crankshaft main bearings (Peugeot 406)

  • Main
  • 40X
  • Peugeot 406 (1995-2004)
  • Power unit
  • Engine overhaul
  • Checking the working clearance of the crankshaft main bearings
0

XU series engine


1. On early engine models, new liners must be installed during a major overhaul. On later engine models, the running clearance check can be performed using the original liners. However, a new set is preferable, as the results obtained will be more accurate.

2. Clean the rear of the bearing shell and its installation location in the cylinder block and main bearing caps.

3. Install the bearing shells in their places. Note that the upper bearing shells have a grooved working surface, while the lower shell has a solid working surface.

4. The working clearance can be checked using two methods.

5. One of the methods (which requires the presence of a micrometer to measure the diameter of the holes) consists of installing the main bearing caps together with the shell on the cylinder block and screwing them down to the required torque. Measure the inside diameter of each assembled pair of bearing shells. Measure the diameter of each crankshaft main journal. Subtract the corresponding crankshaft main journal diameter from the measured bearing diameter.

6. Second (and more accurate) the method is to use a product known as Plastigage. This is a round plastic rod that is compressed between the bearing shell and the crankshaft journal. After removing the main bearing cap, the deformed plastic rod is measured with a special template that is included with the Plastigage. The procedure for using Plastigage is as follows.

7. Install the crankshaft without lubrication on the liners installed in the engine block. The crankshaft journals and liners must be completely clean and dry.
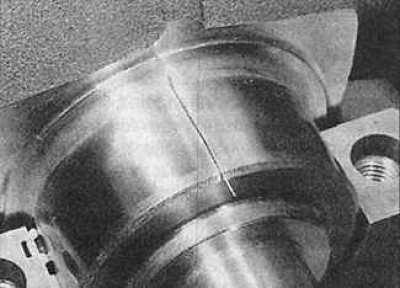


8. Cut a few pieces of Plastigage plastic rod (they should be slightly shorter than the width of…


8. Cut a few pieces of Plastigage plastic rod (they should be slightly shorter than the width of the main bearings) and install them on each crankshaft journal.

9. Install the caps with the lower liners and tighten the mounting bolts to the specified torque. Do not rotate the crankshaft during the Plastigage clearance measurement.
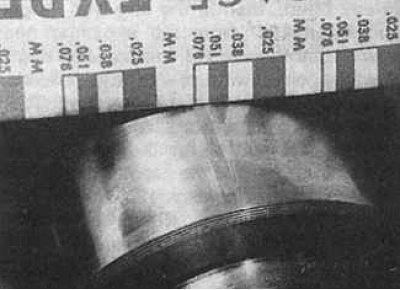
10. Unscrew the liner mounting cover, remove it and apply the scale ruler printed on the package to…


10. Unscrew the liner mounting cover, remove it and apply the scale ruler printed on the package to the deformed plastic rod. By comparing the width of the deformed plastic rod with the control width on the scale ruler, determine the size of the gap.

11. Finally, thoroughly clean any traces of Plastigage material from the bearings and crankshaft.
This article is available at russian, bulgarian, belarusian, ukrainian, serbian, croatian, romanian, polish, slovak, hungarian
Article reviewed by editor: Vinogradov Robert
Share information:
Previous
Peugeot 406: Engine overhaul
Next

Selecting New Crankshaft Main Bearings
Installing piston rings
Sequence of engine assembly during major repairs
Inspection of main and connecting rod bearings
Crankshaft — check
Installing the crankshaft (XU and XUD engines)
Installing pistons
Starting the engine after major repairs
See similar information for other Peugeot models

➨ Crankshaft — refitting and main bearing running clearance check Peugeot 106 (1991-2003)
➨ Checking the crankshaft side clearance Peugeot 207 (2006-2014)
➨ Connecting rod and main bearings — inspection and maintenance Peugeot 305 (1977-1989)
➨ Engine Oil Level — Checking and Replacing Peugeot 605 (1989-2000)
➨ Checking the vehicle's ground clearance Peugeot Partner I (1996-2008)
Link to this article in different formats
Comments and feedback from visitors
No comments yet


Add two numbers 23 + 49


Peugeot 406 (1995-2004) 
  • General information
  • User manual
  • Maintenance (gasoline)
  • Maintenance (diesel)
  • Power unit
  • Gasoline engines
  • Diesel engines
  • Engine overhaul
  • Cooling and heating
  • Fuel system (gasoline)
  • Fuel system (diesel)
  • Engine electrical equipment
  • Transmission
  • Clutch and drive shafts
  • Mechanical gearbox
  • Automatic gearbox
  • Chassis, running gear
  • Brake system
  • Car suspension
  • Steering
  • Body and interior
  • Exterior (external elements)
  • Interior (internal elements)
  • Doors, locks and windows
  • Electrical equipment
  • Equipment and devices
  • Electrical circuits
Peugeot 405 (1987-1997) 
  • General information
  • User manual
  • Maintenance
  • Power unit
  • Petrol engines 1.4 l
  • Petrol engines 1.6-2.0 l
  • Diesel engines
  • Ignition system
  • Fuel system (carburetor)
  • Single point fuel injection
  • Multipoint fuel injection
  • Cooling and lubrication system
  • Exhaust system
  • Transmission
  • Clutch
  • Manual gearbox MA
  • Manual gearbox BE
  • Automatic gearbox
  • Drive shafts
  • Chassis, running gear
  • Steering
  • Front suspension
  • Rear suspension
  • Brake system
  • Body and interior
  • Exterior (external elements)
  • Interior (internal elements)
  • Doors, locks and windows
  • Electrical equipment
  • Equipment and devices
  • Electrical circuits
PeugeotBook.ru © 2018–2026 | Mobile version | Sitemap: EN BG BY UA RS HR RO PL SK HU | Write message | Site search | Add to bookmarks | Peugeot owners
106 (1991-2003) | 206 (1998-2012) | 207 (2006-2014) | 305 (1977-1989) | 306 (1993-2002) | 307 (2001-2008) | 405 (1987-1997) | 406 (1995-2004) | 605 (1989-2000) | Partner-I (1996-2008) | Eurovans-807 (2002-2014) | Eurovans-806 (1994-2002) | J5 (1981-1993) |
Cookies are used to ensure the correct display of pages on the site.