English Русский
Български
Беларускі
Український
Српски
Hrvatski
Română
Polski
Slovenský
Magyar
Bookmark Articles Sitemap Contacts
Company Hyundai Company Opel Company Skoda Company Kia Company Mitsubishi Company LADA Company Audi
PeugeotBook.ru


Series 100   Series 200   Series 300   400-500   Series 600   Crossovers   Others
 
Peugeot 206 (1998-2012) Peugeot 207 (2006-2014)

Checking the crankshaft side clearance (Peugeot 207)

  • Main
  • 20X
  • Peugeot 207 (2006-2014)
  • Power unit
  • Engine repair
  • Checking the crankshaft side clearance
0
Install tools 10-11 on the cylinder block (D).

Fix indicator 12 to supports 10-11.
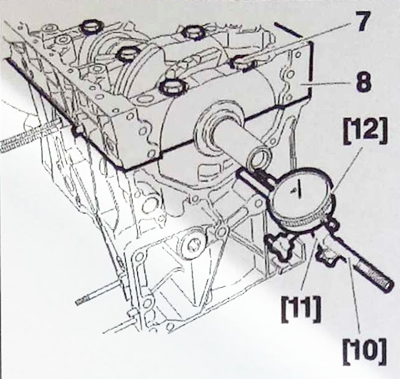
Fix indicator 12 to supports 10-11.


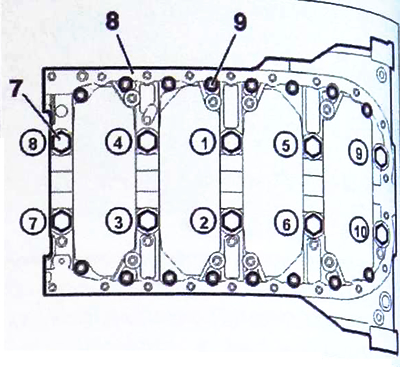
Install the crankshaft main journal cover housings (8) in place and secure them with 10 bolts (7) (tightening torque 10 Nm).

Press axially on the crankshaft in the cylinder block.

Set the dial indicator to zero.

Press axially in the opposite direction on the crankshaft in the cylinder block.

The lateral clearance should be 0.06-0.15 mm.

Choose thicker side pads of equal thickness.

Unscrew 10 bolts (7) and remove the crankshaft main journal cover housing (8).

Make sure pins (j) are present, replace pins (if necessary).

Insert the pin 50% of its length into the crankshaft journal cap housing.

Insert the pin into area (k) using the pin inserter.

Drive a bead into area (k) to lock the pin.
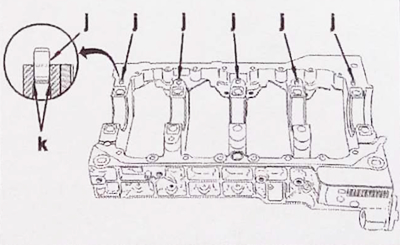
Drive a bead into area (k) to lock the pin.


Apply sealing compound around the perimeter of the main journal cap housing "Autojoint Noir". Reinstall:


  • crankshaft main cap housing (8);
  • 10 bolts (7);
  • 16 bolts (9).

16 bolts (9).


Note: Tighten each bolt in turn in the sequence shown. Make sure the crankshaft rotates without causing tension


Install the piston rings using a ring clamp.

The surface with the "Top" mark of the sealing (second) piston ring (11) must be directed upwards.

Turn the piston ring lock (11) 180° in relation to the piston ring lock (10).

Note: The oil scraper ring (12) "Uflex" does not have a lock.
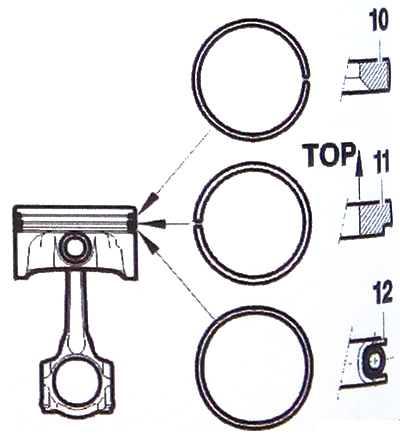

Note: The oil scraper ring (12) «Uflex» does not have a lock.


Insert the piston with the connecting rod assembly using a special bushing 13 (lubricate the peripheral surface).

Insert part (B) of the piston to serve as a guide for the correct installation of the entire piston. Install the upper bearing of a predetermined class.
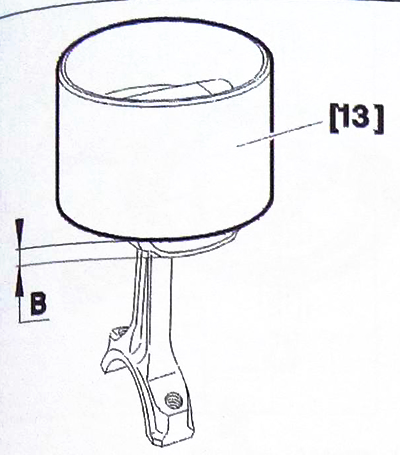


Insert part (B) of the piston to serve as a guide for the correct installation of the entire…


Lubricate the sleeves.

Follow the marks made during disassembly (the arrow on the piston should point towards the timing drive).

Hold the piston ring mounting mandrel 13 so that it is pressed tightly against the cylinder block plane and positioned exactly in the center of the sleeve.
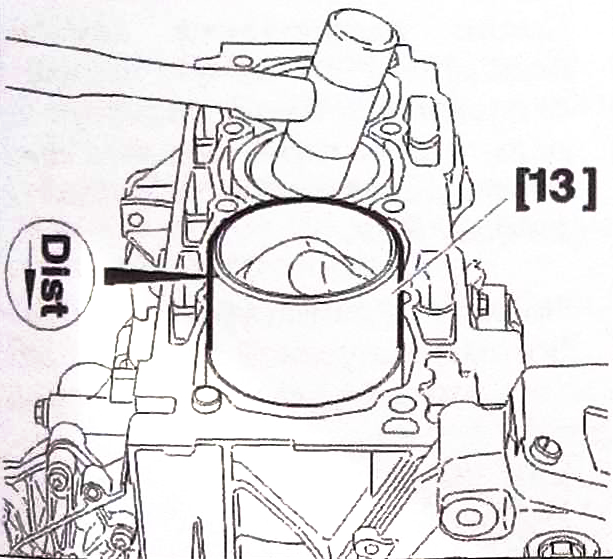
Hold the piston ring mounting mandrel 13 so that it is pressed tightly against the cylinder block…


Insert the piston, making sure to install the oil scraper ring ("Uflex") correctly.

Perform a similar operation for other assemblies.

Turn the cylinder block over.

Note: Install bearings of a predetermined class into the connecting rod caps.


Lubricate the bushings and lower bearings with engine oil.

Replace the connecting rod caps.

Observe the pairing of parts: connecting rods/connecting rod caps.

Install the connecting rod cap bolts (13) (after lubricating them).


Using tools 17 and 22, pre-tighten the bolts (13) to a torque of 23 Nm.

Perform corner tightening at 45°.
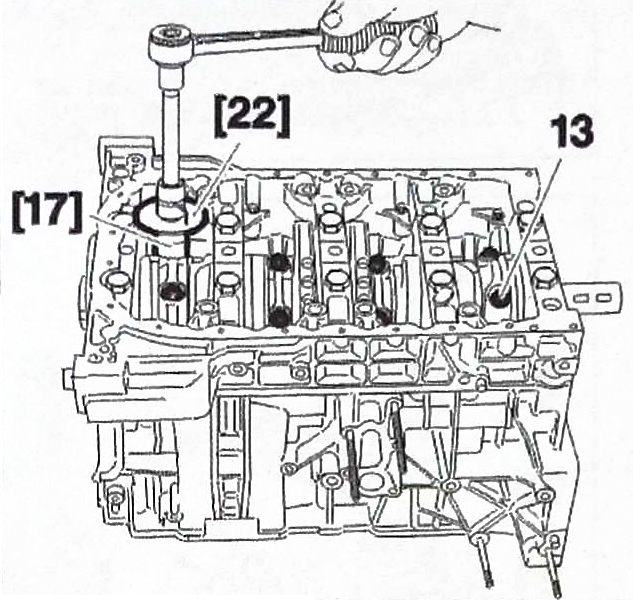
Perform corner tightening at 45°.


Apply sealing paste to the connecting surface of the oil pump "Autojoint Noir".

Install the oil pump (14) in place.

Lubricate with the composition "Loctite Frene-tanch" bolts (15).

Tighten the bolts (15) to 8 Nm.
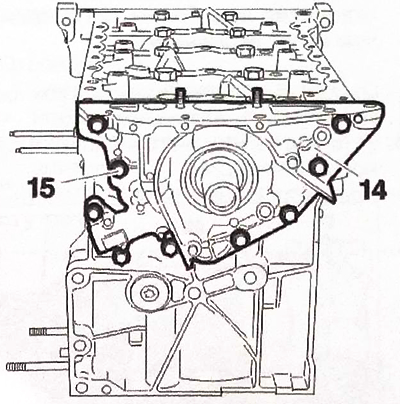
Tighten the bolts (15) to 8 Nm.


Insert tool 14b into tool 14a.

Install the oil seal (16) using tool 14a.

Remove tool 14b.

Caution: When performing installation, lubricate the annular edge of the device, but do not lubricate the outer surface of the seal.
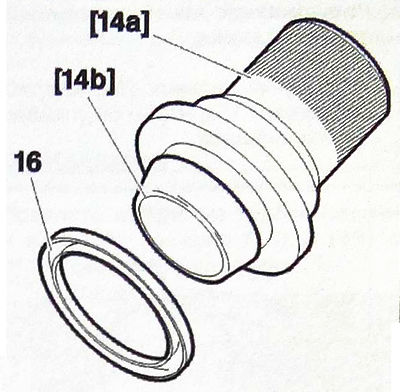

Caution: When performing installation, lubricate the annular edge of the device, but do not…


Install the oil seal (16) with tool 14a so that it rests against the cylinder block.
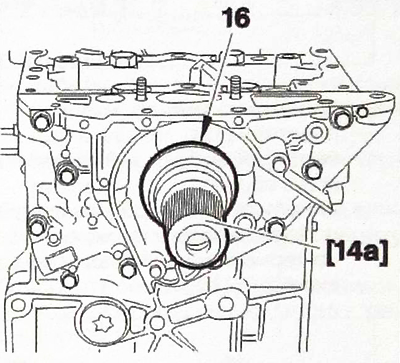


Install the oil seal (16) with tool 14a so that it rests against the cylinder block.


Insert tool 15b into tool 15a.

Install the sealing sleeve (17) using tool 15a.

Remove tool 15b.
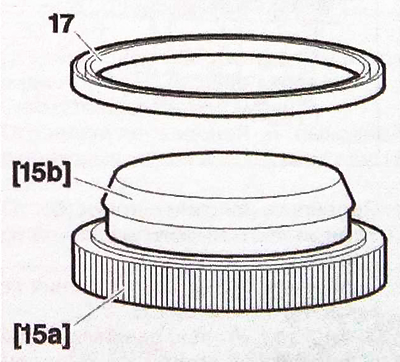
Remove tool 15b.


Caution: When performing installation, lubricate the annular edge of the device, but do not lubricate the outer surface of the seal.


Install the oil seal (17) with tool 15a so that it rests against the cylinder block.
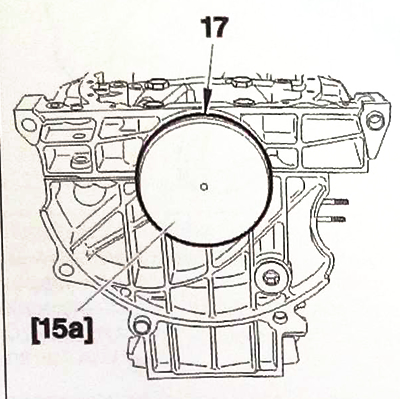
Install the oil seal (17) with tool 15a so that it rests against the cylinder block.


Reinstall:


  • plate (19);
  • mesh filter (18) with gasket assembly;
  • apply a uniform thin layer of sealing paste to the pressing surface of the cylinder block.
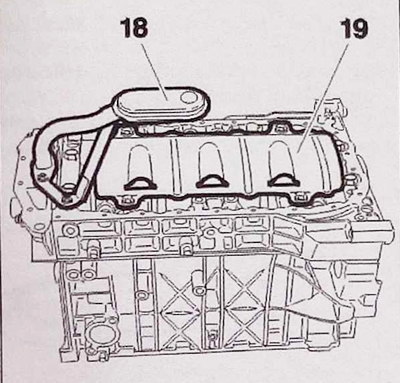
apply a uniform thin layer of sealing paste to the pressing surface of the cylinder block.


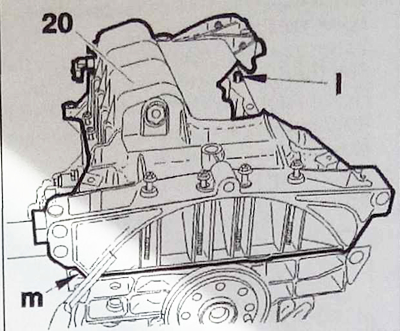
Check for the presence of the key (l).

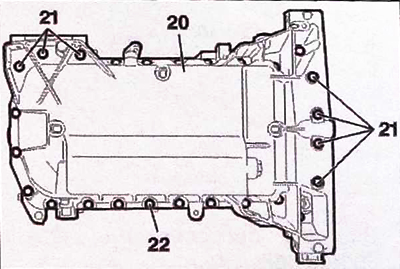
Install the oil pan (20) in place.

Tighten the bolts until contact is achieved, without tightening them.

Place a ground straight edge in area (m) and adjust the position of the oil pan to align it with the cylinder block surface.

Tighten the oil pan bolts (21) and (22).
Tighten the oil pan bolts (21) and (22).


Note: It is necessary to clean the threaded holes for the bolts (24) before installing them.


Clean the mating surfaces of the crankshaft and flywheel.

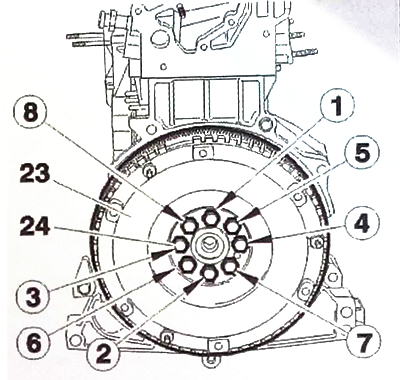
Install the flywheel (23) and new bolts (24) in place.
Install the flywheel (23) and new bolts (24) in place.


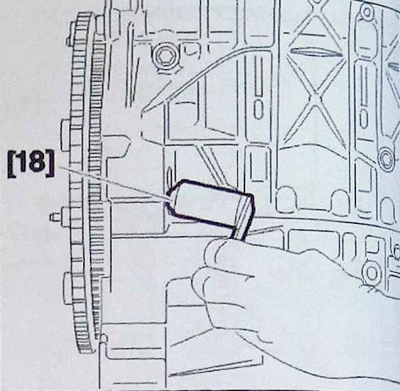
Install fixture 18.

Insert bolts (24) until they touch the flywheel in the order 1-5-3-7-2-6-4-8 and tighten.

Note: Tighten the bolts one by one in the sequence shown.

Note: Tighten the bolts one by one in the sequence shown.


Caution: Make sure the locating pins (n) are present.


Set the pistons to mid-stroke.

Install a new cylinder head gasket.
This article is available at russian, bulgarian, belarusian, ukrainian, serbian, croatian, romanian, polish, slovak, hungarian
Article reviewed by editor: Matveev Demid
Share information:
Previous
Peugeot 207: Engine repair
Next

Assembly of the engine piston group
Engine Cylinder Block Repair
Replacing the dual damper flywheel
Cylinder head repair
Removal and installation of the cylinder head on a vehicle…
Gasoline ICE — Removal
Gasoline ICE — installation
Diesel ICE — Removal
Diesel ICE — installation
See similar information for other Peugeot models

➨ Crankshaft — refitting and main bearing running clearance check Peugeot 106 (1991-2003)
➨ Checking the crankshaft Peugeot 307 (2001-2008)
➨ Checking the working clearance of the crankshaft main bearings Peugeot 406 (1995-2004)
➨ Front crankshaft oil seal (timing belt side) — replacement Peugeot 605 (1989-2000)
➨ Checking the vehicle's ground clearance Peugeot Partner I (1996-2008)
Link to this article in different formats
Comments and feedback from visitors
No comments yet


Add two numbers 37 + 43


Peugeot 207 (2006-2014) 
  • General information
  • Car care
  • Governing bodies
  • Driving and operation
  • Power unit
  • Engine characteristics
  • Engine repair
  • Cooling system
  • Lubrication system
  • Ignition system
  • Control system (gasoline)
  • Fuel system (gasoline)
  • Control system (diesel)
  • Transmission
  • Clutch
  • Mechanical gearbox
  • Automatic gearbox
  • Drive shafts
  • Chassis, running gear
  • Car suspension
  • Steering
  • Brake system
  • Body and interior
  • Exterior (external elements)
  • Interior (internal elements)
  • Heating and air conditioning
  • Electrical equipment
  • Equipment and devices
  • Headlights and lighting
  • Power devices
  • Electrical circuits
Peugeot 206 (1998-2012) 
  • General information
  • User manual
  • Maintenance
  • Power unit
  • Gasoline engines
  • Diesel engines
  • Diesel power system
  • Engine management system
  • Transmission
  • Clutch
  • Mechanical gearbox
  • Automatic gearbox
  • Drive shafts
  • Chassis, running gear
  • Front suspension
  • Rear suspension
  • Steering
  • Brake system
  • Body and interior
  • Body elements
  • Doors, locks and windows
  • Electrical equipment
  • Equipment and devices
  • Electrical circuits
PeugeotBook.ru © 2018–2026 | Mobile version | Sitemap: EN BG BY UA RS HR RO PL SK HU | Write message | Site search | Add to bookmarks | Peugeot owners
106 (1991-2003) | 206 (1998-2012) | 207 (2006-2014) | 305 (1977-1989) | 306 (1993-2002) | 307 (2001-2008) | 405 (1987-1997) | 406 (1995-2004) | 605 (1989-2000) | Partner-I (1996-2008) | Eurovans-807 (2002-2014) | Eurovans-806 (1994-2002) | J5 (1981-1993) |
Cookies are used to ensure the correct display of pages on the site.