
12.0 Distance A between the front wheels may be greater than the rear. In this case, the wheels have a negative convergence. With positive convergence, the value of the mentioned distances is opposite
Workshops use special devices to check and adjust wheel alignment angles. For this reason, we recommend that this check be carried out by a workshop.
Adjustment of forward wheels is carried out at operational loading of the car. This means that the car must be unloaded and the fuel tank must be full. The height of the car must be the same both at the rear and at the front. In addition, the values of the wheel alignment angles for different models may not match. Workshops have corresponding wheel alignment values for all models.
The toe-in of the front wheels can be measured with a mechanical instrument. Wheel alignment can be positive or negative. With a positive convergence of the front wheels, the distance between the wheels in front is less than the distance behind these wheels. With a negative convergence of the front wheels, on the contrary, a smaller distance will be behind. The value of the convergence of the wheels of the cars considered in this manual is in the range of 1-3 mm. If the wheel alignment is set incorrectly, this leads to premature tire wear.
The wheel alignment measurement procedure is as follows.
1. Check the tire pressure and, if necessary, bring it to nominal values.
2. Park the vehicle on a level surface and align the wheels as straight as necessary to drive in a straight line. The position of the wheels can be determined by the steering wheel spokes.
3. Put the measuring rail on the front side of the wheels and press both pins of the device into the edges of the wheel rims, zeroing the scale of the rail. The measuring rail must be at the level of the wheel hubs.
4. Mark with chalk the points of contact of the pins of the device.
5. Remove the measuring rail.
6. Move the car forward so that the wheels turn half a turn, and the points of contact of the pins of the measuring rail on the disks marked with chalk are at the rear at the level of the hubs.
7. Place a measuring stick at the rear of the wheels against the chalk marks by sliding it under the car. If the wheels are installed correctly, then with a positive convergence, the pins of the rack will need to be moved apart, and with a negative one, they will need to be moved in the direction of each other.
8. Read off the dial after the pins have been moved. The offset must be within 1 mm. Offset up to 3 mm is allowed. If this is not the case, then unscrew the locknuts securing both tie rod ends. If the tips have been replaced with new ones, then the locknuts are not yet tightened.
9. Turn the tie rods on both sides to change their length. The change in length should be the same on both the left and right, and should be done in small increments. Toe-in should be measured each time after each step (see illustration).
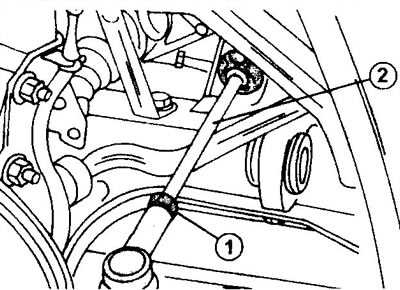
12.9 Adjusting the toe of the front wheels
1 - locknut for fastening the tip on the tie rod
2 - tie rod
If the length of the left and right tie rods is not changed to an equal value, then the position of the steering wheel will change and the spokes will not correspond to the direct position of the wheels.
10. After completing the installation of the wheels, tighten the locknuts for fastening the tips on the transverse steering rods with a torque of 47 Nm. The tie rods themselves must be kept from turning.
11. Check the wheel alignment again and correct if necessary.