
English Русский
Български
Беларускі
Український
Српски
Hrvatski
Română
Polski
Slovenský
Magyar
Bookmark Articles Sitemap Contacts
Company Hyundai Company Opel Company Skoda Company Kia Company Mitsubishi Company LADA Company Audi
PeugeotBook.ru


Series 100   Series 200   Series 300   400-500   Series 600   Crossovers   Others
 
Partner I (1996-2008) Peugeot 807 (2002-2014) Peugeot 806 (1994-2002) Peugeot J5 (1981-1993)

Oil pump (Peugeot J5)

  • Main
  • Пежо
  • Peugeot J5 (1981-1993)
  • Gasoline engine
  • Lubrication system
  • Oil pump
0

3.1.1. Removal and installation


  • The oil pump can be removed without removing the engine.
  • Disconnect the battery.
  • Raise the front of the vehicle or, if possible, drive it onto an overpass or place the front wheels on a lifting ramp.
  • Place a suitable container under the oil pan and drain the oil from the engine. The oil should be at least warm so that it drains better.
  • Release the fastener and pull out the ignition distributor.
  • Unscrew the ignition distributor drive housing. When installing the pump, the drive shaft of the ignition distributor and oil pump must be installed in a certain position.
  • Loosen the oil pan mounting bolts around the circumference and lower the oil pan down. Carefully tap the stuck oil pan with a rubber hammer; do not insert a screwdriver between the contact surfaces.
  • The oil pump is located in the location shown in figure 28 (the engine is shown in the figure with the crankcase facing upwards) and can be turned away and removed as shown in Figure 89 (it shows the engine with the crankcase facing down). The pump shaft is pulled out from the top of the engine.
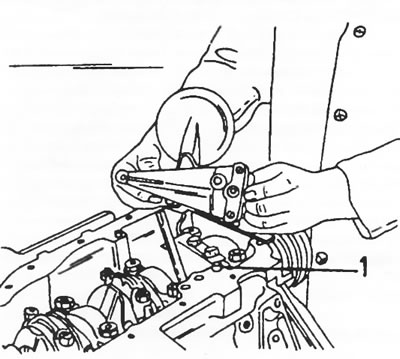
Figure 89. Removing the oil pump. The pump is installed in the cylinder block with an adapter…

Figure 89. Removing the oil pump. The pump is installed in the cylinder block with an adapter sleeve (1).


If the oil pump is removed due to low oil pressure, it is best to install a new oil pump, as the pump housing and gears are most likely worn out.

Before installing the oil pump, thoroughly clean the contact surfaces of the crankcase without using sharp objects.
  • Insert the drive shaft into the cylinder block. When pushing the shaft in, the drive gear with the spline for the driver should be in position (1) in Figure 90. Upon close inspection, you can see that the spline cut is not exactly in the middle. The smaller segment of the drive gear should face the cylinder block.
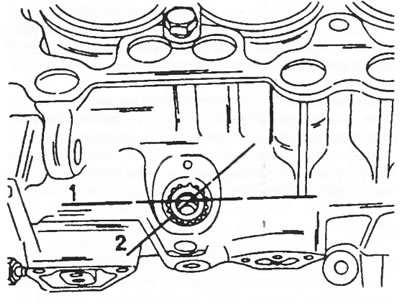
Figure 90. Installing the oil pump drive shaft. When installing the shaft, the spline for the leash…

Figure 90. Installing the oil pump drive shaft. When installing the shaft, the spline for the leash must be in position (1) and after installing the shaft, the spline must turn to position (2).

  • Insert the shaft in this position. Push the shaft in. You will notice that the gear engages the camshaft helical gear and the spline is set to a new position, indicated as (2) in Figure 90. The wider segment of the gear should now face the rear of the engine.
  • Place the distributor clamp on the engine and secure with one bolt.
  • Check from the bottom of the engine that the adapter sleeve (1) in Figure 89 is seated in the cylinder block and install a new O-ring.
  • Install the oil pump, engaging it with the drive shaft, and place it on the block through the adapter sleeve. Tighten the bolts evenly to a torque of 10 Nm.
  • Install the oil pan with a new gasket. Tighten the bolts evenly to a torque of 10 Nm.
  • Install the ignition distributor. After this, check and, if necessary, adjust the ignition timing.
  • Check if the drain plug is tightened (tightening torque 30 Nm) and pour the prescribed amount of oil into the engine. Pull the high-voltage wire out of the center of the ignition distributor. Turn the engine over with the starter until the oil pressure warning light goes out. This determines that the pump creates sufficient oil pressure to lubricate the engine. After this, reconnect the high-voltage wire to the ignition distributor. Start the engine and let it run for a while. Check for oil leaks from the oil pan. Also, after some mileage, check the oil level and, if necessary, add oil to the engine.

[Original text is located at: PEUGEOTBOOK.ru]
This article is available at russian, bulgarian, belarusian, ukrainian, serbian, croatian, romanian, polish, slovak, hungarian
Article reviewed by editor: Bespalov Alexey
Share information:
Previous
Peugeot J5: Lubrication system
Next

Engine lubrication system — general information
Oil filter
Checking oil pressure
Engine oil level
See similar information for other Peugeot models

➨ Oil pump — removal, inspection and refitting Peugeot 106 (1991-2003)
➨ Turbocharger Cooling Pump Replacement (EP6DT Engines) Peugeot 207 (2006-2014)
➨ Oil pump — inspection and maintenance Peugeot 305 (1977-1989)
➨ Power steering pump (XU9J4) (10000 km/6 months) Peugeot 405 (1987-1997)
➨ Oil pump — removal Peugeot 605 (1989-2000)
Link to this article in different formats
Comments and feedback from visitors
No comments yet


Add two numbers 47 + 46


Partner I (1996-2008) 
  • General information
  • Introduction to the guide
  • Faults en route
  • Weekly checks
  • User manual
  • Maintenance (petrol)
  • Maintenance (diesel)
  • Power unit
  • Petrol engines
  • Diesel engines «XUD»
  • Diesel engines «DW»
  • Overhaul of petrol engines
  • Overhaul of diesel engines
  • Cooling and heating
  • Power and exhaust (petrol)
  • Power and exhaust (XUD diesels)
  • Power and exhaust (DW diesels)
  • Emission reduction
  • Starting and charging system
  • Transmission
  • Clutch
  • Mechanical gearbox
  • Drive shafts
  • Chassis, running gear
  • Brake system
  • Car suspension
  • Steering
  • Body and interior
  • Exterior (external elements)
  • Interior (internal elements)
  • Doors, locks and windows
  • Electrical equipment
  • Equipment and devices
  • Electrical circuits
Peugeot 807 (2002-2014) 
  • General information
  • Operating instructions
  • Maintenance
  • Troubleshooting
  • Power unit
  • Gasoline engines
  • Diesel engines
  • Cooling and heating
  • Fuel injection (petrol)
  • Fuel system (diesel)
  • Fuel system
  • Exhaust system
  • Ignition system
  • Transmission
  • Clutch
  • Manual gearbox
  • Automatic gearbox
  • Chassis, running gear
  • Brake system
  • Car suspension
  • Steering system
  • Body and interior
  • Exterior (external elements)
  • Interior (internal elements)
  • Electrical equipment
  • Power devices
  • Electrical circuits
Peugeot 806 (1994-2002) 
  • General information
  • User manual
  • Maintenance
  • Power unit
  • Petrol engines
  • Diesel engines
  • Lubrication system
  • Cooling system
  • Fuel injection (petrol)
  • Fuel system (diesel)
  • Ignition and exhaust systems
  • ECM Bosch Motronic MP 3.2
  • ECM Magneti-Marelli (MM)
  • Transmission
  • Clutch
  • Mechanical gearbox
  • Chassis, running gear
  • Brake system
  • Car suspension
  • Steering
  • Electrical equipment
  • Equipment and devices
  • Electrical circuits
Peugeot J5 (1981-1993) 
  • General information
  • Introduction to manual
  • Specifications
  • Gasoline engine
  • Engine repair
  • Lubrication system
  • Cooling system
  • Fuel system
  • Ignition system
  • Diesel engine
  • Engine repair (DB9)
  • Lubrication system (DB9)
  • Cooling system (DB9)
  • Fuel injection (DB9)
  • Engine repair (U25)
  • Lubrication system (U25)
  • Cooling system (U25)
  • Fuel injection (U25)
  • Transmission
  • Clutch
  • Gearbox
  • Drive shafts
  • Chassis, running gear
  • Steering system
  • Car suspension
  • Brake system
  • Electrical equipment
  • Power devices
  • Electrical circuits
PeugeotBook.ru © 2018–2026 | Mobile version | Sitemap: EN BG BY UA RS HR RO PL SK HU | Write message | Site search | Add to bookmarks | Peugeot owners
106 (1991-2003) | 206 (1998-2012) | 207 (2006-2014) | 305 (1977-1989) | 306 (1993-2002) | 307 (2001-2008) | 405 (1987-1997) | 406 (1995-2004) | 605 (1989-2000) | Partner-I (1996-2008) | Eurovans-807 (2002-2014) | Eurovans-806 (1994-2002) | J5 (1981-1993) |
Cookies are used to ensure the correct display of pages on the site.