



Table of contents: Adjusting the fuel level in the…🠇 Checking and adjusting the…🠇 Checking and adjusting the air…🠇 Checking and adjusting the throttle…🠇 Idle speed adjustment 🠇
Adjusting the fuel level in the float chamber
Checking the float adjustment (fuel level in the float chamber) and a template drawing
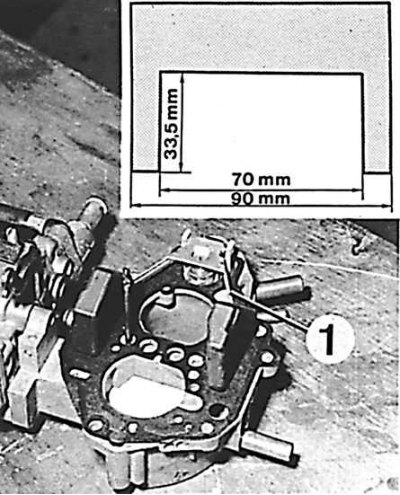
1 – adjusting tongue
1. Remove the carburetor cover.
2. Turn over the lid with the gasket.
3. Install the template and check the position of the floats (the needle valve ball should be pressed in).
4. If the adjustment is incorrect, the position of the floats should be adjusted using the support tongue (1).
Checking and adjusting the additional opening of the throttle valve of the float chamber
This operation can be performed both on a removed and installed carburetor.
The carburetor has been removed
Test conditions: ambient temperature 20°C.
Checking the position of the movable roller when adjusting the additional opening of the first chamber throttle valve

1 – adjusting screw, 2 – movable roller, 3 – screwdriver for adjusting the movable roller, 4 – measuring rod with a diameter of 3 mm, 5 – template 180 143 T
1. Using a measuring rod (or drills) with a diameter of 3 mm, check the opening of the throttle valve of the first chamber.
2. If necessary, set the required value using the screw (1).
The carburetor is installed
1. Check the position of the moving roller. To do this:
- insert template (5) 180 143 T, as shown in the figure Checking the position of the moving roller when adjusting the additional opening of the first chamber throttle valve;
- check whether the moving roller (2) is located between the two notches of the template (5);
- if necessary, use a screwdriver (3) to adjust the adjusting screw and rod (4) with a diameter of 3 mm.
2. Extract template.
3. Start the engine.
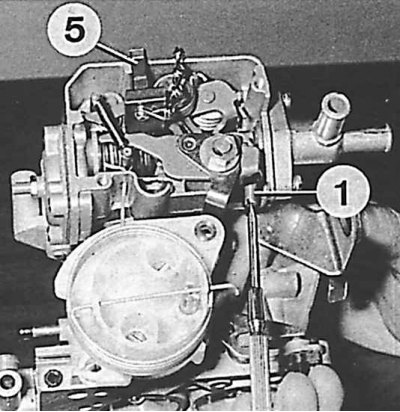
4. Place the circular cutout of the template on the moving roller and turn the template (5) so as to align it with the upper wall of the starting device housing (1 – adjusting screw).
5. The engine speed should be between 2350 and 2450 rpm if the carburetor is equipped with a cam plate, or 1700 to 1800 rpm if the carburetor does not have such a plate.
6. If necessary, make adjustments using the adjusting screw.
Checking and adjusting the air damper opening
Adjusting the air damper opening on a removed carburetor
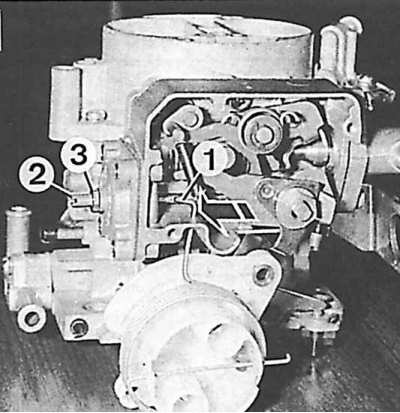
1 – rod, 2 – adjusting screw, 3 – lock nut
This operation can be performed both on a removed and installed carburetor.
The carburetor has been removed
Test conditions: ambient temperature 20°C.
1. Use tweezers to grab the rod (1) (see figure Adjusting the air damper opening on a removed carburetor) and push it in the direction shown by the arrow until it contacts the screw (2).
2. Using a 6 mm drill, measure the opening of the air damper.
3. If necessary, unscrew the lock nut and use the screw (2) to set the required value.
The carburetor is installed
Adjusting the air damper opening on the installed carburetor
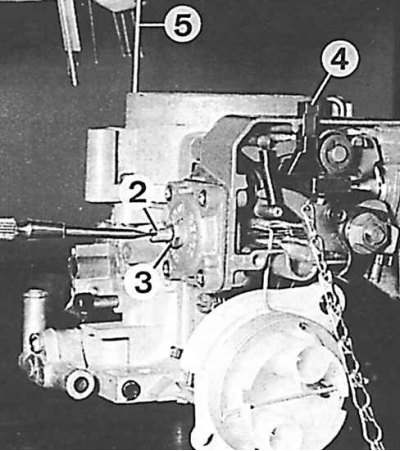
2 – adjusting screw, 3 – lock nut, 4 – template 180 143 T, 5 – measuring rod with a diameter of 6 mm
1. Remove the air filter connection tube from the carburetor.
2. Start the engine.
3. Place the template 180 143 T on the moving roller. Rotate the template (5) (see figure Adjusting the air damper opening on the installed carburetor) in such a way as to fit it with the top wall of the starting device housing.
4. Using a 6 mm drill, measure the opening of the air damper.
5. If necessary, unscrew the lock nut (3) and use the screw (2) to set the required value.
Checking and adjusting the throttle opening
Adjusting the opening of the air damper when the throttle valve of the first chamber is fully opened
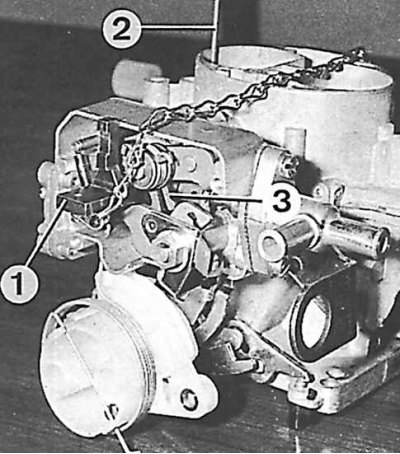
1 – template 180 143 T, 2 – measuring rod with a diameter of 8 mm, 3 – adjusting forks
This operation can be performed both on a removed and installed carburetor.
The carburetor has been removed
Test conditions: ambient temperature 20°C.
1. Fully open the first chamber throttle valve.
2. Using an 8 mm drill, measure the opening of the air damper.
3. If necessary, set the required value using forks (3) (see figure Adjusting the opening of the air damper with the throttle valve of the first chamber fully open) (by moving the forks apart the regulated value increases and vice versa).
The carburetor is installed
1. Place the template (1) on the moving roller and turn it so that it fits into the top wall of the starting device housing.
2. Using an 8 mm drill, measure the opening of the air damper.
3. If necessary, set the required value using forks (3) (by moving the forks apart the regulated value increases and vice versa).
Idle speed adjustment
Idle speed adjustment - throttle screw
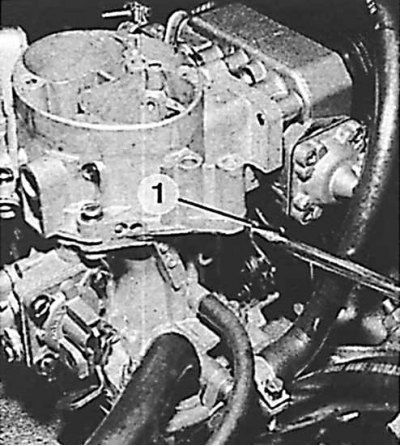
1 – throttle valve screw
Idle speed adjustment - mixture adjustment screw
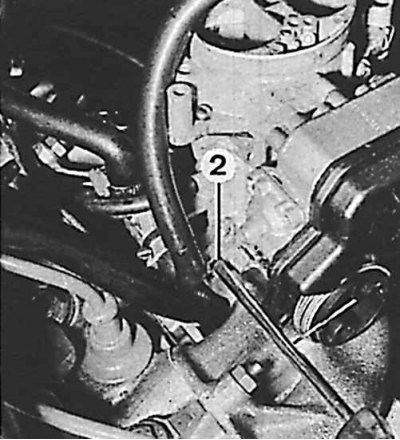
2 – mixture composition adjustment screw
The starting device must not function, the engine must be warmed up to operating temperature, the ignition system must be in good condition and properly adjusted. Leaks through which additional air can be sucked in are unacceptable. Also, the exhaust system must be hermetically sealed, and all consumers of electrical energy must be switched off.
1. Adjust the engine idle speed using the throttle screw (1) (see figure Idle speed adjustment – throttle screw).
2. Adjust the CO content in the exhaust gases using the mixture ratio screw (2) (see figure Idle speed adjustment – mixture ratio adjustment screw).
3. If necessary, adjust the engine idle speed.