



Table of contents: Checking the electrolyte level 🠇 Checking the charge (electrolyte…🠇 Charging the battery 🠇 Removal and installation 🠇 Starting the engine with a dead…🠇 Identifying a faulty on-board…🠇
Checking the electrolyte level
As already mentioned, the battery has plugs if its casing is made of dark plastic and is not transparent. Sulfuric acid diluted with distilled water is poured into the battery. During battery operation, water evaporates, and therefore it is necessary to regularly check the electrolyte level in the battery and, if necessary, add distilled water. Water is poured through the holes under the plugs, which are unscrewed.
Checking the charge (electrolyte density)
To check the density of the electrolyte in the battery, a hydrometer is needed, which takes a certain amount of electrolyte from the battery. The hydrometer float should float freely in the electrolyte taken from the battery. The density of the electrolyte is determined by the scale on the float. If the specific gravity of the electrolyte is 1.28, the battery is fully charged, and if the reading is 1.12, the battery is completely discharged. Intermediate values of electrolyte density correspond to a certain charge value. The division value of the scale on the hydrometer float corresponds to kg/l (see illustration 2.0).
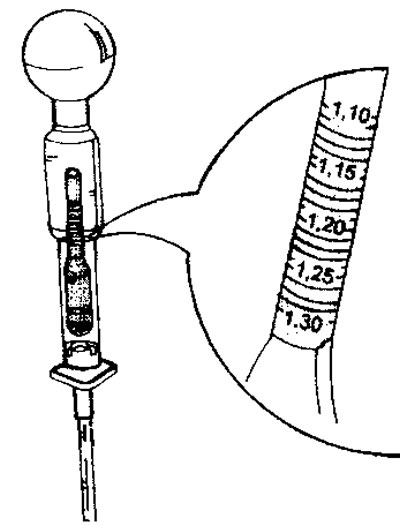
2.0 Hydrometer for determining the density of electrolyte in the battery. The hydrometer float has a scale that determines the specific gravity of the electrolyte. There are also hydrometers of other models available
Charging the battery
Adding distilled water to a deeply discharged battery should only be done after it has been charged. During charging, the volume of electrolyte increases and, accordingly, its level rises. If distilled water was added to the prescribed level before charging, it will boil away. The charging current at the initial phase should not exceed 10% of the battery capacity. This means that before charging the battery, you should check its capacity. Typically, chargers are equipped with automatic regulation of the charging current, which is adjusted as the battery charges. The battery is considered to be charged if the density of the electrolyte in it does not change within two hours after the estimated end time of charging.
Please note: The above procedure does not apply to sealed batteries, which do not require maintenance. In this case, you should follow the battery manufacturer's instructions regarding charging.
When charging the battery, the plugs of its cells should be unscrewed and placed on the holes. The explosive gas generated during charging will escape freely. Due to the possibility of electrolyte boiling, it is recommended to place old newspapers around the battery. If the battery is charged in a closed room, it must be ventilated. When charging a battery, it is prohibited to illuminate its cells with an open flame.
When charging the battery yourself using a charger used by car enthusiasts, this procedure can be performed without removing the battery from the car. The terminals also do not need to be disconnected. A different situation is presented by accelerated charging of the battery using an appropriate device. In this case, the battery must be disconnected from the vehicle's electrical system, as this could damage the generator's diode board, electronic control units, radio receiver, etc.
Removal and installation
Before removing the battery, it is necessary to disconnect the terminals from the poles. The terminal on the positive pole is covered with a cover. When disconnecting terminals, always disconnect the negative (-) wire terminal first.
When installing the old battery, it is necessary to thoroughly clean the terminals and lubricate them with the appropriate grease. When connecting wires to the battery, first attach the terminal to the positive pole, and only then attach the terminal to the negative pole. Make sure both terminals are tight and seated firmly on the terminal posts. Loose terminals lead to power failure in the network. In some cases, loosening of the terminals is accompanied by sparking and even fire.
Important! If your radio is equipped with a security code, disconnecting the battery will delete the code. In order for the radio to work after connecting the battery, you must enter the security code. Therefore, before disconnecting the battery, make sure the code is written down or known. After connecting the battery, you also need to set up the electronic clock again. After installing the battery, you need to perform a test drive so that the electronic control unit of the fuel injection and ignition systems "remembers" the previous settings.
Starting the engine with a dead battery
If the battery is dead and the engine cannot be started, the best solution is to start the engine from an auxiliary battery. In this case, appropriate connecting wires of sufficient cross-section are required. It is not recommended to purchase aluminum auxiliary wires because they become very hot during startup.
When connecting the wires from the auxiliary battery, first connect the positive terminals, and then the negative ones. Ask an assistant to start the engine. The engine must idle for a while at medium speed for the alternator to begin recharging the battery.
In addition to the above method, the engine can be started by pushing or towing.
If the engine is in good condition, then even with a dead battery it can be started by pushing the car. The efforts of two people will be quite sufficient in this case.
1. Turn on the ignition.
2. Turn on first speed. If you turn on the second one, the generator will rotate at a speed that is insufficient to recharge the battery.
3. Depress the clutch. You can start pushing the car.
4. Release the clutch pedal once the vehicle has reached sufficient speed. The engine should start.
5. Depress the clutch pedal and give it gas.
If pushing does not produce results, you can try to start the engine by towing the car. This also requires some skill, as there is a high risk of hitting the towing vehicle. In this case, you should not forget that the brake booster is not working. It would be superfluous to give any advice on towing. We would just like to emphasize that the towing rope must be secured to the appropriate hooks. If your vehicle is towing another vehicle, the towing rope is attached to the rear towing hook on the right side of your vehicle. If the situation is reversed and your vehicle is being towed, the towing rope is attached to the front hook on the left side.
Identifying a faulty on-board electrical system consumer
If the battery is discharged in the morning, although it was absolutely normal the day before, then the cause is a malfunction of the network consumer.
6. Disconnect the negative (-) battery terminal.
7. Connect the multifunction tester lead to the negative battery terminal and the ground (-) wire. If the device registers voltage, one of the on-board electrical system components is faulty.
8. Connect the ground (-) cable to the battery.
9. Open the fuse box and remove the fuses one by one. After removing the fuse, connect the tester to the contacts. If there is no voltage, then the corresponding circuit is OK, even if the tester registers a slight voltage.
10. Repeat measuring the voltage in the circuits until, after removing the next fuse, the device shows the presence of voltage. Using the fuse assignment table, determine the circle of consumers of this circuit.
11. Disconnect the consumers one by one and check the voltage in the circuit. As soon as the tester does not show voltage after the next disconnection, the device is faulty.