
English Русский
Български
Беларускі
Український
Српски
Hrvatski
Română
Polski
Slovenský
Magyar
Bookmark Articles Sitemap Contacts
Company Hyundai Company Opel Company Skoda Company Kia Company Mitsubishi Company LADA Company Audi
PeugeotBook.ru


Series 100   Series 200   Series 300   400-500   Series 600   Crossovers   Others
 
Partner I (1996-2008) Peugeot 807 (2002-2014) Peugeot 806 (1994-2002) Peugeot J5 (1981-1993)

Alternator belt — removal (Peugeot Eurovans 806)

  • Main
  • Пежо
  • Peugeot 806 (1994-2002)
  • Electrical equipment
  • Equipment and devices
  • Alternator belt — removal
0
Table of contents: All cars 🠇 Cars with 1.8 and 2.0 liter petrol…🠇 Cars without air conditioning 🠇 Cars with air conditioning 🠇 Cars with 16-valve engines 🠇 Diesel-powered vehicles 🠇 Cars with air conditioning 🠇
Almost all models have their own alternator belt routing pattern. Diesel engines are equipped with a so-called dynamic alternator belt tensioner. As already mentioned, in order to properly tension the alternator belt, a special device is required.

All cars


1. Disconnect the ground (-) wire terminal.

2. Place the front of the vehicle on jack stands and remove the engine splash guard to provide access to the relevant components.

3. Remove the right wheel.

Cars with 1.8 and 2.0 liter petrol engines (8 valves)


In this case, there may be two options for belt routing. One option is when the car is equipped with air conditioning and the second is without air conditioning. Removing the alternator belt of a car with air conditioning is more labor-intensive.

Cars without air conditioning


4. Loosen bolts 1 and 4, and tighten bolt 5 until it stops. As a result, tension roller 2 will move upward, and the belt tension will weaken and can be removed (see illustration).
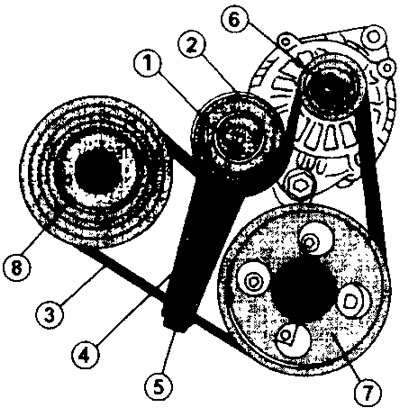
3.4 Location of the alternator drive belt in a vehicle with an XU gasoline engine (8 valves)…

3.4 Location of the alternator drive belt in a vehicle with an XU gasoline engine (8 valves) without air conditioning. 1.8 and 2.0 liter engines with and without turbocharger.
1 - belt tension roller bolt
2 - belt tension roller
3 - drive belt (all units)
4 - belt tension roller lock bolt
5 - belt tension adjustment screw
6 - generator pulley
7 - crankshaft belt pulley
8 - power steering pump belt pulley


Cars with air conditioning


Follow all the steps above to gain access to the belt.

6. Move tensioner 5 away from belt 4. The belt tensioner has a 3/8 inch hole into which a square key from the socket set is inserted. Once the roller is moved away from the belt, insert a 4mm socket wrench into hole "a" to hold the tensioner in that position.

7. Unscrew bolts 3 and remove the tensioner. Now you can remove the belt itself 4 (see illustration)
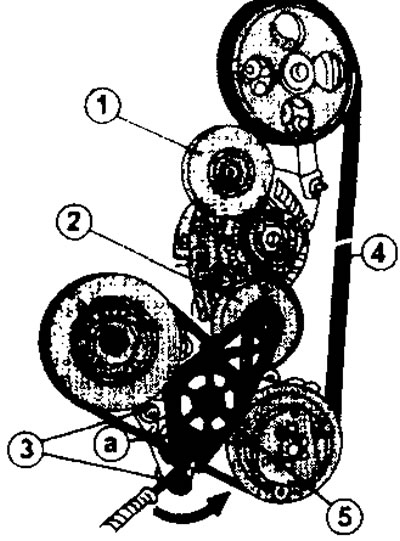
3.7 Location of the alternator drive belt in a vehicle with an XU gasoline engine (8 valves) with…

3.7 Location of the alternator drive belt in a vehicle with an XU gasoline engine (8 valves) with air conditioning. 1.8 and 2.0 liter engines with and without turbocharger. A 4 mm socket wrench is inserted into hole "a".
1 - guide roller
2 - guide roller
3 - belt tensioner bolts
4 - drive belt
5 - belt tensioner


Cars with 16-valve engines


If the vehicle is equipped with air conditioning, then removing the alternator belt is performed as described above. On cars without air conditioning, removing the alternator belt is done differently.

8. Loosen both bolts 1 and turn out the adjusting screw 2 so that the belt tension is relieved and can be removed.

9. Make sure that guide rollers 3 and 4 have free movement and there is no play (see illustration)
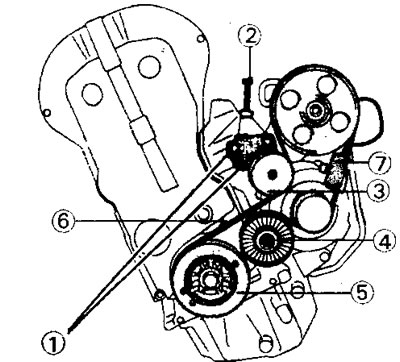


3.9 Location of the alternator belt for a 15-valve engine without air conditioning.

3.9 Location of the alternator belt for a 15-valve engine without air conditioning.
1 - mounting bolts. Tightening torque 20 Nm
2 - adjusting screw
3 - guide roller
4 - guide roller
5 - crankshaft belt pulley
6 - generator belt
7 - device for measuring belt tension


Diesel-powered vehicles


Due to the fact that diesel engines have a dynamic belt tensioner, removing and replacing the alternator belt is a rather complex process. The tensioner must be locked. You will also need a 1/2-inch square socket wrench from the kit and a 7 mm square wrench. If the vehicle is not equipped with air conditioning, the belt routing is the same as in Illustration 3.4.

10. Loosen bolts 1 and 4, and tighten bolt 5 until it stops. As a result, tension roller 2 will move upward, and the belt tension will weaken and can be removed (see illustration 3.4).

Cars with air conditioning


11. Loosen bolt 4 in the center of eccentric 5 of the generator belt dynamic tensioner (see illustration).
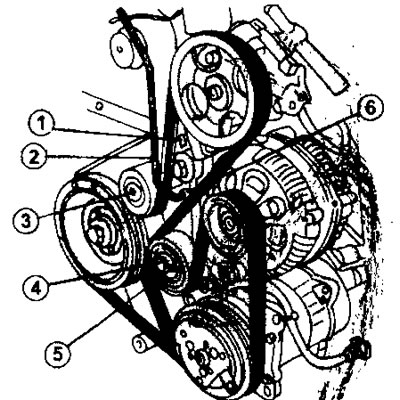
3.11 Removing and installing the alternator belt. Diesel engine car with air conditioning.

3.11 Removing and installing the alternator belt. Diesel engine car with air conditioning.
1 - tetrahedron
2 - rod for turning the tensioner
3 - guide roller
4 - bolt. Tightening torque 50 Nm
5 - Guide roller
6 - hole for fixing the tensioner
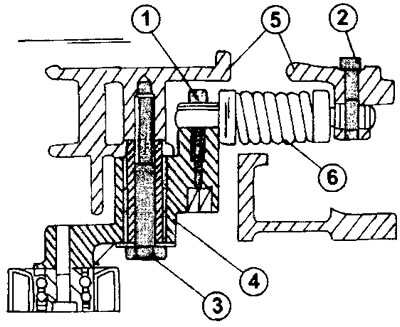


3.11a Dynamic alternator belt tensioner in section

3.11a Dynamic alternator belt tensioner in section
1 - bolt. Tightening torque 22 Nm
2 - bolt. Tightening torque 22 Nm
3 - bolt. Tightening torque 95 Nm
4 - dynamic tensioner roller
5 - generator suspension
6 - dynamic tensioner


12. Move roller 5 to the side so that the rod for turning the tensioner can be inserted into hole 6, which coincides with the hole on the generator suspension. To move the roller to the side, you need a 7 mm square wrench (see illustration 3.11).

13. Remove the belt from all pulleys and rollers.

Note: If the alternator belt is broken, you still need to move the dynamic tensioner to the side to remove it. Considering that replacing the belt in this case is a certain complexity, we recommend entrusting this work to a workshop.
This article is available at russian, bulgarian, belarusian, ukrainian, serbian, croatian, romanian, polish, slovak, hungarian
Article reviewed by editor: Shirokov Arseny
Share information:
Previous
Peugeot 806: Equipment and devices
Next

Generator — removal and installation
Generator — check
Generator general description
Battery — removal, installation and testing
General description of the electrical system
Alternator belt — installation
Starter — inspection, removal and installation, repair
Lighting — replacement, removal and installation of light bulbs
Windshield wiper
Instrument panel
See similar information for other Peugeot models

➨ Timing belt covers — removal and refitting Peugeot 106 (1991-2003)
➨ Timing belt characteristics (petrol engines 1.4 and 1.6 l, EP3,… Peugeot 207 (2006-2014)
➨ Alternator Drive Belt — tension adjustment Peugeot 305 (1977-1989)
➨ Checking and adjusting the V-belt tension (10,000 km/6 months) Peugeot 405 (1987-1997)
➨ Checking the condition of the V-belt Peugeot 605 (1989-2000)
Link to this article in different formats
Comments and feedback from visitors
No comments yet


Add two numbers 48 + 23


Partner I (1996-2008) 
  • General information
  • Introduction to the guide
  • Faults en route
  • Weekly checks
  • User manual
  • Maintenance (petrol)
  • Maintenance (diesel)
  • Power unit
  • Petrol engines
  • Diesel engines «XUD»
  • Diesel engines «DW»
  • Overhaul of petrol engines
  • Overhaul of diesel engines
  • Cooling and heating
  • Power and exhaust (petrol)
  • Power and exhaust (XUD diesels)
  • Power and exhaust (DW diesels)
  • Emission reduction
  • Starting and charging system
  • Transmission
  • Clutch
  • Mechanical gearbox
  • Drive shafts
  • Chassis, running gear
  • Brake system
  • Car suspension
  • Steering
  • Body and interior
  • Exterior (external elements)
  • Interior (internal elements)
  • Doors, locks and windows
  • Electrical equipment
  • Equipment and devices
  • Electrical circuits
Peugeot 807 (2002-2014) 
  • General information
  • Operating instructions
  • Maintenance
  • Troubleshooting
  • Power unit
  • Gasoline engines
  • Diesel engines
  • Cooling and heating
  • Fuel injection (petrol)
  • Fuel system (diesel)
  • Fuel system
  • Exhaust system
  • Ignition system
  • Transmission
  • Clutch
  • Manual gearbox
  • Automatic gearbox
  • Chassis, running gear
  • Brake system
  • Car suspension
  • Steering system
  • Body and interior
  • Exterior (external elements)
  • Interior (internal elements)
  • Electrical equipment
  • Power devices
  • Electrical circuits
Peugeot 806 (1994-2002) 
  • General information
  • User manual
  • Maintenance
  • Power unit
  • Petrol engines
  • Diesel engines
  • Lubrication system
  • Cooling system
  • Fuel injection (petrol)
  • Fuel system (diesel)
  • Ignition and exhaust systems
  • ECM Bosch Motronic MP 3.2
  • ECM Magneti-Marelli (MM)
  • Transmission
  • Clutch
  • Mechanical gearbox
  • Chassis, running gear
  • Brake system
  • Car suspension
  • Steering
  • Electrical equipment
  • Equipment and devices
  • Electrical circuits
Peugeot J5 (1981-1993) 
  • General information
  • Introduction to manual
  • Specifications
  • Gasoline engine
  • Engine repair
  • Lubrication system
  • Cooling system
  • Fuel system
  • Ignition system
  • Diesel engine
  • Engine repair (DB9)
  • Lubrication system (DB9)
  • Cooling system (DB9)
  • Fuel injection (DB9)
  • Engine repair (U25)
  • Lubrication system (U25)
  • Cooling system (U25)
  • Fuel injection (U25)
  • Transmission
  • Clutch
  • Gearbox
  • Drive shafts
  • Chassis, running gear
  • Steering system
  • Car suspension
  • Brake system
  • Electrical equipment
  • Power devices
  • Electrical circuits
PeugeotBook.ru © 2018–2026 | Mobile version | Sitemap: EN BG BY UA RS HR RO PL SK HU | Write message | Site search | Add to bookmarks | Peugeot owners
106 (1991-2003) | 206 (1998-2012) | 207 (2006-2014) | 305 (1977-1989) | 306 (1993-2002) | 307 (2001-2008) | 405 (1987-1997) | 406 (1995-2004) | 605 (1989-2000) | Partner-I (1996-2008) | Eurovans-807 (2002-2014) | Eurovans-806 (1994-2002) | J5 (1981-1993) |
Cookies are used to ensure the correct display of pages on the site.