



Table of contents: A car with a 1.8 and 2.0 liter…🠇 Cars without air conditioning 🠇 Cars with air conditioning 🠇 Cars with a 2.0-liter engine (16…🠇 Diesel vehicles without air…🠇
When installing the alternator belt, the procedure is as follows.
14. Place the belt on the pulleys. Make sure the belt fits snugly into the grooves on each pulley. Further steps depend on the type of engine installed in the vehicle.
A car with a 1.8 and 2.0 liter petrol engine (8 valves)
15. Make sure that roller 2 (see illustration 3.4), as well as videos 1 and 2 (see illustration 3.7) have free play. To tension the belt properly, the belt tensioner mentioned above is required (see illustration). If the device is not available, tensioning is performed taking into account the actions given below, with subsequent tension adjustment in the workshop.
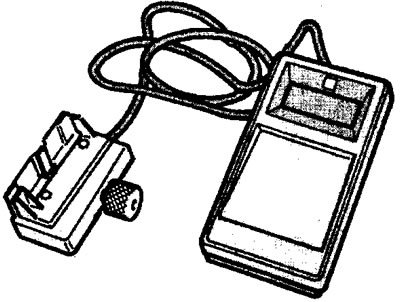
3.15 Device for measuring the tension of the generator drive belt. The device is placed on the belt and secured with a locking bolt
Cars without air conditioning
16. Loosen bolt 5 to tension the belt, then tighten bolts 1 and 4 to 5 Nm (see illustration 3.4).
17. Turn the crankshaft four revolutions and measure the belt tension. If the alternator belt tension does not correspond to the value of 60?3 sim, then loosen bolts 1 and 4 and tighten bolt 5 so that the belt tension is within the required limits. After this, tighten bolts 1 and 4 to a torque of 20 Nm (see illustration 3.4).
Please note: The above value applies to a new belt only. If the old belt is installed, its tension is adjusted to within 45 sim. The alternator belt tensioner shown in Figure 3.15 is available in two versions. If such a device is not available, the belt is tensioned based on existing experience, and then the tension is checked in the workshop. Experienced mechanics can easily determine whether the belt is tensioned correctly.
18. Connect the negative (-) terminal of the battery and start the engine. Let the engine run for about 10 minutes and check the alternator belt tension.
Cars with air conditioning
19. Install the belt tensioner 5 (see illustration 3.7). Before installation, lubricate bolts 3 with protective agent "Loctite" and tighten to a torque of 20 Nm.
20 Press the belt tensioner 5 to the side using a square key, as shown by the arrow in illustration 3.7, to release and remove the socket wrench from hole "a".
21. Release the belt tensioner to tighten the belt. No other belt adjustments are required because the belt tension is automatic.
2.2 Install all remaining parts in the reverse order of removal.
Cars with a 2.0-liter engine (16 valves)
The installation of the belt on cars with this type of engine and air conditioning is carried out in the same way as on cars with 8-valve engines.
For vehicles without air conditioning, tighten bolts I by hand and install belt tensioner 7 on section 6 as shown in illustration 3.9.
23. Tighten bolt 2 so that the instrument reading when installing the new belt is 120 sim. When installing the old belt, the instrument reading should be 90 sim. As soon as the instrument shows the required tension value, tighten bolts 1 with a torque of 20 Nm (see illustration 3.9).
24. Remove the belt tensioner and turn the crankshaft in the direction of engine rotation. Check the belt tension. If necessary, adjust it by loosening bolts 1 and tightening bolt 2.
25. Install all remaining parts in the reverse order of removal.
Diesel vehicles without air conditioning
26. Attach the device 4 for measuring belt tension as shown in the illustration. Screw 1 should not be tightened (see illustration).
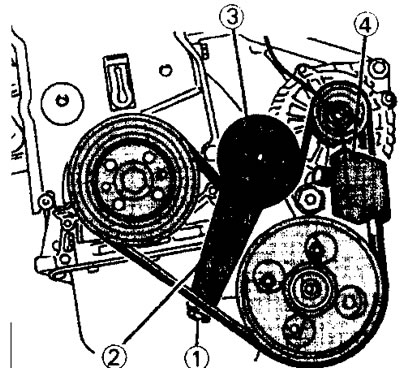
3.26 Tensioning the alternator belt in vehicles with a diesel engine without air conditioning.
1 - adjusting screw
2 - mounting bolt. Tightening torque 22 Nm
3 - mounting bolt. Tightening torque 22 Nm
4 - device for measuring belt tension
Text taken from the website peugeotbook.ru
27. Tighten screw 1 until the instrument shows a belt tension of 115±10 sim. Then tighten bolts 2 and 3 and remove the instrument.
28. Turn the crankshaft in the direction of engine rotation and check the belt tension. Adjust it if necessary.
29. Remove the belt tension gauge if tension adjustment was necessary and install all other parts in the reverse order of removal. Vehicles with a diesel engine and air conditioning
30. Place the belt as directed illustration 3.11, on all pulleys and rollers. Make sure the belt fits into the grooves.
31. Turn tension roller 5 to the right so that rod 2 for turning the belt tensioner can be removed from hole 6 (see illustration 3.11).
32. Tighten bolt 4 to a torque of 50 Nm without changing the position of the belt. The belt tension is sufficient and no adjustment is required.
33. Turn the crankshaft four revolutions and make sure the belt is tensioned correctly. If this is the case, then the rod 2 for turning the tensioner can be freely inserted into the hole 6 (see illustration 3.11).
34. Reinstall all remaining parts in the reverse order of removal.
Important! If you don't have a belt tension gauge, we recommend having your belt tension checked by a mechanic.