
English Русский
Български
Беларускі
Український
Српски
Hrvatski
Română
Polski
Slovenský
Magyar
Bookmark Articles Sitemap Contacts
Company Hyundai Company Opel Company Skoda Company Kia Company Mitsubishi Company LADA Company Audi
PeugeotBook.ru


Series 100   Series 200   Series 300   400-500   Series 600   Crossovers   Others
 
Partner I (1996-2008) Peugeot 807 (2002-2014) Peugeot 806 (1994-2002) Peugeot J5 (1981-1993)

Clutch Drive — Bleeding (Peugeot Eurovans 807)

  • Main
  • Пежо
  • Peugeot 807 (2002-2014)
  • Transmission
  • Clutch
  • Clutch Drive — Bleeding
0
Caution! It is not recommended to bleed the clutch hydraulic system using an automatic device. When using it, foaming of the brake fluid in the hydraulic drive cannot be ruled out.


Air must be removed from the clutch hydraulic drive if the clutch pedal does not return to the upper position or takes this position slowly, as well as in cases where gear shifting is difficult or if the hydraulic system has opened.

Since the hydraulic clutch system operates on brake fluid, please refer to the relevant provisions in the chapter "Bleeding the brake system".

Caution! Brake fluid is poisonous and should never be sucked out by mouth through a hose. Use special containers to collect brake fluid to prevent accidental use.


Caution! Do not allow brake fluid to come into contact with the gearbox housing. If liquid gets on you, remove it immediately with a cloth.


1. Place the vehicle on jack stands and remove the engine splash guard, as well as the cabin filter and its bracket and the air filter, disconnecting the supply air duct.

2. Check the brake fluid level in the expansion tank. If necessary, add fluid up to the MAX mark.

Please note: Only DOT4 brake fluid is used in the brake system and clutch hydraulic system.


3. Remove the dust cap from the bleed nipple 1 on the clutch slave cylinder 2 and put a transparent hose A on it, lowering the other end into a container located below the slave cylinder (see illustration).
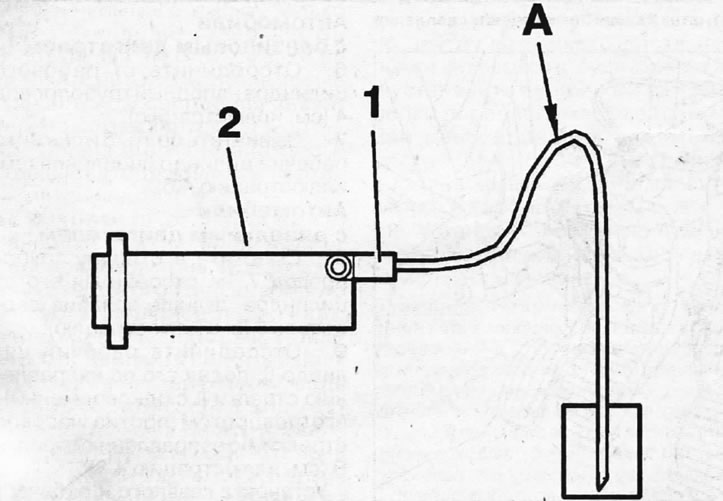
5.3. Attach a transparent hose A to the bleed nipple 1 on the clutch slave cylinder 2, and lower…

5.3. Attach a transparent hose A to the bleed nipple 1 on the clutch slave cylinder 2, and lower the other end into a container located below the slave cylinder


4. Open the bleed nipple. so that the liquid starts to come out. Before doing this, ask an assistant to press and release the 3rd clutch pedal by hand seven times, making one movement back and forth for one second (see illustration).
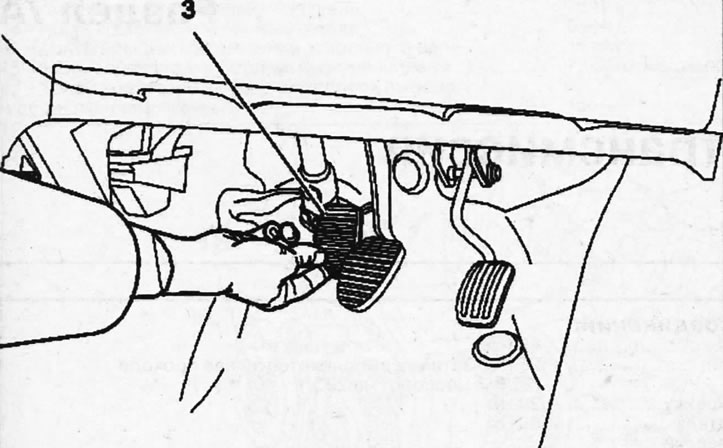
5.4. Ask an assistant to press and release the 3rd clutch pedal by hand seven times, making one…

5.4. Ask an assistant to press and release the 3rd clutch pedal by hand seven times, making one movement back and forth for one second


Ask an assistant to depress the clutch pedal all the way and hold it in this position. After filling the hose with brake fluid, tighten the nipple and ask an assistant to release the pedal. Repeat this procedure several times, filling the hose with brake fluid each time. To prevent liquid from leaking out of the hose, plug its free end with your finger.

Caution! Do not allow the brake fluid level in the expansion tank to drop significantly; top up with fresh fluid.


Repeat the bleeding procedure until air bubbles stop appearing in the brake fluid.

6. Close the nipple on the clutch slave cylinder and remove the transparent hose.

7. Add brake fluid to the expansion tank up to the MAX mark.

8. Depress and release the clutch pedal forty times, making one movement back and forth for one second. This will force the remaining air out of the system.


9. Start the engine, apply the parking brake and engage gear.

10. Make sure that when releasing the depressed clutch pedal, the driven disc maintains contact with the flywheel when the pedal is at a distance X from the floor, which should be 35 millimeters or even more (see illustration). If this is not the case, then repeat the bleeding of the hydraulic drive.
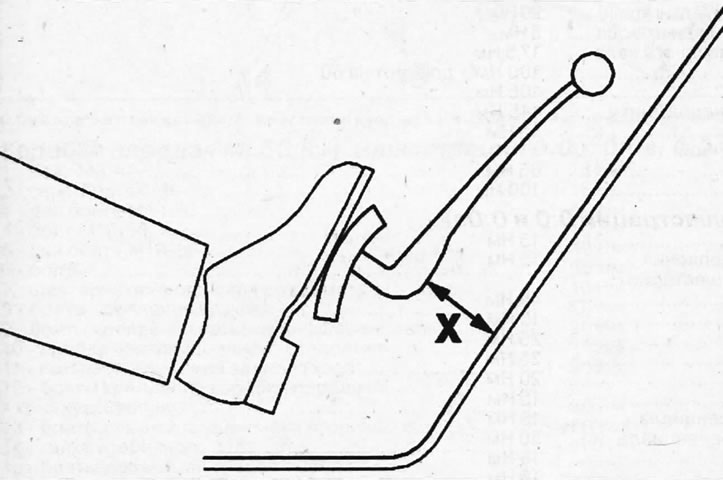
5.10. Make sure that when releasing the depressed clutch pedal, the driven disc maintains contact…

5.10. Make sure that when releasing the depressed clutch pedal, the driven disc maintains contact with the flywheel when the pedal is at a distance X from the floor


11. Tighten the bleeder screw on the slave cylinder to 7.5 Nm and install the components removed for bleeding.
This article is available at russian, bulgarian, belarusian, ukrainian, serbian, croatian, romanian, polish, slovak, hungarian
Article reviewed by editor: Vinogradov Robert
Share information:
Previous
Peugeot 807: Clutch
Next

Clutch drive — removal and installation
Clutch release fork and release bearing bushing — removal and…
Clutch — removal, installation and inspection
Clutch — General Description
 
See similar information for other Peugeot models

➨ Clutch adjustment check and control mechanism lubrication Peugeot 106 (1991-2003)
➨ Bleeding the clutch hydraulic drive Peugeot 207 (2006-2014)
➨ Brake fluid and clutch drive level Peugeot 307 (2001-2008)
➨ Checking the auxiliary drive belt (10,000 km/6 months) Peugeot 405 (1987-1997)
➨ Drive shaft CV joint covers — inspection Peugeot 605 (1989-2000)
Link to this article in different formats
Comments and feedback from visitors
No comments yet


Add two numbers 23 + 28


Partner I (1996-2008) 
  • General information
  • Introduction to the guide
  • Faults en route
  • Weekly checks
  • User manual
  • Maintenance (petrol)
  • Maintenance (diesel)
  • Power unit
  • Petrol engines
  • Diesel engines «XUD»
  • Diesel engines «DW»
  • Overhaul of petrol engines
  • Overhaul of diesel engines
  • Cooling and heating
  • Power and exhaust (petrol)
  • Power and exhaust (XUD diesels)
  • Power and exhaust (DW diesels)
  • Emission reduction
  • Starting and charging system
  • Transmission
  • Clutch
  • Mechanical gearbox
  • Drive shafts
  • Chassis, running gear
  • Brake system
  • Car suspension
  • Steering
  • Body and interior
  • Exterior (external elements)
  • Interior (internal elements)
  • Doors, locks and windows
  • Electrical equipment
  • Equipment and devices
  • Electrical circuits
Peugeot 807 (2002-2014) 
  • General information
  • Operating instructions
  • Maintenance
  • Troubleshooting
  • Power unit
  • Gasoline engines
  • Diesel engines
  • Cooling and heating
  • Fuel injection (petrol)
  • Fuel system (diesel)
  • Fuel system
  • Exhaust system
  • Ignition system
  • Transmission
  • Clutch
  • Manual gearbox
  • Automatic gearbox
  • Chassis, running gear
  • Brake system
  • Car suspension
  • Steering system
  • Body and interior
  • Exterior (external elements)
  • Interior (internal elements)
  • Electrical equipment
  • Power devices
  • Electrical circuits
Peugeot 806 (1994-2002) 
  • General information
  • User manual
  • Maintenance
  • Power unit
  • Petrol engines
  • Diesel engines
  • Lubrication system
  • Cooling system
  • Fuel injection (petrol)
  • Fuel system (diesel)
  • Ignition and exhaust systems
  • ECM Bosch Motronic MP 3.2
  • ECM Magneti-Marelli (MM)
  • Transmission
  • Clutch
  • Mechanical gearbox
  • Chassis, running gear
  • Brake system
  • Car suspension
  • Steering
  • Electrical equipment
  • Equipment and devices
  • Electrical circuits
Peugeot J5 (1981-1993) 
  • General information
  • Introduction to manual
  • Specifications
  • Gasoline engine
  • Engine repair
  • Lubrication system
  • Cooling system
  • Fuel system
  • Ignition system
  • Diesel engine
  • Engine repair (DB9)
  • Lubrication system (DB9)
  • Cooling system (DB9)
  • Fuel injection (DB9)
  • Engine repair (U25)
  • Lubrication system (U25)
  • Cooling system (U25)
  • Fuel injection (U25)
  • Transmission
  • Clutch
  • Gearbox
  • Drive shafts
  • Chassis, running gear
  • Steering system
  • Car suspension
  • Brake system
  • Electrical equipment
  • Power devices
  • Electrical circuits
PeugeotBook.ru © 2018–2026 | Mobile version | Sitemap: EN BG BY UA RS HR RO PL SK HU | Write message | Site search | Add to bookmarks | Peugeot owners
106 (1991-2003) | 206 (1998-2012) | 207 (2006-2014) | 305 (1977-1989) | 306 (1993-2002) | 307 (2001-2008) | 405 (1987-1997) | 406 (1995-2004) | 605 (1989-2000) | Partner-I (1996-2008) | Eurovans-807 (2002-2014) | Eurovans-806 (1994-2002) | J5 (1981-1993) |
Cookies are used to ensure the correct display of pages on the site.